
Objects can be moved, duplicated, and distributed along a specified distance by clicking with the Move by Points tool. This tool also moves symbols within walls (see Moving Symbols in Walls with the Move by Points Tool).
Mode |
Description |
Move |
Moves and duplicates selected objects according to the distance and direction specified by two mouse clicks |
Distribute |
Moves and distributes duplicate objects between the points specified by two mouse clicks |
Reference Point |
Moves selected objects according to a clicked reference point and a specified offset distance from that point; the Preferences settings are not applicable when this mode is selected |
Object Retention |
Keeps the original objects; this is the same as selecting the Retain option in the tool preferences |

To move, duplicate, and distribute selected objects:
1. Select the object(s) to move and/or duplicate.
2. Click the Move by Points tool from the Basic palette and click Preferences from the Tool bar.
The Move by Points Settings dialog box opens. Select the settings and click OK.
Click to show/hide the parameters.
To select additional objects or to change the currently selected objects to move, duplicate, or distribute, press and hold the Alt key (Windows) or Cmd key (Mac) while shift-clicking or click-dragging the mouse around them to marquee select them; the Selection tool is activated in boomerang mode while the Alt or Cmd key is being pressed.
3. Select either the Move or Distribute mode, depending on the desired outcome.
Mode |
Number of |
Original Object Retained |
Result |
Move or Distribute |
0 |
not applicable |
Moves the original object(s) to the location specified by clicking |
Move or Distribute |
1 |
No |
Moves the original object(s) to the location specified by clicking |
Move or Distribute |
1 |
Yes |
Creates one duplicate of the original object(s), placed at the location indicated by clicking |
Move |
> 1 |
No |
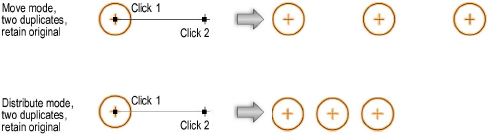
Moves the original object(s), placing the original at the location specified by the first click, and placing the duplicates the same distance apart from each other along the vector created by the two click points |
Move |
> 1 |
Yes |
Creates duplicates of the original object(s), placing the first duplicate at the location specified by the second click, and placing additional duplicates the same distance apart from each other along the vector created by the two click points |
Distribute |
> 1 |
No |
Moves the original object(s), placing the original at the location specified by the first click, and distributing the duplicates between the two click points, and along the vector created by the two points |
Distribute |
> 1 |
Yes |
Creates duplicates of the original object(s), distributing the duplicates between the two click points, and along the vector created by the two points |
4. Click once (anywhere on the drawing) to indicate the vector start point, and click again to indicate the vector end point. Duplicates are placed in the vector direction, at the distance specified by the click points, along the line defined by the click points.
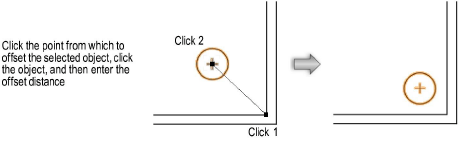
Reference Point mode can work two ways; the first click can either indicate the object to be moved or the reference point from which the object will be offset.

To move selected objects using a reference point:
1. Select the object(s) to move.
2. Click the Move by Points tool from the Basic palette.
To select additional objects or to change the currently selected objects to move, duplicate, or distribute, press and hold the Alt key (Windows) or Cmd key (Mac) while shift-clicking or click-dragging the mouse around them to marquee select them; the Selection tool is activated in boomerang mode while the Alt or Cmd is being pressed.
3. Select the Reference Point mode from the Tool bar.
4. Click to indicate either the reference point, or a point on the selected object.
The Enter Offset dialog box opens.
5. The current Offset distance between the two click points displays. Enter the desired distance.
6. Select whether the first click made was the reference point or a point on the object to be moved.
7. Click OK. The selected object is moved as specified, along the line defined by the click points.
8. The setting for how the first click is interpreted remains set until it is changed.
Click here for a video tip on this topic (Internet access required).
~~~~~~~~~~~~~~~~~~~~~~~~~
![]()