The Circle tool has six modes and the Push/Pull toggle mode.

Mode |
Description |
|
Radius |
Defines the circle by its radius |
|
Diameter |
Defines the circle by its diameter |
|
Circle by Three Points |
Defines the circle by its circumference |
|
Circle from Three Lines |
Defines the circle by making it tangent to two or three selected lines |
|
Point and Center |
Defines the circle by a point on its circumference and then its center |
|
Tangent and Center |
Defines the circle by defining a tangent to the circle and then its center |
|
Push/Pull (3D views only) |
Instantly extrudes the circle after creation; available in 3D views |
To create a NURBS curve, draw a circle and then select Modify > Convert > Convert to NURBS.

To create a circle by radius:
1. Click the Circle tool from the Basic palette, and select the Radius mode.
2. Click to set the center of the circle.
3. Move the mouse to the desired radius and click to set the radius of the circle.


To create a circle by diameter:
1. Click the Circle tool from the Basic palette, and select the Diameter mode.
2. Click to set the first point on the circle diameter.
3. Move the mouse to the desired diameter and click to set the diameter of the circle.


To create a circle by three points:
1. Click the Circle tool from the Basic palette, and select the Circle by Three Points mode.
2. Click to set the first point on the circle diameter.
3. Move the mouse and click to set the second point on the circle and click again to set the third point on the circle.


To create a circle tangent to three lines:
1. Click the Circle tool from the Basic palette, and select the Circle from Three Lines mode.
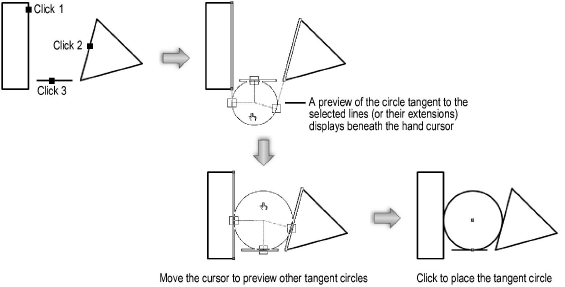
2. Click to select the three lines or linear segments to which the circle will be tangent. Each line is highlighted as it is selected. The lines (or their extensions) must intersect in at least two places.
3. When the third line is selected, a preview of a tangent circle displays where the cursor is currently located. You can create circles tangent to two or three lines. In places where only two lines intersect, the size of the circle is controlled by the cursor location. Move the cursor until the desired tangent circle displays, and then click to set the circle.


To create a circle by point and center:
1. Click the Circle tool from the Basic palette, and select the Point and Center mode.
2. Click to set the first point on the circumference of the circle.
3. Move the mouse to the center of the circle and click to set the radius of the circle.


To create a circle by tangent and center:
1. Click the Circle tool from the Basic palette, and select the Tangent and Center mode.
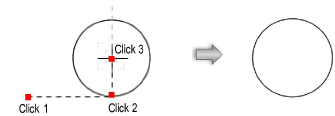
2. Click to set the first point on the line tangent to the circle.
3. Click to set the second point on the line tangent to the circle, defining the tangent line.
4. Move the mouse to define the radius perpendicular to the tangent. Click to set the radius of the circle. It is not necessary to click on the center point; click anywhere along an axis parallel to the tangent. This allows you to set the radius based on other geometry, if desired.

A planar circle that has been created in a 3D view can be extruded immediately after creation, creating a cylinder.

To extrude a created circle:
1. Enable the Push/Pull toggle mode in the Tool bar for the Circle tool.
2. Create a circle using any of the modes in the Tool bar.
3. With the circle still selected, click, move the cursor, and then click to create the extrude.

A circle can be extruded at any time with the Push/Pull tool. See Direct Modeling with the Push/Pull Tool.
Cylinder height and radius can be changed with the Reshape tool (see Reshaping Extruded Objects and Solid Primitives), the radius can be modified in the Object Info palette, and the resolution can be adjusted through the 3D Conversion Resolution setting (see 3D Preferences).
Click here for a video tip on this topic (Internet access required).
~~~~~~~~~~~~~~~~~~~~~~~~~
