
The Cone tool creates cones using one of two modes.
Mode |
Description |
|
Radius and Height |
Defines the base of the cone by radius and tip of the cone by height |
|
Radius and Tip |
Defines the base of the cone by radius and, if desired, snaps the tip of the cone to a point |
When in a non-isometric view, the height of the cone is set in the Set Extrusion Height dialog box. In an isometric view, the cone height can be set by dragging with the mouse or entering the height in the Data bar. For more information on the different views, see Using Standard Views.
The cone height can be changed with the Reshape tool (see Reshaping Extruded Objects and Solid Primitives), the radius can be modified in the Object Info palette, and the resolution can be adjusted through the 3D Conversion Resolution setting (see 3D Preferences).

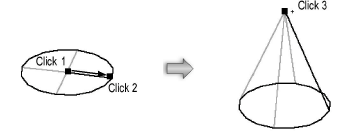
To create a cone using radius and height:
1. In a 3D isometric view, click the Cone tool from the 3D Modeling tool set, and select the Radius and Height mode.
2. Click to set the center of the cone base.
3. Move the mouse to the desired radius and click to set the radius of the cone base. The radius can also be set in the Data bar.
4. Move the mouse and click to set the cone height.

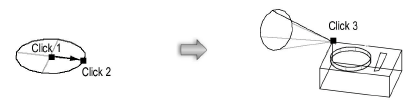
To create a cone using radius and tip:
1. Ensure that Snap to Object and Smart Points snapping is enabled (see Setting Snapping Parameters).
2. In a 3D isometric view, click the Cone tool from the 3D Modeling tool set and select the Radius and Tip mode.
3. Click to set center of the cone.
4. Move the mouse to the desired radius and click to set the radius of the cone base. The radius can also be set in the Data bar.
5. Using snapping, snap the top of the cone to a snap point on another 3D object. A preview object displays. Click to create the cone.
Click here for a video tip on this topic (Internet access required).
![]()