Inserting
Speakers Inserting
Speakers
Inserting
Speakers Inserting
Speakers Use the Speaker tool to insert individual speakers that are not part of an array. Manually-inserted speakers can be placed as single speakers, or as several speakers arranged in a column. A variety of supports and labeling options are available. Use a speaker type with pre-set data from the speaker library file that is included with the Vectorworks Spotlight product (in the Vectorworks application folder [Vectorworks]\Libraries). You can also create a speaker with custom data and save it to the library for future use and sharing.

To insert a speaker:
Click the Speaker tool from the Spotlight tool set.
Click to place the object in the drawing, and click again to set the rotation.
The first time you use the tool in a file, a properties dialog box opens. Set the default properties, and click OK. The properties can be edited from the Object Info palette.
Click to show/hide the parameters.
Parameter |
Description |
Select a speaker from the default speaker data available in the library file; alternatively, select <Generic> to create a speaker with custom data and then save the speaker as a custom speaker in the library file. Select Import to import predefined speaker data only (such as width and weight) from a library or another file containing speakers. The Import Speaker Type dialog box opens to select the file and type. A symbol is not imported from the file; only data is added. |
|
Brand |
Specifies the speaker manufacturer |
Model |
Specifies the manufacturer’s information |
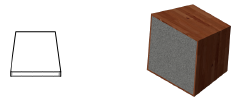
Front Width/Height |
Indicates the width and height of the front face of the speaker |
Back Width/Height |
Indicates the width and height of the back face of the speaker; the back face cannot be larger than the front face |
Depth |
Specifies the speaker depth |
Flip Orientation |
Rotates the speaker 90° to place the speaker on its side |
Tilt Reference |
When the speaker is in an array, sets the reference for tilting the speaker to either the front or back face |
Weight |
Indicates the weight of the speaker |
Self-Powered |
Indicates whether the speaker uses an internal or remote amplifier |
Expand Dispersion Features |
When selected, allows you to enter range notes and dispersion area information for up to three ranges; deselect to enter only Overall information |
Range 1/2/3 |
Enter notes for three dispersion ranges, such as a frequency range, key frequency, or crossover point. When Expand Dispersion Features is deselected, the range is automatically set to Overall and only one set of notes can be entered. |
Horiz./Vert. Dispersion |
Enter the horizontal and vertical dispersion angles, from 0 to 180°; ranges 2 and 3 are only available when Expand Dispersion Features is selected |
Throw Distance |
Sets the throw distance reference for the dispersion lines; ranges 2 and 3 are only available when Expand Dispersion Features is selected |
Save Type to Library |
Saves the current speaker configuration as a new speaker type; enter the name of the speaker type. This custom speaker can then be selected from the Type list. |
Delete Type from Library |
Removes the speaker currently selected in Type from the library file; the current parameters remain as set, and the type becomes <Generic> |
Listening Height |
Sets the listening height reference for the dispersion lines. Listening height must be less than the speaker’s elevation (Z value). |
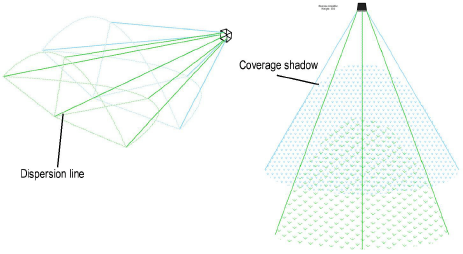
Show Dispersion Range 1/2/3 |
Draws the top, bottom, left, and right dispersion lines, along with a center reference line, for each of the three dispersion ranges selected for display (or the Overall range if expanded dispersion is not selected). An outline or hatch pattern representing the listening area coverage “shadow” is drawn when the throw distance and the vertical dispersion and tilt angles allow the speaker to cover the area at or below the Listening Height.
|
Show Dispersion Hatch |
Displays hatch fills in the coverage shadow of each enabled dispersion range |
Support |
Select the support method for the speaker. The options are for reference only, except for Tripod, which creates a tripod floor stand in the drawing, and Ground-Stacked, which allows speakers in an array to be ground-stacked rather than flown. |
Stand Height |
For tripod support, sets the height of the floor stand |
Tilt Difference |
Displays the tilt difference between the selected speaker and the one above it |
Actual Tilt Angle |
Specifies the tilt angle of the speaker, from -90 to 90° |
Location |
Indicates the speaker location (such as Downstage Right) |
Purpose |
Indicates the purpose of the speaker (such as Center Fill) |
Rack |
Enter notes about the rack driving the speaker |
Drive Line |
Indicates information about the drive line feeding the signal to the speaker |
Column ID |
An individual speaker can optionally be part of a column of speakers or in a speaker array. This specifies the column ID. Speakers in the same column receive a stacked Column ID when Arrange Column is clicked. |
Position in Column |
When speakers are arranged in a column or array, indicates the speaker’s position in the stack. Position 1 is the top speaker. |
Arrange Column |
Provides selected speakers with a Column ID in order of their arrangement, based on their elevation (Z value); calculates tilt differences, and assigns each speaker a Position in Column number |
Notes |
Enter miscellaneous notes such as rental source or stock number |
Class Speaker Parts |
When first selected, automatically creates classes for the different parts of the speaker, for appearance and visibility control. This allows portions of the cabinets, grills, and other elements to be set to visible, grayed, or invisible. Different textures can be applied to the different part classes (Renderworks required), for a highly realistic appearance. Once the classes have been created, this check box toggles whether class visibility changes apply to the selected speaker object. You may need to click Update to view any changes. |
Parts Classes Prefix |
When speaker parts are classed, enter a prefix for the class names so that they are sorted together |
Text Options |
Opens the Text Options dialog box, to enable the display and format the text of labels |
Default Text Position |
Restores text labels to their default positions |
Update |
Updates the object when changes have been made to the Object Info palette parameters. For example, you may need to refresh the display when toggling Class Speaker Parts on and off, when the attributes of the speaker parts have been set by class. |
~~~~~~~~~~~~~~~~~~~~~~~~~
Inserting Speakers and Speaker Arrays
Formatting Speaker Object Labels
![]()