 Inserting a Node with
the Marionette Tool
 Inserting a Node with
the Marionette Tool
Inserting a Node with
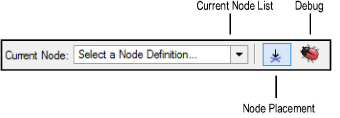
the Marionette ToolThe Marionette tool places nodes, and also enables a special Debug mode for troubleshooting.

Mode |
Description |
Current Node list |
Select the node for placement. The files and folders available in the current document and in the libraries are listed on the left. Select a file to display thumbnails of the nodes available in that location, and select the desired node. |
Node Placement |
Allows the selection and placement of nodes from the Current Node list; see Creating a Network for more information |
Debug |
Allows for the troubleshooting and debugging of networks; see Debugging a Marionette Script for more information |
Nodes are color coded by function for ease of identification in networks.
Click here to show/hide parameters.
![]()
To insert a node:
Click the Marionette tool from the Basic palette, and click Node Placement mode from the Tool bar.
Select the node for placement from the Current Node list. The files and folders available in the current document and in the libraries are listed on the left. Select a file to display thumbnails of the nodes available in that location, and select the desired node.
Click in the drawing to place the node.
The node properties can be accessed from the Object Info palette.
Click to show/hide the parameters.
~~~~~~~~~~~~~~~~~~~~~~~~~
