NURBS (Non-Uniform Rational B-Splines) are used to create curves in 3D space. They can also be used as defining objects for extrusions along a path.
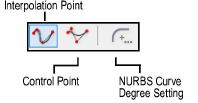
NURBS curves can be created using one of two modes. Specify the NURBS curve degree prior to selecting a mode.
Click here for a video tip about this topic (Internet access required).

NURBS curves can also be created from planar objects by converting them to NURBS; see Converting to NURBS.
The curve degree affects the number of vertices created; the higher the degree value, the greater the number of vertices.

To specify the NURBS curve degree:
Click the NURBS Curve tool from the 3D Modeling tool set, and click NURBS Curve Degree Setting from the Tool bar.
Alternatively, double-click the NURBS Curve tool to open the Curve Degree dialog box.
The Curve Degree dialog box opens. Specify the curve degree for the NURBS Curve tool to use. Click OK.
Set the degree value to 1 to create a NURBS curve with linear segments (similar to a 3D polygon). A linear NURBS curve can be used to measure an object from point to point in a 3D view.

To create a NURBS curve by interpolation point:
Click the NURBS Curve tool from the 3D Modeling tool set, and select the Interpolation Point mode.
Click to set the first point on the curve.
Click to set the point through which the curve passes.
Continue clicking to add more interpolation points, extending the curve.

Double-click to set the end point of the curve.

To create a NURBS curve by control point:
Click the NURBS Curve tool from the 3D Modeling tool set, and select the Control Point mode.
Click to set the first point on the curve.
Click to set the point that the curve pulls toward but does not touch.
Continue clicking to add more control points, extending the curve.

Double-click to set the end point of the curve.
~~~~~~~~~~~~~~~~~~~~~~~~~
