A total of six control lines define the three vanishing points of a photo.
Each control line, along with the reference target, serves to correctly place and orient the photo image.
Item |
Purpose |
|
Green and red control lines |
The green and red lines establish the left and right vanishing points respectively |
|
Blue control lines |
The blue lines establish the vertical vanishing point |
|
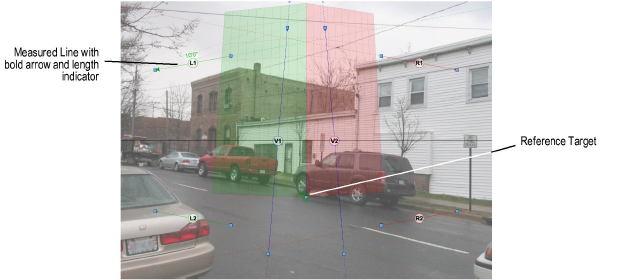
Measured Line |
The measured line is a control line that specifies the known length of a feature in the photo. Any control line that lies on he vertical plane defined by the green or red axis of the Camera Match reference can be selected as the measured line. The control line that is chosen as the measured line is shown with a bold arrow and displays its given dimension |
|
Reference Target Point |
The reference target point establishes where the Camera Match reference is on the photo. The reference target point is indicated by a circle with crosshairs; the color of the target corresponds to the color of the measured line. The reference target point (and the Camera Match reference) should lie on the vertical plane defined by the measured line. |
|
Horizon Line |
The black line represents the calculated horizon line |

The measured line represents a known length within the photo image.
To select the measured line and specify its length:
With only the Camera Match object selected, select View > Zoom > Fit to Objects so that the entire photo is within the drawing window.
Position the control lines so that Camera Match can identify the orientation of the Camera Match reference:
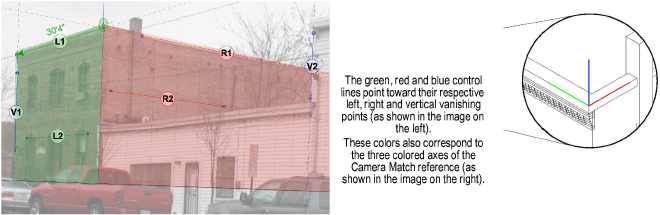
● The green lines point toward the left vanishing point (defined by the green axis of the Camera Match reference).
● The red lines point toward the right vanishing point (defined by the red axis of the Camera Match reference).
● The blue lines point toward the vertical vanishing point. Place on any vertical element in the photo.
From the Object Info palette, select the Measured Line from the list, and then enter the Measured Length of the line.
Since the reference target point establishes where the Camera Match reference is on the photo, use the reference target’s control point to move it to the location of the Camera Match reference on the photo.
Initially, the Camera Match object displays with the six colored control lines and a reference target.
The reference target is the circle with cross-hairs. Move it to the Camera Match reference location on the photo.
Before adjusting the control lines and target, turn off all constraints in the Snapping palette. This makes it easier to place the points and adjust the lines without inadvertently snapping to objects in the model.
Each control line has handles for adjusting its location. Move the control lines so that the green lines point toward the left vanishing point, the red lines toward the right, and the blue lines toward the vertical. Once the control lines are in place, zoom in on each control line to fine tune it.
Try to keep each colored pair of lines far from one another. The closer any pair of lines are, the more nearly parallel they become; this makes it harder to establish an accurate vanishing point.
Colored pairs of control lines that are close to parallel are far more sensitive to adjustments. When like color control lines are near parallel, even a very minute change in the angle between them can cause a very large change in the location of the vanishing point where they converge. When setting up views in this situation, the preview object can be a big help in seeing the effect while making very small changes to the control lines (see The Camera Match Preview Object). If you cannot get the preview object perfectly placed, get it as close as you can, set the view, then fine tune it to get it where you need.
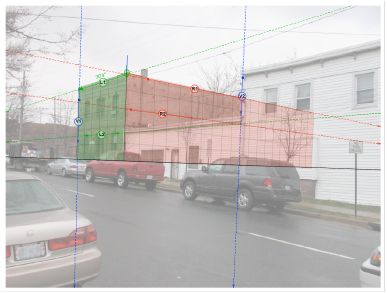
In the image, the two red lines are not ideal, but (as evident in the preview object) they are still acceptable.
~~~~~~~~~~~~~~~~~~~~~~~~~
![]()