 Formatting the label legend layout
 Formatting the label legend layout
Once a label legend has been created, set the locations and format of the labels in Top/Plan and 3D views. The labels, containers, and layout symbol (or if deselected, loci) are selected when creating the label legend; see Creating label legends.
When creating the label legend, a single label format can be applied to all labels in 2D only, 3D only, or both views. If a view is set to use a single label format, the label layout and formatting for the labels in that view cannot be adjusted individually. For example, if 2D Only is set for Use Single Label in, the 2D Layout cannot be adjusted by editing the label layout as described here.
To format the label legend:
1. From the Label Legend Manager dialog box, select the legend, and then click Edit 2D Layout or Edit 3D Layout.
Alternatively, right-click on a lighting device and select Locate Label Legend in Resource Manager from the context menu. The label legend associated with that lighting device is highlighted in the Resource Manager. Right-click on the highlighted label legend, and select Edit from the context menu. The Edit Symbol dialog box opens. Select 2D Components or 3D Component and click Edit. (See Editing symbol definitions for additional information about the Edit Symbol dialog box.)
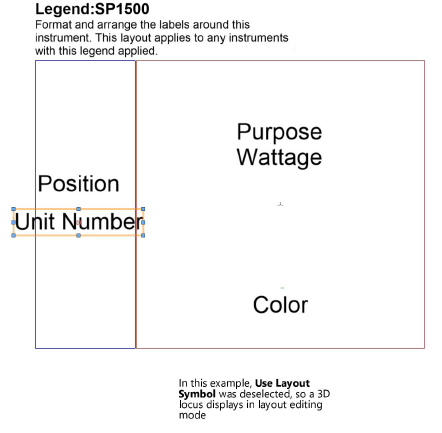
The Edit Symbol window opens, where the default position and format of the labels is specified for instruments that use this label legend. The name of the current label legend is displayed at the top of the Edit Symbol window. The instrument used for the layout is either the symbol selected in Lighting Instrument Layout Symbol or the active symbol at the time the legend was created. If this option was deselected, a locus displays instead, and the labels are positioned with absolute coordinates relative to the locus.

2. The labels selected for the legend display to the left of the instrument diagram. Drag each label to its position on or around the instrument or locus, and drag any label containers relative to the label text. The label’s formatting can be set by selecting the label, and then using the Object Info palette or the Text menu to select the label’s font, size, style, and justification. Change the label stacking order with the Modify > Send commands; the instrument is part of the stacking order. Change the color of the label by selecting it and applying a solid pen color from the Attributes palette.
The Horiz Align/Vert. Align options in the Object Info palette for a selected label adjust the position of the label’s control point, which is useful when grouping label objects.
If necessary, the labels placed outside the bounding box of the instrument are adjusted so they are always placed at an absolute distance from the instrument. For example, a label placed six inches in front of an instrument always appears six inches in front of any instrument to which the label is applied. The position of a label placed upon an instrument is scaled so it is in the same relative position whether the instrument is larger or smaller than the one used for formatting. A label placed at the center of the instrument is always at the center. If label placement is an issue, use a locus instead of an instrument by deselecting Use Layout Symbol in the Edit Label Legend dialog box.
If editing the 3D layout, the default layout view is Front; change to a different view if needed. Set the label position and format. After saving the changes, select the view for 3D Legend View in the Object Info palette for lighting instruments that use the legend, to display the labels aligned with that view.

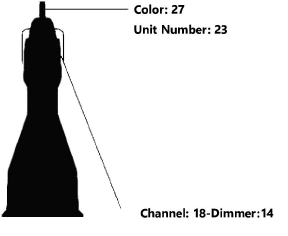
3. Both 2D and 3D labels can be grouped and then moved by a single control point. Additional text objects can be added to a group of labels. For example, add a prefix, suffix, or separator. To avoid overlapping text, set the Horiz. Align/Vert. Align to adjust the label insertion point of the labels.
In this example, the bottom group of labels/text objects has a “-” separator text object. The Channel label is left aligned, and the Dimmer field is right aligned.

4. When the labels are set, click Exit Symbol in the upper right corner of the window to return to the drawing. The formatting and position of the labels applies to all instruments that use this legend.
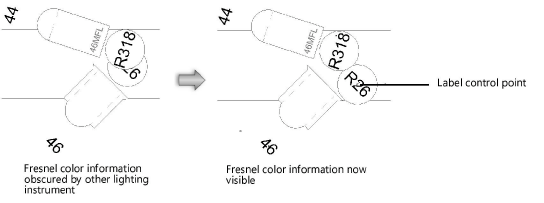
Labels (when they are not in single label format) should normally be repositioned through the Label Legend Manager. On a complex light plot, however, a label can be hidden by the nearest object. If that occurs, click the instrument to select it, and then click the instrument label control point, located at the center of the label, with the Selection tool. Drag the label to another location. This one-time repositioning does not affect the label legend.
Labels in single label format have a single control point.

|
Command |
Path |
|
Create Label Legend from Instrument |
Spotlight > Label Legend |
If labels have been repositioned and the arrangement is suitable to use as a label legend for other instruments, you can create a new label legend from a selected lighting instrument’s legend. The current label arrangement and instrument rotation are used for the new label legend.
The 3D Legend View setting is not applied to the new legend; the legends are aligned to the Front view. If the current instrument’s label legend is set to Use Single Label for either 2D or 3D, the created legend places and formats the labels the same way, but uses a layout view to set them, with the selected instrument as the layout symbol.
To create a label legend based on an existing instrument:
1. Select the lighting instrument. The instrument must already have a label legend attached.
2. Select the command.
3. Enter a unique name for the new label legend.
By default, the instrument’s existing label legend is appended with a -1 (or with the next available number) as a suggested name.
The new label legend is automatically assigned to the selected instrument. The instrument specified in Symbol Name in the Object Info palette of the selected instrument becomes the representative lighting device for the label legend.
Label legends from another file created with the Vectorworks Spotlight product can be imported into the current file. From the Resource Manager, drag the Label Legends symbols from the original file into the Label Legends folder in the new file, or use the Import command from the context menu. The imported label legends are listed in the Label Legend Manager.
~~~~~~~~~~~~~~~~~~~~~~~~~