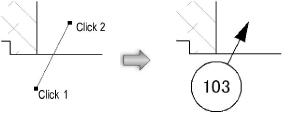
 Adding Detail Bubbles
  Adding Detail Bubbles
To add a detail bubble:
1. Click the Detail Bubble tool from the Dims/Notes tool set.
2. Click on the drawing to place the bubble portion of the object. Click again to place the marker.
If this is the first time the object has been inserted in this session, the Object Properties dialog box opens. If the Attributes palette has not been set to use end markers, select the marker style, size, and angle from the Object Properties dialog box.
If no Part Info record exists, one is created automatically the first time a detail bubble is placed in the drawing.

The detail bubble number automatically increments as the bubbles are placed. Change the auto-incrementing number by editing the Item Number field in the Object Info palette. When detail bubble placement resumes, the last number entered becomes the starting number.
~~~~~~~~~~~~~~~~~~~~~~~~~
