
To insert a symbol:
1. Select the desired symbol from the Resource Browser.
2. Select Resources > Make Active. The Symbol Insertion tool, on the Basic palette, automatically becomes active.
Alternatively, double-click the symbol in the Resource Browser to make the symbol active and select the Symbol Insertion tool.
3. Click Standard Insertion from the Tool bar.
To insert the symbol into a wall with breaks, enable Wall Insertion mode. The symbol also must have the Insert in Walls option enabled (see Creating New Symbols).
4. Click the desired alignment mode (see Inserting Symbols).
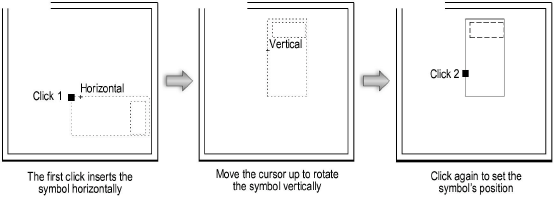
5. Click to set the location of the symbol.
6. If the symbol is not oriented properly, move the cursor slightly away from the insertion point; then move the cursor to rotate the symbol about its insertion point. In the Data bar, use the A (angle) and WP A (working plane angle) fields to help position the symbol.
7. Click a second time, without moving the mouse, to position the symbol exactly as inserted. Alternatively, move the cursor slightly away from the insertion point to rotate or flip the symbol about its insertion point.
For symbols placed inside walls, moving the mouse flips the symbol about one of two axes: up and down, or left and right.
In click-drag mode, click and hold the mouse to insert the symbol and still be able to rotate it. A quick click eliminates the ability to rotate or flip the symbol and locks the orientation of the symbol as it is placed.
8. Click to set the symbol.

To place another copy of the symbol in the drawing, move the cursor to another location and click. The selected symbol and Symbol Insertion tool remain active until another tool is selected.
~~~~~~~~~~~~~~~~~~~~~~~~~
