Applying
Tiles
Apply tiles to specific objects using either the Attributes
palette or the Resource Browser. Some objects have the ability to apply
tile settings while setting the object attributes.
Attributes can also be applied by class settings
(see Setting Class Attributes)
or transferred with the Eyedropper tool.
Applying a Tile
from the Attributes Palette
To apply a tile from the Attributes palette and specify the
tile settings:
Select
the object, and then select Tile from the
Attributes palette fill list.
If no tiles are defined, and default
content is not enabled in Vectorworks preferences, you are prompted
to add a default tile definition.
To change
to a different tile, click the tile list and select a different tile
from a library or the current file.
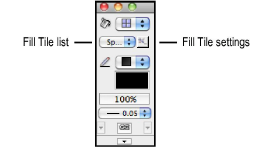
To specify
the settings for the current tile fill, click the Fill
Tile Settings button next to the Fill Tile list.
The Tile Settings dialog box opens.
Click
to show/hide the parameters.
If desired,
click Preview to view the results of the
fill settings.
Click OK to apply the fill settings.
Applying a Tile
from the Resource Browser
To apply a tile from the Resource Browser:
Select
the object.
From
the Resource Browser, select the resource to be applied. Right-click
(Windows) or Ctrl-click (Mac) and select Apply from
the context menu. (Alternatively, double-click the resource to apply
it to the selection or drag the resource onto an object.)
The fill settings can be edited from the
Attributes palette.
~~~~~~~~~~~~~~~~~~~~~~~~~
Transferring Attributes
Defining Tiles
Editing Tile Definitions
Mapping Hatch and Tile Fills

vectorworks.net