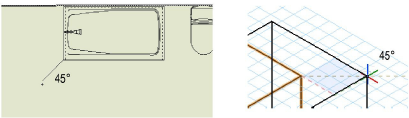
Two points define an angle; Snap to Angle only applies to the second point of a two-point feedback segment, such as when drawing a line or polygon. When snapping to angles, the SmartCursor finds the angles specified, and by default, the SmartCursor also finds angles relative to the horizontal and vertical axes. Snap to Angle can also detect a plan rotation angle (Vectorworks Design Series required); items created along that angle when in a rotated plan view, appear horizontal when in a non-rotated, world coordinate view.
To set angle snapping:
Select Tools > SmartCursor Settings, or double-click the Snap to Angle tool in the Snapping palette.
The SmartCursor Settings dialog box opens. From the Angle tab, specify the angle snap settings.
► Click to show/hide the parameters.
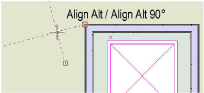
Holding the Shift key while drawing forces the SmartCursor to select the nearest snap angle.
Click OK to set the angle snapping options.
To activate angle snapping, click the Snap to Angle tool from the Snapping palette.
► Click here for a video tip about this topic (internet access required).
~~~~~~~~~~~~~~~~~~~~~~~~~