 Creating
and Managing Stories
 Creating
and Managing Stories
Creating
and Managing StoriesProject setup begins with creating stories and specifying their associated story levels. The Stories tab of the Organization dialog box allows stories to be created and managed. Stories can also be created when creating or editing design layers with options that display only when the Vectorworks Architect product is installed. See Setting Design Layer Properties.
To create and manage stories from the Organization dialog box:
Select Tools > Organization to open the Organization dialog box. Click the Stories tab.
The functionality of the Organization dialog box is described in The Organization Dialog Box.
Visibilities view displays a list of story names. From the top of the dialog box, select Details view.
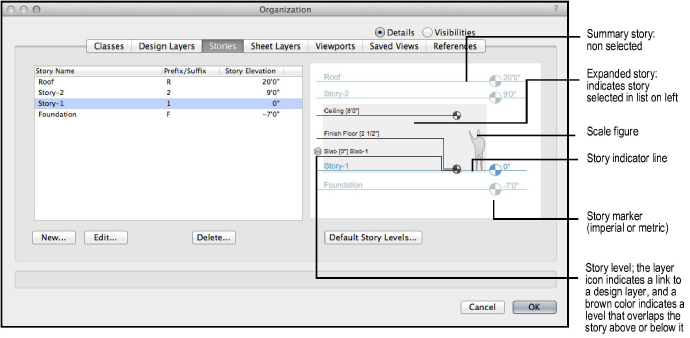
On the left, the stories are listed, along with the story’s prefix or suffix, and elevation. On the right, an interactive diagram displays the stories and associated layers that make up the building model.

► Click to show/hide the parameters.
Click New to create a new story, or Edit to modify the currently selected story.
The New Story or Edit Story dialog box opens. Specify the name, elevation, prefix or suffix for any layers to be created, and associated levels. To add objects to a story, at least one layer is required.
► Click to show/hide the parameters.
If changing the elevation of a story from the Edit Story dialog box, the Change Story Elevation dialog box opens to determine how to adjust the story and the stories around it. If not changing the story elevation, proceed to Step 7.
► Click to show/hide the parameters.
Click OK to return to the Edit Story dialog box.
When the story settings have been made, click OK to return to the Organization dialog box.
The stories, once set up with associated levels and any layers with layer-defined objects, define the building model. On the Design Layers tab of the Organization dialog box, listed layers that are associated with levels display their story, level type, elevation, and default wall height.
~~~~~~~~~~~~~~~~~~~~~~~~~