 Creating
Data Tag StylesCreating
Data Tag Styles
Creating
Data Tag StylesCreating
Data Tag StylesCommand |
Path |
Create Plug-In Style |
● Tools ● Context menu |
The Vectorworks resource libraries provide many commonly used tags, such as window and door type IDs and date stamps. If you need a tag for a different type of object (such as columns), or to display different data (such as window dimensions), create a custom data tag style.
To create a data tag style:
Do one of the following:
● From the Resource Manager, select an existing data tag resource in the active file to use as a starting point. Right-click on the resource and select Edit from the context menu.
● Select an existing data tag in the drawing to use as a starting point. From the Object Info palette, select Convert to Unstyled from the Style list. Select the Create Plug-in Style command, or right-click on the tag and select New Plug-in Style from Unstyled Plug-in from the context menu. From the Create Symbol dialog box, select the destination folder for the data tag style.
The Data Tag Style dialog box opens.
![]() Click
to show/hide the parameters.
Click
to show/hide the parameters.
Enter the desired parameters for the data tag. For each parameter, specify whether it is to be set by style, or by instance. Style parameters have a fixed value established by the style; instance parameters can be set independently for each instance of the object in the drawing (see Concept: Plug-in Object Styles).
Click Edit Tag Layout.
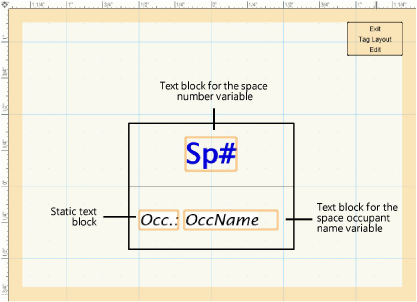
In the tag editing window, draw the geometry of the tag in page units using any planar graphic tools. The origin (0,0) point is always the primary attachment point for a leader line, if used. To define an alternate attachment point, add a 2D locus to the geometry, and enable Allow Multiple Attachment Points in the Data Tag Style dialog box.
Use the Text tool to add static and/or dynamic text objects to the tag. From the Object Info palette, specify the appearance of the text; see Formatting Text for more information about the options available.
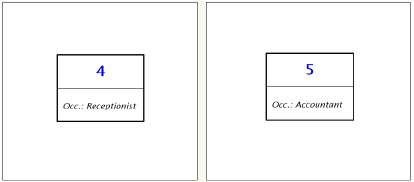
● Static text simply displays the text object on each tag.
● Dynamic text displays data from the tagged object (for example, the width of the window) on each tag, in place of the text object. To create dynamic text, select the text object and click Use Dynamic Text from the Object Info palette. Then click Define Tag Field to open the Define Tag Field dialog box.
![]() Click
to show/hide the parameters.
Click
to show/hide the parameters.
When you are done editing the geometry and text fields on the tag, click Exit Tag Layout Edit. The new style is added to the Resource Manager for the current file and is now available for use with the Data Tag tool.
~~~~~~~~~~~~~~~~~~~~~~~~~