 Connecting
Structural ElementsConnecting
Structural Elements
Connecting
Structural ElementsConnecting
Structural ElementsTool |
Tool set |
Insert Connection
|
Rigging |
The Insert Connection tool either connects structural element sections with a drop (hoist or dead hang object) or stacks them with a truss cross connection. When stacking structural elements, you can choose to move the object to be stacked either up or down.
The following modes are available.
Mode |
Description |
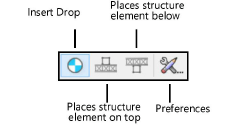
Insert Drop |
Creates a connection between two structural elements by placing a hoist or dead hang object at the clicked point |
Places structure element on top |
Stacks a structural element above another one, moving a truss and all its associated supports and loads up to meet the reference truss. A truss cross is created at the connection point. |
Places structure element below |
Stacks a structural element above another one, moving a truss and all its associated supports and loads down to meet the reference truss. A truss cross is created at the connection point. |
Preferences |
Opens the Insert Drop dialog box, to select a hoist or dead hang symbol to use in Insert Drop mode |
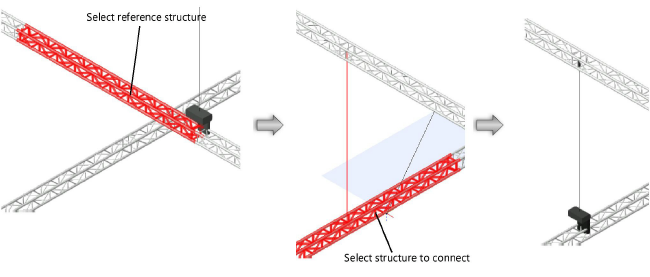
To connect structural elements with one or more hoists or dead hangs:
Click the tool, and then click Insert Drop mode.
Click the structural element to connect.
Move the mouse to the structural element to be connected.
Valid connecting structures are highlighted, and a preview of the drop location displays.
Click to place the drop at that location and connect the structures.
The first time you use the tool in a file, the Insert Drop dialog box opens to set the default preferences.
Select whether to insert a hoist or dead hang object. From the Resource Selector, select the symbol to insert.
The selected drop is inserted.
To connect structural elements to each other with a truss cross:
Click the tool, and then, depending on whether you want to move the structure up or down, click either Places structure element on top or Places structure element below mode.
Click on the reference structural element; this truss does not move.
Click on the structural element to move either up or down (stacking the moved truss under or over).
The truss is stacked with the reference truss, and any connected hoists or dead hang objects, attached loads, and supports move with the truss. If hoists are connected between the trusses, they are removed; hoists connected to other truss sections may be lengthened or shortened.
A truss cross is automatically created at the connection point. A truss cross indicates how to calculate and model the connection between stacked trusses. Its appearance indicates the type of connection (whether it is connected, flexible, or rigid; can transmit all forces, or only tension or only compression forces, or no forces).
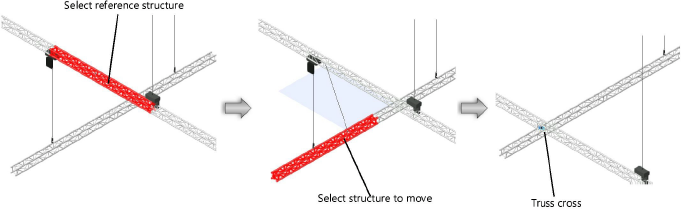
The truss cross properties can be edited from the Object Info palette.
![]() Click
to show/hide the parameters.
Click
to show/hide the parameters.
~~~~~~~~~~~~~~~~~~~~~~~~~
