Decals allow multiple textures to be applied to a single object or part of an object, over a base texture that is already applied to the object. The decal can originate from an imported image file or a texture resource present in the file. Use a decal to simulate a sign on a textured wall, for example. Or use multiple decals to portray wainscoting on a wall or patterns on fabric.
Decals must be rendered in a Renderworks mode. The Cartoon Artistic Renderworks mode cannot display decals.
To create a decal texture:
Select a textured, 3D object. A decal can only be applied to an object with an underlying texture; the map type of the texture determines the decal map type.
The underlying texture must have planar, spherical, or cylindrical mapping for the decal to be edited with the Attribute Mapping tool. Textures with any type of mapping can be edited with the Object Info palette.
If the object has textureable parts, select the part where the decal will be placed from the Part list on the Render tab of the Object Info palette.
Click Add Decal.
The Add Decal dialog box opens.
![]() Click
to show/hide the parameters.
Click
to show/hide the parameters.
If the decal consists of an imported or reused image, the Decal Options dialog box opens.
![]() Click
to show/hide the parameters.
Click
to show/hide the parameters.
If creating a rectangular mask decal, proceed to step 9. Otherwise, if creating an image mask, click Choose Image.
The Choose Decal Mask Image dialog box opens; select the image mask to use. A new image can be imported for masking, or an existing image resource from the current file can be selected (including the current image).
Click OK.
The Create Mask dialog box opens.
![]() Click
to show/hide the parameters.
Click
to show/hide the parameters.
For Grayscale Pixel and Alpha Channel masks, click OK. Proceed to step 9.
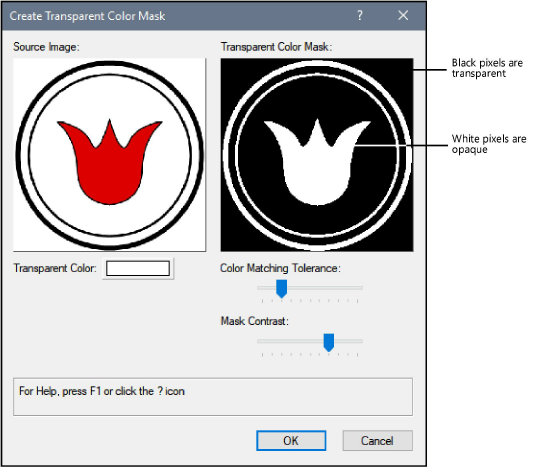
If Transparent Color is selected, the Create Transparent Color Mask dialog box opens. Select the mask properties and click OK.
The source image must be more than eight-bit color to create a transparent color mask. Images with a monochrome background are easiest to use when creating a mask transparency.
![]() Click
to show/hide the parameters.
Click
to show/hide the parameters.
Click OK to return to the Decal Options dialog box.
Click OK to create the decal texture and apply it to the selected object.
The decal is placed on the object; adjust its position, scale, and rotation with the Attribute Mapping tool or Object Info palette as described in Editing Decal Textures. By default, decal textures only repeat once horizontally and vertically, with matte reflectivity and no bump or other material options. This can be modified by editing the texture from the Resource Manager.
|
Click here for a video tip about this topic (internet access required). |
~~~~~~~~~~~~~~~~~~~~~~~~~
