 Inserting bridles manuallyInserting bridles manually
|
Mode |
Tool |
Tool set |
|
Click Insertion
|
Insert Bridle
|
Rigging |
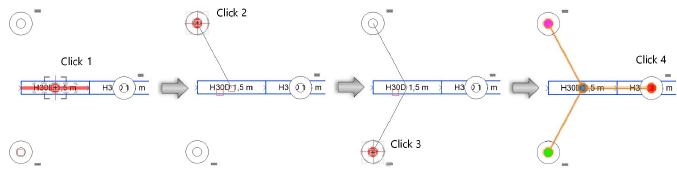
The Click Insertion mode uses multiple clicks to insert a bridle object. For most bridle types, the first click defines the bridle’s connection point on the object it will support, and subsequent clicks define the leg insertion points. Reversed two leg bridles are inserted differently.
To insert a bridle manually:
1. Click the tool and insertion mode.
2. Click the bridle type mode.
3. If you are working in Top/Plan view, enter the Trim Height of the bridle on the Tool bar.
4. If inserting a reversed two leg bridle, do the following. If inserting any other bridle type, proceed to step 5.
● Click on the rigging object to set the insertion point for Leg 1, and click again to set the insertion point for Leg 2. The available insertion points are highlighted as the mouse moves over them.
● Click on the rigging point where the bridle will attach. Valid insertion points are highlighted as the mouse moves over them. The bridle object is inserted in the drawing.
5. Move the mouse to the object that the bridle will support, and click to set the connection point. Valid connection points are highlighted as the mouse moves over them.
6. Insert the bridle legs. For each leg, click on the rigging point where the leg will attach. The available insertion points are highlighted as the mouse moves over them.
The bridle object is inserted in the drawing.
The Bridle properties can be edited from the Object Info palette.
~~~~~~~~~~~~~~~~~~~~~~~~~

