 Associating loads with rigging objectsAssociating loads with rigging objects
Load objects can be associated with a rigging object for intelligent interaction. In Top/Plan view, an associated, or attached, load is automatically set to the rigging object height. In a 3D view, the height is determined by the load’s precise insertion point on the rigging object. If a load object has multiple components, each can be attached to a different rigging object; see Inserting a video screen object for details.
A load moves with its associated rigging object. Loads that support free 3D rotation, such as lighting devices, maintain their rotation angles relative to the rigging object when it is rotated. Loads that are placed on or near their associated rigging object can participate in structural calculations (Braceworks required); see Associating existing loads with the Manage Loads tool.
Load objects include:
● Lighting devices (see Inserting instruments)
● Video screen objects, speakers and speaker arrays, soft goods, cables, and point and distributed loads
Load objects can be automatically associated with a rigging object, both at insertion and when an existing load is moved in the drawing. At insertion, a load is automatically associated with a rigging object if one is found within the Pick radius specified in Spotlight preferences setup. When moving an existing load, auto positioning must be enabled for the load to automatically associate with a rigging object.
Hanging positions have added benefits for associated lighting devices. The devices can be auto-numbered according to their hanging position, and instrument summaries and other reports can be created for each hanging position.
If lighting devices associated with a hanging position are moved to a different position or rigging object, the Position name is automatically updated for the devices, and the Z height of the devices is calculated automatically based on the Z height of the position or rigging object.
In schematic views, associated loads can be placed at an offset for greater visibility; see Concept: Schematic views.
When a load object is created, it can be automatically associated with a rigging object when Enable auto positioning when created is selected on the Spotlight preferences: Loads and rigging pane. The load is associated when it is placed directly on a rigging object, or placed within the specified Pick radius of a rigging object. Valid rigging objects are highlighted as the cursor moves over them.
If a schematic view was created from the associated rigging object, a load is added to the schematic view in the same relative position as the model load.
When Enable Auto Positioning when moved is selected in the Spotlight preferences, an existing load can be moved to a rigging object.
To move a load to a rigging object by dragging:
● Click and drag the load to the desired location within the Pick radius specified in the Spotlight preferences: Loads and rigging pane. The load attaches to the nearest rigging object within the radius, if one is found.
● Click and drag the load directly onto a rigging object.
Load objects with multiple components, such as a video screen and projector, are moved and associated as a single unit.
When a load is dragged directly onto a truss object, the load attaches to the bottom of the truss by default. While dragging, press the Alt key (Windows) or Cmd key (Mac) to attach the load to the top of the truss.
The load is moved to the rigging object and is automatically associated with it.
If a schematic view was created from the associated rigging object, a load is added to the schematic view in the same relative position as the model load.
|
Mode |
Tool |
Tool set |
|
Attach
|
Manage Loads
|
Rigging |
As described in Managing loads, the Manage Loads tool is available for objects in the model and schematic views.
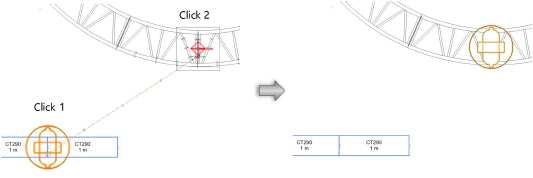
To associate existing loads with a rigging object:
1. Click the tool and mode.
Alternatively, right-click on a load object and select Attach to Rigging Object from the context menu. This command is also available for schematic load objects; see Creating schematic views.
2. Select the desired load object(s); the selected loads are highlighted.
If a load has multiple components, such as a video screen and projector, click the component to attach; only the clicked component will be associated with the rigging object.
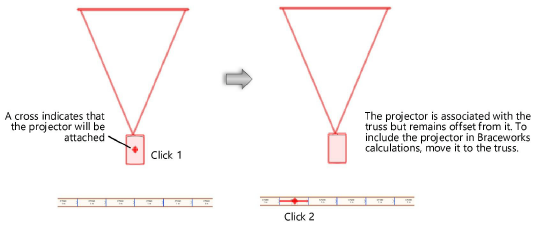
3. Click on a rigging object to associate the loads with it. Valid rigging objects are highlighted as the cursor moves over them. The loads are associated with the rigging object, but they are not automatically moved to it.
As the rigging object moves and rotates, the associated loads will also transform based on their positions relative to the rigging object. However, the loads will participate in structural calculations (Braceworks required) only if they are placed on or near their associated rigging object. For loads that are placed too far away, the Select Load to Place dialog box opens.
4. Select which loads should move onto the rigging object to enable calculations (Braceworks required). Click in the Use column to place a check mark beside each load to move. The load moves to its nearest point on the rigging object.
Alternatively, drag the load to the desired position, or use the method of Repositioning loads with the Manage Loads tool for more precise placement.
If a schematic view was created from the associated rigging object, loads are added to the schematic view in the same relative position as the model loads. However, when loads are added to a schematic rigging object, this does not affect the model. See Concept: Schematic views.
~~~~~~~~~~~~~~~~~~~~~~~~~

