 Placing a dimension
tapePlacing a dimension
tape
Placing a dimension
tapePlacing a dimension
tapeMode |
Tool |
Tool set |
Modes for Creating lines |
Dimension Tape
|
Dims/Notes |
Spotlight software users can place a dimension tape object on the drawing to quickly indicate the approximate location of objects that don’t require final alignment until after installation is completed.
|
Click here for a video tip about this topic (internet access required). |
To create a dimension tape:
1. Click the tool and mode.
2.Click to place the object in the drawing, click again to set the length and rotation, and click a third time to establish the position. The first time you use the tool in a file, a properties dialog box opens. Set the default parameters. The parameters can be edited later from the Object Info palette.
The dimension tape’s text font, size, and style are controlled with the Text menu, and attributes such as pen color, line type, and fill are controlled with the Attributes palette.
![]() Click
to show/hide the parameters.
Click
to show/hide the parameters.
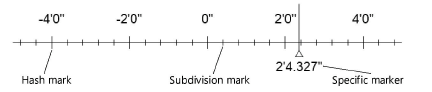
3.If you need to indicate a specific location on the tape to mark the placement of an item, right-click on the dimension tape object and select Add Specific marker from the context menu.
The specific marker is a separate object from the dimension tape it is associated with, and its pen, line type, and fill attributes are edited independently. The placement of the specific marker and the length of its line can be edited with control points, and its position on the tape can be modified in the Object Info palette. To remove a specific marker, move its control point past the end of the dimension tape object, or select it and press the Delete key.

