Setting snapping parameters
SmartCursor snapping options are controlled by the Snapping set on the Status bar at the bottom of the application window. Click each tool to toggle that snapping type on or off as needed for a particular drawing task, and control the on-screen feedback that displays while drawing.
Click on an individual tool icon in the graphic below to link to the help for that snapping type.
![]()
Most of the snapping tools work for both 2D and 3D views; however, Snap to Tangent only applies to 2D views, and Snap to Working Plane only applies to 3D views.
Snapping types can be used individually or combined for precise drawing and snapping. For example, enable Snap to Objects and Snap to Grid to find points which are both on an object and on a grid line. Snapping can also be combined with Data bar input to find a specific snap point along a defined location in the drawing area.
Most snapping tools have settings that can be set from a popover that opens when you double-click, right-click, or click and hold the tool. Most of these settings are considered application settings and apply to any file opened in the Vectorworks program. Certain settings are considered document settings and are saved with the file; these include grid dimensions, alternate angle extension lines, datum and smart edge offset, and distance snap settings. Some of the snapping tools do not have additional parameters, and are simply toggled on or off.
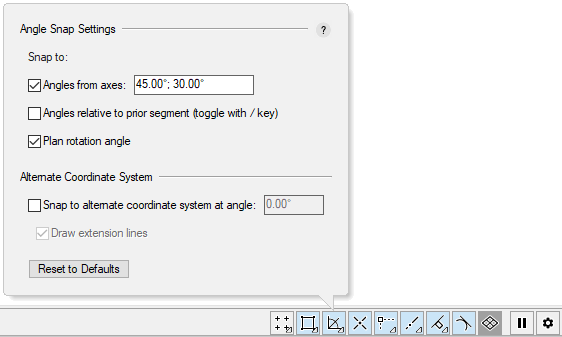
Double-click, right-click, or click and hold snapping tools that have an arrow in the lower-right corner to open a popover with settings for that snapping type. Click Snapping Settings on the right to open the General Snapping Settings popover. Click anywhere outside a popover to dismiss it.
When drawing, you can suspend SmartCursor snapping. Click Suspend Snapping  to toggle snapping on or off. When snapping is suspended, the tool icons are replaced by a colored bar. The snapping settings, including which tools are toggled on and off, are retained when snapping resumes. Suspended snapping is a global setting that persists across all open documents in the session, but it is not saved across sessions.
![]()
Alternatively, for a briefer suspension, press and hold the shortcut key, which is the ‘ key (back quote key) by default. Press the key quickly twice to make the suspension stick. The shortcut key to suspend snapping can be customized; see Modifying special shortcuts.
To set up and activate snapping types:
Click Snapping Settings ![]() in the Snapping set on the Status bar to open the General Snapping Settings popover and set the parameters that are not specific to any tool.
in the Snapping set on the Status bar to open the General Snapping Settings popover and set the parameters that are not specific to any tool.
Double-click, right-click, or click and hold a tool in the Snapping set on the Status bar to open the settings popover for that snapping type, and set parameters for that tool. Some of the tools do not have a settings popover.
The general and type-specific snapping parameters are described in the following sections.
Click a snapping tool to toggle it on or off as needed.
Snapping shortcut keys can be set in the Workspace Editor; see Modifying special shortcuts.
Different combinations of constraints and snapping parameters are required for different drawing tasks. Select the Tools > Custom Tool/Attribute command to easily create a script with the current snapping settings and active snapping tools. Execute the script by double-clicking on it from the Resource Manager to quickly change snapping parameters and settings. See Creating custom tool/attribute scripts for more information.
