Managing and editing camera views
An animation is created as a camera moves along the animation path between established views, which are located at keyframes placed along the path. Camera views can be managed by adding and deleting keyframes, by changing the camera’s look-to point, and by editing the camera’s view angle.
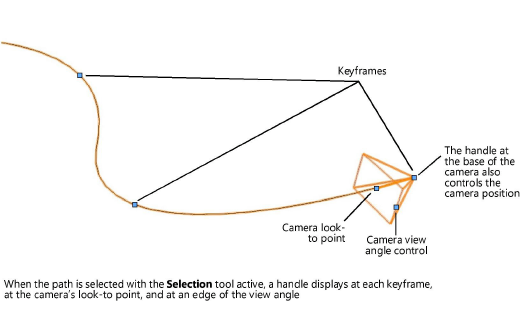
To select a keyframe, click it, or use the Keyframe arrows in the Object Info palette to move sequentially from one keyframe to the next/previous one. Click Skip Backward in the Object Info palette to select the first keyframe on the path, or Skip Forward to select the last keyframe.
Adding and deleting keyframes
When you create an animation path, keyframes are automatically placed at the corner and apex of every curve for walkthrough paths, and evenly spaced around the circle for orbit and spin paths. Keyframes are used both to create camera views and to control the speed of the animation along the path. You can delete and add keyframes anywhere except at the end points of the path, as needed to adjust the animation.
To delete a keyframe:
Click the keyframe and either click Delete Keyframe from the Object Info palette or right-click on the keyframe and select Delete Keyframe from the context menu.
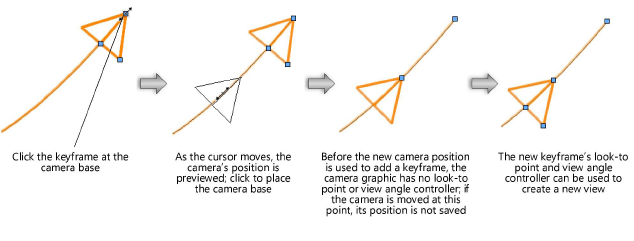
To add a keyframe:
Click the keyframe at the base of the camera to select it.
Move the camera along the animation path to the position for the new keyframe and click again to place the camera; keyframes can be added only on the existing path.
Alternatively, change the Time in the Object Info palette to move the camera to a different location on the path.
Click Add Keyframe from the Object Info palette or right-click on the animation path and select Add Keyframe from the context menu.
A keyframe is added at the camera base’s position on the path.
Changing the camera’s look-to point
By default, the camera aims in the direction of the path, or for orbit and spin animations, toward the object, but the look-to point can be changed to view items at any angle relative to the path. The height of the look-to point can also be changed.
There are two ways to change the camera’s look-to point, both of which are made easier when using multiple views to see the animation path object and an active camera view simultaneously (see Using multiple drawing views).
Manually manipulate the camera’s look-to point on the animation path.
Use the Walkthrough tool to look around within an active camera view.
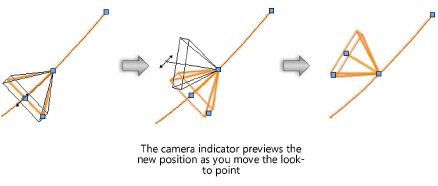
To change the camera’s look-to point from the animation path:
With the animation point selected, click the look-to point to select it.
Move the cursor to the desired view, and click again to place the look-to point. If a camera view is active, it updates in real time.
To change the camera’s look-to point from an active camera view:
If the camera view is not already active, select the animation path and click Activate Camera View in the Object Info palette.
A first-person camera view displays, and the animation path object is not visible in that view pane. The Walkthrough tool in Look Around mode becomes active.
Use the Walkthrough tool to change the camera’s active view (see Looking around a model). The camera on the animation path changes direction in real time, and the look-to point reflects the active camera view.
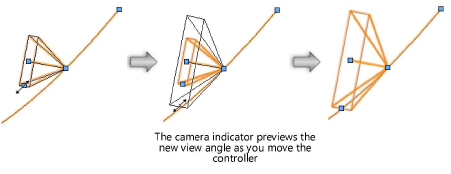
Changing the camera’s view angle
You can broaden or narrow the camera view angle as needed to focus on a design detail or encompass a panoramic sweep.
To change the camera’s view angle:
Click the camera view angle control to select it.
Move the cursor to the desired view angle, and click again to set the angle.
Alternatively, drag the View Angle slider in the Object Info palette to the desired angle.