Existing tree autonumbering and ID tags
Existing tree tags can contain an automatic numbering ID as well as tree information. Set up the new tree autonumbering properties first, to automatically number the trees according to the settings as they are placed on the drawing. Autonumbering can also be changed after placement on a tree-by-tree basis.
To set autonumbering and ID tag information for existing trees:
From the Object Info palette of a selected existing tree, select Tag and Number Options. The Tag and Number Options dialog box opens.
Click to show/hide the parameters.Click to show/hide the parameters.
|
Parameter |
Description |
|
Auto Number New Trees |
Sets autonumbering defaults for trees to be placed on the drawing. Deselect the option if autonumbering is not desired. |
|
Leading Zeros |
Specify the number of leading zeros to use for the autonumber. Using leading zeros allows correct sorting in worksheets. |
|
New Tree Prefix/Suffix |
Specifies a prefix and or/suffix, if any, before and after the autonumber |
|
Auto number duplicated trees |
When selected, existing trees that are copied or duplicated (with the Duplicate command, or by clicking and dragging with the Option (Mac) or Ctrl (Windows) key pressed) receive their own autonumber |
|
Separate numbering on each layer |
Restarts the autonumbering series for each layer of the drawing |
|
Auto Number This Tree |
Sets autonumbering properties for the currently selected tree; deselect to manually enter a number in Full ID Number instead of using an autonumber. When displaying transplanted trees, for example, the same number is needed for the tree representation in the original and new locations. For one of the representations, deselect Auto Number This Tree and enter the identical number in the Full ID Number. If Auto number duplicated trees is not selected, Auto Number This Tree is automatically disabled when an autonumbered tree is duplicated. |
|
Leading Zeros |
Specifies the number of leading zeros to use for the autonumbering of the selected tree |
|
This Tree Prefix/Suffix |
Specifies a prefix and or/suffix, if any, before and after the autonumber for the selected tree |
|
ID Tag Options |
Specifies how to display existing tree ID tags |
|
Snap tag to edge of trunk |
Snaps the end of the leader line to the edge of the trunk; deselect to adjust the endpoint location manually |
|
Display marker at end of tag leader |
Adds a marker to the leader line endpoint. The marker style is controlled by the ID tag class. |
|
Enable tag shoulder line |
Adds a shoulder to the leader line |
|
Shoulder Angle |
Sets the angle of the ID text and shoulder |
|
Display |
Specifies the information to display in the tag; each item displays on its own line. The Notes information is set from the Object Info palette. |
|
Class |
To control appearance and visibility, select a class from the list of classes present in the drawing |
|
Apply To |
Select the method to apply the numbering and ID properties. To this object only: Applies the properties to the currently selected existing tree To all objects on all layers: Applies the properties to all existing trees in the drawing To all objects on active layer only: Applies the properties to all existing trees in the current layer To all selected objects on all layers: Applies the properties to selected existing trees in the drawing To all selected objects on active layer only: Applies the properties to selected existing trees in the current layer |
|
Also apply as the document defaults |
Sets the tag and numbering properties as the default preferences for the Existing Tree tool. Existing trees placed by the tool after clicking OK will have these properties applied. |
|
Also apply position of ID tag |
Also applies the position of the ID tag and leader line from the currently selected tree to the existing trees set in Apply To |
|
Full ID Number |
Displays the selected tree’s autonumber; deselect Auto Number This Tree to specify a custom ID Number |
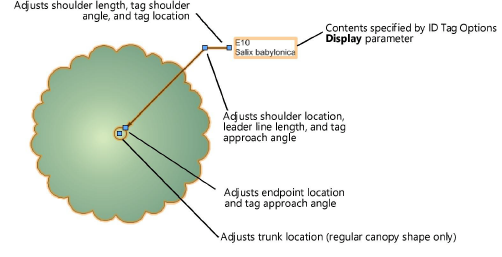
Existing tree tag appearance and placement is flexible, and can be adjusted in several ways, including through the Object Info palette, tag class settings, and the control point locations on the drawing.
When existing tree tags are required, define their appearance in the Tag and Number Options dialog box. Apply the ID tag options to all existing trees and to the document defaults.
Individual tags can then be changed for selected existing trees by clicking Tag and Number Options from the Object Info palette. For example, selected trees in one area of a planting plan look more uniform when they all use the same tag approach and tag shoulder angle. Set the Shoulder Angle and then select Also apply position of ID tag.
The existing tree tag class controls the appearance of the leader/shoulder lines, as well as the marker style.
To move the plant tags of several selected plants at once, click the Unrestricted Interactive Scaling mode of the Selection tool.
If an individual tag needs to be repositioned, plant tags also have several control points for adjusting the tag text and leader line and shoulder position and angle.
Align and distribute the leader lines for improved readability with the Align/Distribute Leader Lines command (see Aligning and distributing leader lines).