 Editing space boundaries
Spaces are path-based objects and can be reshaped, added to, and clipped by modifier objects. Right-click on the space and select Edit from the context menu to open the Edit Space dialog box. From there, select whether to edit the space boundary or modifiers, reshape the space, or open the Space Settings dialog box to edit parameters. Alternatively, right-click on the space and select Edit Boundary or Edit Modifiers from the context menu to enter Object Editing mode and edit the boundaries (see Object editing mode).
Reshaping an auto-bounded space
An auto-bounded space is associated with a set of walls. When you move or change the walls that surround the space, in many cases, the space boundary updates automatically.
To reshape an auto-bounded space:
Add, delete, or move the associated walls.
The spaces and labels update automatically, unless you’re adding a new wall that affects an existing space or removing a wall that surrounds a space.
If walls have been moved, the wall settings (thickness or components) have changed, or you move, edit, or delete an associated column or wall feature, the associated space objects and labels update automatically.
If walls that are associated with a space are deleted, the space changes from an auto-bound space to a manual space. The space can be associated with new walls.
If walls have been added, update the space object. Select one or more spaces, and then click Update Boundary from the Object Info palette. The location of the updated space is based on the position of the anchor point; other areas created by the dividing wall remain empty.
Alternatively, you can update the boundary as part of Updating spaces overall.
The boundary of the space adjusts to match the surrounding walls.
In cases where there are adjacent spaces that are not explicitly separated by an actual wall, the <Virtual wall> wall style (a wall without width or height) gives the user a boundary for space objects to see when Auto-Boundary is enabled, primarily for IFC export.
Reshaping a non-bounded space
If a space is not associated with any walls, there are two ways to reshape the space as a path object.
Use the Reshape tool to add, subtract, and change vertices. See 2D reshape modes for details.
If you reshape an auto-bounded space, it becomes disassociated from its walls.
Select Modify > Edit Space and then reshape the space using either the Reshape tool or the Selection tool (to scale the space).
Right-click the space, and select either Edit or Edit Boundary from the context menu. If you select Edit, from the Edit Space dialog box, select either Boundary to enter Object Editing mode (see Object editing mode for details), or Reshape to use the Reshape tool.
Editing a space label or anchor location
Each space has a control point that indicates the label location. If the space is auto-bounded, it also has a separate “anchor” control point that locates the space within its boundary. The anchor control point is typically in the center of the space’s bounding box, so it may be directly on top of the label control point.
To move a label or an anchor, click the control point and drag it to a new location; click again to move the point. If a label is moved outside of the space boundary, a line is drawn to connect the label to the space automatically.

Editing space geometry with 2D modifiers
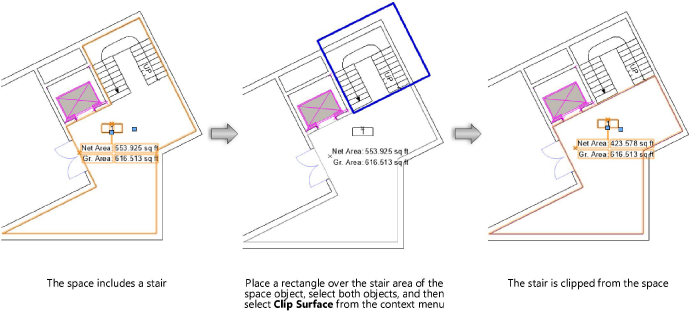
You can adjust the boundary of a space with 2D modifier objects. Position a closed 2D shape (for example, a rectangle or polyline) on the space object, select both objects, and then right-click and select either the Add Surface or Clip Surface command from the context menu. An auto-bounded space remains associated with the walls after the operation.
Changing space modifiers
To change the shape of any modifiers that have been applied to an auto-bounded space object, right-click the space, and select either Edit Modifiers or Edit from the context menu. If you select Edit, from the Edit Space dialog box, select Modifiers. Move, delete, or reshape the modifiers as needed, and then click Exit Modifiers to return to the drawing.
Converting space boundary associations
Converting to manual mode
Auto-bounded spaces can be converted to manual mode, releasing them from their association with walls.
To convert auto-bounded spaces to manual spaces:
Select the auto-bounded space. In the Object Info palette, the Auto-Boundary mode displays Auto-Boundary.
Select Manual from the Auto-Boundary list.
The space is disassociated from its wall set, though it remains in place.
Converting to auto-bounded mode using anchor points
Manual mode spaces can be converted to auto-bounded mode by automatically associating them with the surrounding walls.
To convert manual spaces to auto-bounded spaces:
Select a manual space whose anchor point is surrounded by walls. In the Object Info palette, the Auto-Boundary mode displays Manual.
Select Auto-Boundary from the Auto-Boundary list.
The space object is regenerated using the anchor point(s) to find the surrounding walls and associate the walls with the space.
Converting to auto-bounded mode by picking boundaries
Manually drawn spaces can be associated with a set of walls, converting them to auto-bounded mode. Similarly, an auto-bounded space can be associated with a new set of walls.
To convert manual spaces to auto-bounded spaces:
Select the manual space. In the Object Info palette, the Auto-Boundary mode displays Manual.
Select Pick Boundary from the Auto-Boundary list.
The Space tool is automatically activated, and Picked Walls mode is selected.
Click each wall that forms the wall set and press Enter, or click the check mark button on the Tool bar.
The space is associated with the wall set. Its location and size may change as it is bounded by the wall set.