Concept: Stories and story-aware objects
A model set up with stories emulates real-world construction situations. See Setting up the building structure with stories. To use layers and stories effectively when setting up a model, you need an understanding of how wall and slab styles work with layers and stories.
Throughout these descriptions, the word “bound” refers to an associated boundary that sets the top, bottom, edge, and/or elevation constraint of walls and slabs. Even though walls and slabs are the focus of this section, other objects can be similarly constrained.
There are three different methods of setting up walls and slabs in a Vectorworks model.
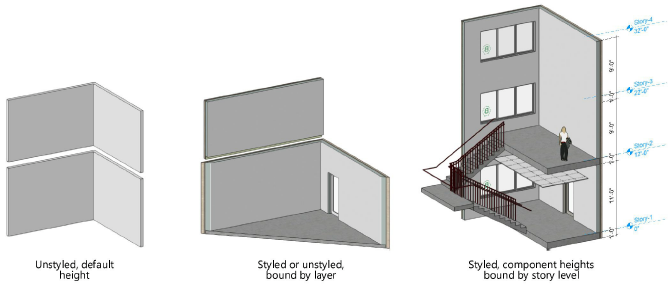
Unstyled
For simple drawings or concept exploration, simply open a new file and start drawing with unstyled walls and slabs. An unstyled wall is set to a default height and thickness. An unstyled slab has a default thickness and can be associated with surrounding walls at its edges. The height and thickness of walls and slabs can be changed from the Object Info palette or, for walls, by graphically Reshaping objects.
Layer-bound setup
This drawing method uses the design layer height and elevation settings to control both styled and unstyled walls. For slabs, the slab datum elevation can also be set according to the layer elevation, while the slab edges can be bound to the surrounding walls.
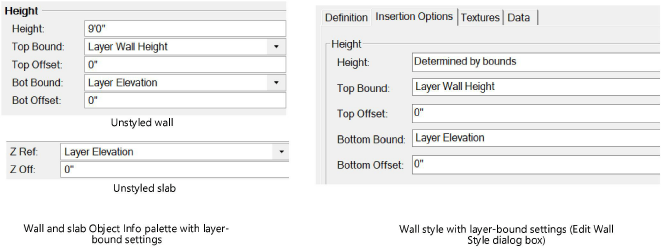
Each design layer has its own Elevation and Layer Wall Height values, available when Setting design layer properties. These can then be used by the walls and slabs on that layer, with optional offset values, to establish the slab and wall elevation and the wall height.
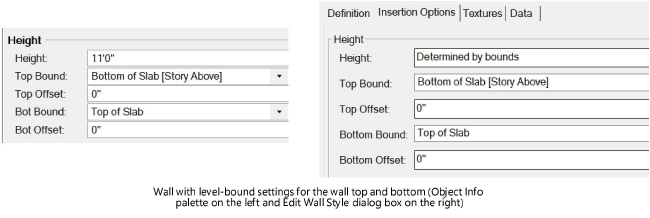
Unstyled walls and slabs are set to be layer bound from the Object Info palette. Styled walls and slabs are set to be layer bound from the Insertion Options tab of the Edit Wall Style (or Edit Slab Style) dialog box, when editing the style resource. If the styled wall uses components, the component top and bottom are set to be Relative to Wall in a simple layer-bound scenario. Components can also have optional offsets at the top and bottom of the component.
If the layer’s elevation or wall height value changes, all walls and slabs set to be bound by these values change as well. If you want to override the settings for an instance, the wall height of an individual wall can be overridden by changing its Height in the Object Info palette or by using the Reshape tool. The wall height of a styled wall can be overridden by changing the Height to a specific value rather than a setting of Determined by bounds. Component bounds or offsets can be overridden by clicking Components from the Object Info palette.
Level-bound setup
With this method, the level information contained within stories sets the height and elevation of not just the walls, but also the wall components. Each component is assigned to a story level that determines its height. When the story height changes, so can all of its levels, and the other stories and levels in the model adjust accordingly; all level-bound objects, their associated design layers, and objects on those layers respond to a change in story height.
Using wall styles and Using slab styles makes this complex setup easier:
For the walls, on the Insertion Options tab of the Edit Wall Style dialog box, set story levels for the bounds.
For slab styles, the datum elevation is set to a story level on the Insertion Options tab of the Edit Slab Style dialog box.
The Object Info palette top/bottom bound options for a selected wall look similar to the Insertion Options settings. However, for a wall with components, the height or bounding changes made in the Object Info palette only affect the wall when its component bounds are set to Relative to Wall in the Wall Component Settings dialog box.
Changes to the bounds settings of a wall or slab style only affect future instances of those styles, unless you elect to Update heights in the Wall Replacement or Slab Replacement dialog box.
Every drawing contains Default story levels which are available when creating a new story. For convenience, wall and slab styles are available from the Resource Selector with the same default story levels already specified within the style. This makes it much easier to set up the model using stories and default levels for the top/bottom bounds of walls and the elevation of slabs.
When Creating and managing stories, place a check mark next to the levels to be included with the story. Of course, new levels can also be created, and the elevations of the levels within each story are adjustable. For example, if you are adding a ledge level, its Elev Offset may require a negative value such as -1’0”.
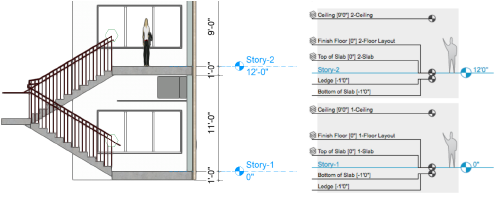
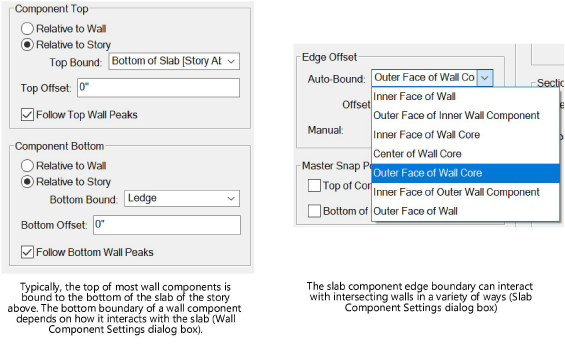
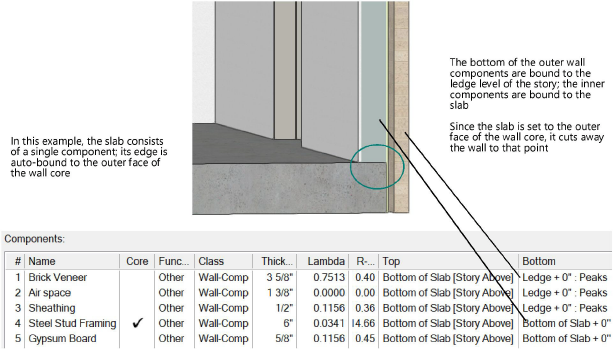
In addition to setting the top and bottom of the wall to a story level, when a wall style uses components, the top and bottom of each component can be set to a story level. This allows the model to be set up according to real-world construction conditions. For example, you can extend the bottom of an outer wall component to a ledge level to stretch it past the bottom of the slab, while the inner components stop at the slab level. For a split-level or mezzanine, walls may be set to the bottom of the slab with an additional offset for the level bounds.
To properly establish the wall/slab interface, evaluate how the wall and its components interact with the slab and its components. Consider the levels each component is bound to, and how the edges of the slab interact with the wall components to cut them away. Establishing the core component of the wall is also important if the slab edge is bound to a portion of the core.