Accessing existing working planes
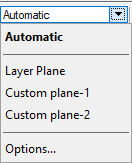
On the View bar, the Planes list displays the current working plane, and allows you to select a different working plane. The available planes vary depending on the drawing view, the active tool, and whether you have saved any working plane positions.
Alternatively, select Window > Palettes > Working Planes and double-click the name of the plane from the Working Planes palette.

|
Plane |
Description |
|
Automatic |
Enables the automatic working plane. When an appropriate drawing tool is active, the working plane changes as the cursor moves over the drawing area in a 3D view. A highlighted surface indicates that an object can be drawn planar to that surface. If there is no suitable surface under the cursor, the layer plane is the working plane. Alternatively, press the \ key (backslash) to toggle the automatic working plane on and off. The shortcut key can be customized in the Workspace Editor; see Modifying special shortcuts. |
|
Layer Plane |
Selects the layer plane as the working plane |
|
Saved planes |
Selects a saved working plane position as the working plane |
|
Screen Aligned |
Indicates that the working plane is parallel to the computer screen in the current view |
|
Working Plane |
Indicates that the working plane is not the layer plane or an automatic working plane, and the plane position hasn't been saved |
|
Options |
Opens the Document Preferences dialog box, for setting legacy 2D workflow options; see Document preferences: Legacy 2D tab |
Accessing unsaved working plane positions
To access unsaved working plane positions, select Modify > Working Plane > Next Working Plane and Modify > Working Plane > Previous Working Plane. The commands cycle through ten working plane positions from the current drawing session.
