Defining and editing hatches
Both associative and non-associative hatches must be defined. A hatch definition is a repetition of the elements in a series of lines in all directions from the beginning point. Specify where the hatch line begins (the Start Point), where it stops (the Dash Factor), where it begins to repeat (the Repeat), and the distance separating the line from a neighboring line (the Offset); the pattern is repeated in all directions.
A hatch can consist of several levels, or layers, of pattern definitions. Each level is edited individually to create the overall hatch. (Hatch layers are named hatch levels in order to distinguish them from the layers in the drawing area.)
If you create a finely-spaced hatch and export it to PDF, it may become automatically simplified during export to prevent it from appearing as an indistinguishable pattern.
Changes to a hatch definition affect all associative instances of that hatch in the drawing file. Non-associative hatches are not affected.
To create or edit a hatch definition:
Do one of the following:
To create a new hatch definition, from the Resource Manager, click New Resource, select Hatch, and then click Create. Alternatively, from the Resource Manager, select Hatches from the list of resource types on the tool bar, and click New Hatch.
To create a new hatch definition based on an existing hatch, from the Resource Manager, right-click on the resource, and select Duplicate from the context menu; name the new hatch definition in the Assign Name dialog box. From the Resource Manager, right-click on the new resource, and select Edit from the context menu.
To edit an existing hatch definition, from the Resource Manager, right-click on the resource, and select Edit from the context menu.
To edit a non-associative hatch used by the Hatch command, select a drawing object, select Modify > Hatch, and click Edit for the selected hatch in the Hatches dialog box. (See Applying non-associative hatches for more information.)
Alternatively, to create a new hatch from a locally mapped hatch, see Creating a new resource from a locally mapped hatch or tile.
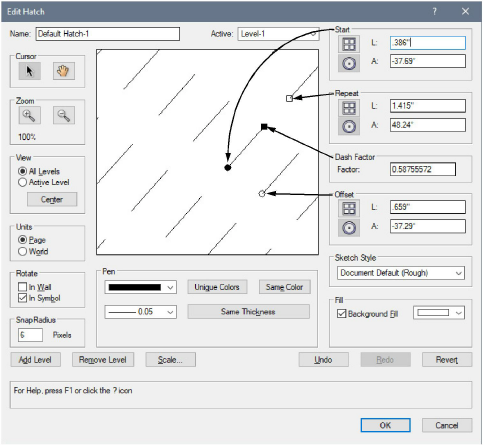
The Edit Hatch dialog box opens.
Click to show/hide the parameters.Click to show/hide the parameters.
|
Parameter |
Description |
|
Name |
Enter a name for the hatch |
|
Active |
Select the active hatch level from the list. A level can also be selected by clicking on one of its pattern lines, or by using the keyboard right and left arrow keys. Levels are numbered in the order of creation. |
|
Cursor |
Switches between the pointer and pan functions. The pointer adjusts the four control handles in the hatch window. The pan moves the elements of the hatch around the preview window. |
|
Zoom |
Zooms in and out by a factor of two. The center of the view remains at its current coordinates. The current zoom ratio is also displayed. The initial zoom setting when the dialog box opens corresponds to the best setting for editing Level 1. |
|
View |
Select whether to view All Levels or only the Active Level; click Center to center the start point of the active level |
|
Units |
Switches between Page and World settings for the hatch. Page is absolute in screen coordinates, where one inch in the hatch equals one inch on the screen (at 100% zoom). World sets the hatch to use the unit values for the layer where the hatch will be placed; for example, one inch in the hatch equals one inch in the drawing area as defined by the rulers (this may not equal one inch on the screen depending on the unit setting). When switching between Page and World, the hatch settings are adjusted for all levels to preserve the hatch appearance. |
|
Rotate |
Select whether to rotate the hatch to match the orientation of any symbols or walls where it will be placed |
|
Snap Radius |
Set the snap radius for snapping to the end points and mid points of pattern lines when moving a line by dragging |
|
Pen color |
Sets the color for the active level hatch lines; click the color box to select a color. Click Unique Colors to set a unique color for each level; click Same Color to apply the active level color selection to all levels. |
|
Pen line weight |
Sets the hatch line weight for the current level. Click the line to select a weight from the list. Create a custom weight by selecting Set Thickness. The Set Thickness dialog box opens. Enter the Thickness Value and Thickness Units. Click Same Thickness to apply the active level line thickness to all levels. |
|
Start Point |
Controls the location of the start of the first hatch line in relation to the hatch origin for the active level. The default mode uses polar coordinates (L = distance, A = angle). Enter values or move the Start Point handle in the preview window. |
|
Repeat |
Sets the distance, for the active level, between the beginning of a segment and the beginning of the next collinear segment. Repeat directly relates to the Dash Factor, with the two determining if the line is dashed or solid, as well as the length of the dashes and line segments. The default mode uses polar coordinates (L = distance, A = angle). Enter values or move the Repeat handle in the preview window. |
|
Dash Factor |
Represents, for the active level, the percentage of the distance between the Start Point and the Repeat that is shown as a line. Set to 1 to create a solid line. Enter a value or move the Dash Factor handle in the preview window. |
|
Offset |
Determines the distance and direction between lines for the active level. The values entered are relative to the Start Point. The default mode uses polar coordinates (L = distance, A = angle). Enter values or move the Offset handle in the preview window. |
|
Sketch Style |
For Vectorworks Design Suite products, specifies a hatch sketch style; see Applying sketch styles to hatches |
|
Background Fill |
Uses a background color; click the color box to select a color. Background color applies only to associative hatches |
|
Add/Remove Level |
Click Add Level to create an offset duplicate of the active level. Alternatively, create a duplicate level by clicking and dragging the Start Point handle with the Option (Mac) or Alt (Windows) key. Click Remove Level to remove the active level. |
|
Opens the Scale Hatch Definition dialog box. Enter a Scaling Factor to change the hatch definitions for the active level (except for the Dash Factor value, which remains unchanged). Select Apply to All Levels to change the scale factor for all levels. |
|
|
Undo |
The last five actions can be undone by clicking Undo |
|
Redo |
After clicking Undo, click to redo the last action that was undone. If multiple actions were undone, you can click multiple times to redo them in order. |
|
Revert |
Returns the hatch definition to its status at the time the Edit Hatch dialog box was opened |
The Start Point, Repeat, Dash Factor, and Offset functions correspond to the four control handles in the preview window. When a handle is moved, the corresponding function’s values change to reflect the move. The Shift key constrains the drag when using the control handles, affecting each of the four functions differently.
For the Start Point, Repeat, and Offset parameters, enter values according to either the polar coordinate system or the Cartesian system. The text box labels for these four controls change to correspond to the selection of Cartesian or polar.
|
Coordinate system |
Description |
|
Cartesian
|
Cartesian coordinates are the same as those used in the drawing area, with positive and negative X and Y axes |
|
Polar
|
Defines the different hatch line segments by length and angle values. In polar mode, angles are represented as positive or negative values from 0 to 180. Values from 180 to 359 are automatically converted to negative. 0 is at the 3 o’clock position. |


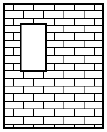
Example: Creating a brick hatch
The following Edit Hatch values demonstrate how to create a brick pattern. The hatch requires two levels. The bricks will be 8”x 3” and the first set of lines will be the vertical components of the bricks. This procedure creates a hatch that scales appropriately when it is placed into a drawing.
All values are entered in World units and Cartesian mode.
|
Parameter |
Level 1 values |
Level 2 values |
|
Start Point |
X = 0, Y = 0 |
X = 0, Y = 0 |
|
Repeat |
X = 0, Y = 6 |
X = 2, Y = 0 |
|
Dash Factor |
0.5 |
1 |
|
Offset |
X = 4, Y = 3 |
X = 0, Y = 3 |
