 Adding labels to irrigation objects
|
Tool |
Tool set |
|
Tag/Label
|
Irrigation |
Use of the Data Tag tool is recommended for labeling irrigation objects; see Adding data tags and labels. However, a Tag/Label tool for use in irrigation design is available, if desired.
The Tag/Label tool attaches standardized labels to any of the objects in the drawing. The labels can display any of the associated object parameters that you need to show, such as names, notes, values, text, and so on. Records attached to objects in the drawing, including custom records with specific parametric data, can be displayed within the tag/label. In addition, a record can be attached to the label itself, and its fields can be reported.
Label configurations (number of fields displayed, appearance, and the parameters displayed) are saved as part of the label symbol and are associated with the object type. This allows the same label symbol to be used for different irrigation objects. Any symbol can be used as a label symbol; see
To label an object in the drawing:
Click the tool.
Do one of the following:
Click Tag/Label on the Tool bar to select a resource from the Resource Selector. Select from one of the tag/label libraries, or select a custom resource from Generic.vwx and set its properties after placement. The default label symbols are categorized by irrigation object type, and should work well for displaying the parameters of those objects; all of the labels can be customized.
Click Preferences to open the object properties dialog box and specify the tool’s default parameters.
The parameters can be edited later from the Object Info palette.
Click to show/hide parameters.Click to show/hide parameters.
|
Parameter |
Description |
|
Horizontal Position |
Sets the horizontal position of the text relative to the shoulder; select Auto to position the text to the right if the leader is on the left, or to the left if the leader is on the right |
|
Leader Type |
Select Line, Arc, Bézier, or None; curved leader lines contain additional control points for controlling the curve shape |
|
Leader Radius |
For arc leader types, specifies the arc radius |
|
Custom Leader Length |
Sets the length of the line between the object and the shoulder control point; this can be changed by moving a control point or by selecting the option |
|
Leader Length |
If the Custom Leader Line option is selected, enter the leader line length |
|
Edit Tag/Label |
Opens the Tag/Label Edit dialog box, to select the parametric information to display in the label, select a different label symbol definition, or save a new label definition in the current file |
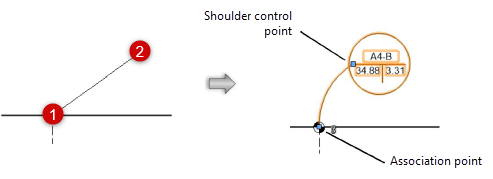
As you move the cursor over a valid object, such as an irrigation object, the object is highlighted; click on the object to be labeled.
Move the cursor to define the leader line length, and click to place the shoulder point and the label.

Align and distribute the leader lines for improved readability with the Align/Distribute Leader Lines command (see Aligning and distributing leader lines).
The label association point indicates which object is labeled; move the control point to associate the label with a different object. The label information updates automatically.

