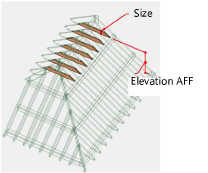
 Creating collars
|
Command |
Path |
|
Roof Framer |
AEC > Framing |
To create collars (collar beams):
Select the roof object.
Select the command.
The Roof Framer dialog box opens.
Click the Collars tab, and select Create Collars.
Specify the collar parameters.
Click to show/hide the parameters.Click to show/hide the parameters.
|
Parameter |
Description |
|
Style |
Select the collar style; flush collars or collar ties will only connect to the common rafters, joist collars connect to both common and jack rafters. Joist: tie beam that rests on the bearing wall and overlaps the rafters Flush Collar: tie collar that is flush to the rafters, usually attached to the rafters with metal plates Collar Tie: tie collar that scabs onto the rafters and is attached with nails, bolts, and so on |
|
Size |
Specifies the collar size in width x height, in current file units. Sizes can be edited by selecting Edit List (see Custom frame element sizes). |
|
Spacing |
Select the collar spacing (Every Rafter, Every Other Rafter, and Every Third Rafter) |
|
Location |
For joist or collar tie styles, specifies the location of the collars in reference to the rafters. For flush collar style, the location is automatically set to Middle. Middle places one collar at the center of the rafter for flush collar and joist styles, and one collar on each side of the rafter for the collar tie style. Left/Right places a single collar on the designated side of the rafter for joist or collar tie styles. Joists and collar ties extend to the intersection of the rafter tops. |
|
Elevation AFF |
Specifies the elevation above finished floor of the bottom of the collars. If Flush Collar or Collar Tie is selected for Style, the default elevation is two-thirds of the roof height. Joist style is automatically set to 0. |
|
Class |
To control appearance and visibility, select a class from the list of classes present in the drawing or create a new class (see Creating classes) |
|
Classes |
Edits class attributes |
|
Object Attributes |
Specifies the collar attributes |

