 Creating purlins
|
Command |
Path |
|
Roof Framer |
AEC > Framing |
To create purlins:
Select the roof object.
Select the command.
The Roof Framer dialog box opens.
Click the Purlins tab, and select Create Purlins.
Specify the purlin parameters.
Click to show/hide the parameters.Click to show/hide the parameters.
|
Parameter |
Description |
|
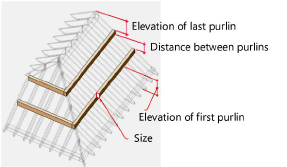
Purlin Size |
Specifies the purlin size in width x height, in current file units. Sizes can be edited by selecting Edit List (see Custom frame element sizes). |
|
Elevation of First Purlin |
Specifies the elevation above finished floor of the bottom of the lowest purlin |
|
Elevation of Last Purlin |
Sets the elevation from the top of the roof to the last purlin |
|
Create Purlins by: |
|
|
Number of Purlins |
Indicates the number of purlins to create; the purlins are evenly spaced between the first and last purlins |
|
Distance Between Purlins |
Specifies the distance between purlins; the number of purlins created is based on this value |
|
Purlin Position |
|
|
Top of Rafter |
Matches the tops of the purlins to the top of the roof object, as for roof tile supports |
|
Bottom of Rafter |
Matches the tops of the purlins to the bottom of the roof, as when the purlins support the rafters |
|
Purlins Start at the Lower End of the Rafter |
Sets the elevation of the first purlin to start from the lower end of the rafter |
|
Rotate Purlins to Roof Slope |
Rotates the purlins so that they match the slope of the roof |
|
Bearing inset |
Specifies the depth at which the purlin is notched into the rafters; if purlins are rotated this field is grayed since the inset only applies to horizontal purlins |
|
Class |
To control appearance and visibility, select a class from the list of classes present in the drawing or create a new class (see Creating classes) |
|
Classes |
Edits class attributes |
|
Object Attributes |
Specifies the purlin attributes |

