Formatting worksheet cells
|
Command |
Path |
|
Cells |
Format (worksheet menu) |
Set the appearance of worksheet cells with a variety of formatting options. Formatting applied to a database header row applies to all of the associated database sub-rows. The worksheet formatting also applies to worksheets placed on a drawing.
You can apply Fill and Pen attributes to the worksheet image on the drawing (from the Attributes palette). However, it is not recommended to apply both cell formatting and attributes to the same object, because the results can be unpredictable.
To format worksheet cells:
Select the cells to format.
Select the command.
The Format Cells dialog box opens.
On the Number tab, set the number format for the selected cells.
Click to show/hide the parameters.Click to show/hide the parameters.
|
Parameter |
Description |
|
General |
Specifies the default general format for any purpose |
|
Decimal |
Uses decimal numbers; enter a value for the number of decimal places, and if desired, use commas as separators |
|
Scientific |
Uses scientific numbers; enter a value for the number of decimal places |
|
Fractional |
Uses fractional numbers; enter the rounding value for fractions |
|
Percentage |
Uses percentages; enter a value for the number of decimal places |
|
Dimension |
Uses dimension numbers |
|
Dimension Area |
Uses the dimension area format (precision and units) as specified for this document; also displays the area units after the number |
|
Dimension Volume |
Uses the dimension volume format (precision and units) as specified for this document; also displays the volume units after the number |
|
Angle |
Determines the accuracy of angles and the measurement system used; the measurement system can be degrees/minutes/seconds, or decimal numbers up to eight decimal places |
|
Date |
Uses date formats; select the desired format from the list |
|
Boolean |
Evaluates the cell data to either True or False |
|
Text |
Treats the cell contents as text, even if a number is in the character string |
|
Leader |
Displays the specified leader text before the cell value (except for Boolean and Text formats) |
|
Trailer |
Displays the specified trailer text after the cell value (except for Boolean and Text formats) |
Click the Alignment tab to specify text alignment options.
Click to show/hide the parameters.Click to show/hide the parameters.
|
Parameter |
Description |
|
Alignment |
Sets the alignment of text in relation to the cell border |
|
Horizontal |
Specifies horizontal text alignment; select General to align text strings on the left and numbers on the right |
|
Vertical |
Specifies vertical text alignment |
|
Text Orientation |
Sets the text orientation |
|
Vertical Text |
Orients text vertically |
|
Horizontal Text |
Orients text horizontally |
|
Wrap Text |
Wraps text that exceeds the cell width (automatically adjusting row height); deselect to allow text that is longer than the cell width to “float” over empty adjacent cells. If adjacent cells contain content, unwrapped text may appear truncated. Numbers that exceed the cell width are displayed with # characters. |
|
Merge Cells |
Merges a range of selected spreadsheet cells into one cell; cell and border formatting and text wrapping are applied to the cell group rather than to the individual cells. The cell contents and format of only the upper left cell in the group apply to the merged cells. Data and formatting in the other cells will be lost during the merge. To split merged cells, select the merged cell group and then deselect Merge Cells. |
Click the Font tab to specify the font, font size, style, and color of text in selected cells. See Formatting text.
Click the Border tab to set cell border formatting options.
Select the Line Attributes, and then use the Presets or Preview buttons to add or remove border elements.
Click to show/hide the parameters.Click to show/hide the parameters.
|
Parameter |
Description |
|
Line Attributes |
|
|
Style |
Sets the line style and thickness for the border element |
|
Color |
Sets the line color for the border element |
|
Presets |
|
|
None |
Removes all border formatting |
|
Outline |
Adds or removes a border only on the outside edges (top, bottom, left, and right) of the cell selection |
|
Inside |
Adds or removes a border only on the inside (horizontal and vertical) edges of the cell selection |
|
Preview |
|
|
Top |
Adds or removes a border at the top of the cell selection |
|
Horizontal |
When more than one cell is selected, adds or removes a horizontal border between cells |
|
Bottom |
Adds or removes a border at the bottom of the cell selection |
|
Left |
Adds or removes a border on the left edge of the cell selection |
|
Vertical |
When more than one cell is selected, adds or removes a vertical border between cells |
|
Right |
Adds or removes a border on the right edge of the cell selection |
Click the Patterns tab to specify fill options for the selected cells.
Click to show/hide the parameters.Click to show/hide the parameters.
|
Parameter |
Description |
|
Style |
Select Solid or Pattern to apply a solid fill color or pattern to the selected cell |
|
Color/Pattern |
If Style is set to Solid, select the fill Color; if Style is set to Pattern, select the Pattern and the foreground and background colors |
If Vectorworks Design Suite is installed, click the Images tab to specify the type, size, view, and margin for images in the selected cells. For more information, see Inserting images in worksheet cells.
Click to show/hide the parameters.Click to show/hide the parameters.
|
Parameter |
Description |
|
Image Type |
Select Thumbnail to display a thumbnail image of the referenced object in the cell; this is useful for 2D/3D symbols or plug-in objects. Use other settings to control the scale, view, rotation, and render mode shown in the thumbnail. Select 2D Attributes to display a rectangle with the same 2D attributes as the referenced object. For a styled wall, slab, or space, the rectangle fill is a top/plan cross-section view of the object. |
|
Size |
|
|
AutoSize |
Sizes the image automatically so that the entire image is always visible, even when the cell size changes |
|
Fixed |
Sizes the image according to the specified Height and Width; also specify the Units for the dimensions (points, millimeters, or inches) |
|
Layer Scale |
Sizes the image according to the scale of the layer on which the object appears (thumbnails only) |
|
Custom Scale |
Select this option and then click Scale to select or enter a scale for the image (thumbnails only) |
|
View |
|
|
Standard Views |
Select from any of the standard Vectorworks views for the image (thumbnails only) |
|
Component |
Select which 2D/3D component view of symbols and plug-in objects to display in the worksheet cell; the options available depend on the Standard Views selection |
|
Rotation |
If Top/Plan view is selected, enter the number of degrees to rotate the image (thumbnails only) |
|
Render Mode |
For any view except Top/Plan, select the render mode for the image (Wireframe, Shaded, or Hidden Line); Top/Plan view is always rendered in Wireframe mode. Applies to thumbnails only. |
|
Margin |
|
|
Units |
Enter the units to use for the Size of the margin around the image (points, millimeters, or inches) |
|
Size |
Enter the size of the margin around the image, in the specified Units |

Formatted worksheet in the worksheet window
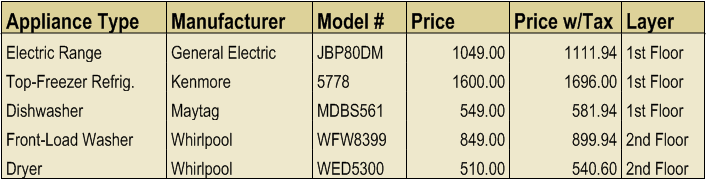
Formatted worksheet placed on the drawing
