 Replacing truss configurations
|
Command |
Workspace: Path |
|
Replace Truss |
Design Suite: Entertainment > Rigging/Braceworks Spotlight: Spotlight > Rigging/Braceworks |
If a truss line was designed with truss lengths that are not currently available in the inventory, or the length of various truss sections needs to be exchanged for others from the same line for any reason, the truss line can be automatically or manually reconfigured to use lengths that are available.
The command replaces either stand-alone truss lines or those in a system; only straight trusses can be replaced by this method. Corner, circular, hinge, or curved trusses must be manually replaced.
The term inventory here refers to the Truss Inventory, and not to the Inventory and Equipment list.
To replace truss lengths:
Select the command.
The Replace Truss dialog box opens.
Click to show/hide the parameters.Click to show/hide the parameters.
|
Parameter |
Description |
|
Truss Types |
Lists the truss types used in the current file; select the truss type to display truss lines of that type |
|
Truss Inventory |
Opens the Truss Inventory dialog box, for Managing truss inventory |
|
Proposed Configuration |
Lists all truss lines for the selected truss type; select one to view it in the drawing. The Current Length displays the length of the truss line in the drawing; the Proposed Length displays the length after configuration changes are made. Ideally, these lengths are equal and the Difference is 0 (zero). The quantities of each truss section in the truss line display in the remaining columns; any changes based on the proposed configuration display in bold. The columns are based off of the truss inventory. Scroll to the right, if needed, to see the quantity of all of the truss sections. |
|
Auto-Calculate |
Vectorworks attempts to calculate a possible replacement configuration based on the available inventory |
|
Change Name of Truss System |
When a truss line is selected, opens the Change Truss System Name dialog box, for Renaming truss systems |
|
Replace Truss Configuration |
Opens the Replace Truss Configuration dialog box, to manually select truss lengths for reconfiguring the selected truss line or lines |
|
Export |
Creates a worksheet populated with all of the data for each truss line in the system |
|
Inventory |
Displays the truss lengths used for all of the truss lines in the system, as well as those available in the current inventory |
|
Reset |
Resets the configuration to match the current status in the drawing |
Select a Truss Type, and then select a truss line in the Proposed Configuration list; the drawing centers on the truss line, and the truss system is selected in the drawing.
More than one truss line can be selected at once.
Do one of the following:
For automated replacement, first refresh the inventory by clicking Truss Inventory, and then click OK to close the Truss Inventory dialog box. Click Auto-Calculate. Vectorworks attempts to reconfigure the truss line for you based on the available inventory. If successful, the proposed configuration displays and the Inventory updates to reflect any changes. Proceed to step 7. If unsuccessful, you are notified; you may need to adjust inventory amounts or change the configuration manually.
For manual replacement (not based on current inventory), click Replace Truss Configuration. Alternatively, double-click on the selected truss line or lines.
The Replace Truss Configuration dialog box opens.
This dialog box can also be opened by clicking Change Configuration on the Object Info palette, or by right-clicking on a truss in the drawing and selecting the command from the context menu.
Click to show/hide the parameters.Click to show/hide the parameters.
|
Parameter |
Description |
|
Configuration |
Displays the truss line or lines selected for reconfiguration |
|
Edit Quantity |
Edits the quantities of truss sections in the selected truss line |
|
Truss lengths/Quantities |
Scroll through the lengths of truss available for the truss line, and enter the desired quantities of each truss section to configure the truss line |
|
Selection |
Displays the configuration parameters of the selected truss line and indicates the lengths of the current and proposed configurations, and the difference between them |
|
Clear |
Resets the configuration to match the current status in the drawing |
Select a truss line. The Edit Quantity area displays the current quantity of each length used to make up the truss line. Select different quantities of truss lengths as needed to reconfigure the line, by entering the quantity of each length to use. Click <- and -> (or press Shift + Tab and Tab) to scroll through the available lengths.
The current and proposed truss configuration updates automatically in the Configuration list; red and green colors show at a glance whether the proposed truss configuration has a length Difference of 0 (zero), indicating successful truss line replacement.
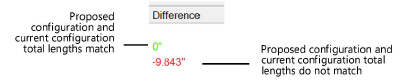
While you can continue with the truss replacement even if the Difference is not 0 (zero), the result will be a shorter or longer truss line, which will likely cause problems with the truss system connections.
Click OK to return to the Replace Truss dialog box. The Proposed Configuration list updates with the new configuration, and the Used and Available quantities in the Inventory also updates to reflect the proposed configuration; if sufficient quantities are not available in the inventory, the Available quantities display with a negative value.
Click OK to perform the replacement of the truss line or lines. Replacing the truss configuration for several lines can take some time.
Truss lines that changed configuration are selected in the drawing.
