 Creating an equipment summary key
|
Tool |
Tool set |
|
Equipment Summary Key
|
Lighting |

Statistics on the equipment used in the drawing help with event organization and production. Equipment summaries can be created for all equipment, including lighting devices, speakers, hoists, TVs, and more, and/or for lighting devices on specific hanging positions (see Creating an equipment summary for a hanging position). The summary is placed on the drawing for clients, vendors, or installation crews. The summary, which can be custom formatted, can show the symbol thumbnail and name, the number of each type of equipment in use, and the total counts, along with other parameters and information. You can add special elements like notes, column breaks, circuit summaries, and other items. Counting can be subtotaled to count parts, such as lighting device bodies and lenses. Symbols which have the same instrument type are counted together, allowing for alternate versions of a single type. The summary can compare its information to the inventory so that the designer can determine how much equipment remains in the inventory.
The insertion modes specify the location of the summary's insertion point. The insertion point can also be changed later in the summary's settings.
|
Mode |
Description |
|
Insertion Mode: Top Left Mode
|
Sets the insertion point as the top left corner of the equipment summary key's bounding box |
|
Insertion Mode: Bottom Left Mode
|
Sets the insertion point as the bottom left corner of the equipment summary key's bounding box |
|
Insertion Mode: Top Right Mode
|
Sets the insertion point as the top right corner of the equipment summary key's bounding box |
|
Insertion Mode: Bottom Right Mode
|
Sets the insertion point as the bottom right corner of the equipment summary key's bounding box |
|
Preferences
|
Sets the default parameters for the tool |


The Equipment Summary Key dialog box, accessed from the Preferences button on the Tool bar, has two uses:
Sets the default layout and formatting parameters individually for Position and Equipment types of Summary Defaults. (You can change the layout for existing summaries from the Object Info palette.)
Specifies the equipment to display in the summary key. Use filters, categories, and the > and >> buttons to move the items to include into the Items and Elements to Display list.
Once placed, the key can be edited from the Object Info palette.
There are two ways to place an equipment summary key:
Click the tool to place the summary key in the drawing (on a design layer or sheet layer, or positioned on a title block)
From the Object Info palette of a selected hanging position, click Insert Position Summary. The layout settings for a Position (Summary Defaults parameter) are used. A filter automatically applies to the summary to limit the equipment to the items on the hanging position, and the Key Title is set to the hanging position name.
Multi-cell lighting devices must be set up in a specific way to function correctly in the equipment summary. Use a single master symbol that contains all the component parts nested within the main symbol. Add the master symbol to the inventory list. For multi-cell lighting devices to be counted properly in the equipment summary, the data such as instrument types and wattages associated with the nested symbols must match the components of the multi-cell lighting device.
You can create a dedicated symbol for use only in the key if, for instance, the symbol used in the file is too long to fit neatly. This dedicated symbol must also be added to the inventory, and its data must match the components used in the lighting device for correct reporting. This symbol can be accessed in the Unused Equipment Symbols selection of the Available Items and Elements list described in this section.
To create an equipment summary key:
Click the tool and insertion mode.
If you are placing a summary for a hanging position, see Creating an equipment summary for a hanging position.
Click Preferences to open the Equipment Summary Key dialog box.
Click to show/hide the parameters.Click to show/hide the parameters.
|
Parameter |
Description |
|
Available Items and Elements |
Limits the display of available components according to the filter and other selections |
|
Filter |
Select a filter to limit the equipment displayed in the Available Items and Elements list |
|
Manage Filters |
Opens the Inventory Management Filters dialog box, to create filter sets for displaying equipment for selection. See Managing inventory filters. |
|
Used equipment symbols |
Lists all symbols that are currently in use in the file |
|
Used plug-in objects |
Lists all the objects that are currently in use in the file (plug-in objects display in green so they can be distinguished from the used symbols in the Items and Elements to Display list) |
|
Unused equipment symbols |
Lists all the symbols in the file that are in the Resource Manager, but not currently placed in the drawing (unused symbols display in blue so they can be distinguished from the used symbols in the Items and Elements to Display list) |
|
Other elements |
Lists summary and display elements which can be added to customize the summary; certain items require the specification of additional customization options after adding them to the Items and Elements to Display list. Column break: Adds a new column to the summary; items added after the break indicator will be placed in the new column. Column Headers: Adds a predefined header descriptor (symbol, description, and count) to each column. Begin subtotal: Indicates the start of a subtotal count section for the quantities of each symbol. End subtotal: Indicates the end of a subtotal count section; the subtotal value is placed at this location (after the word, Total). If a subtotal cannot be calculated, nothing is displayed in the summary. Header: Adds a section header. Specify the text of each header by clicking Options. Divider: Places a horizontal separator across the column; the separator does not extend into the border padding area. Full divider: Places a horizontal separator across the column; the separator extends to the border. Note: Adds text that is aligned with the symbol text. Specify the text of each note by clicking Options. Typical symbol: Places a selected symbol that is normally the reference symbol used for label legends. Click Options to select a specific symbol. Color summary: Adds a summary of all the gel colors used, with color, gel size, and counts (select Show Swatch in the Equipment Summary Key dialog box or Object Info palette to include a color swatch). Circuit summary: Adds a summary of the circuits in use (usually only included with hanging position summaries). Position height: Displays the position height value, when the instrument summary is filtered by position. (When not filtered by position, or when position heights vary, the height value displays "Varies.") Gobo summary: Adds a summary of the gobos in use with lighting devices |
|
Available Items and Elements list |
Lists the items that can be added to the summary; the available items depend on the selection in Available Items and Elements. Sort the symbols by clicking in the column header. |
|
> |
Adds one or more selected items from the Available Items and Elements list to the Items and Elements to Display list. The items are added to the row above the selected row, or to the end of the list if nothing is selected. Alternatively, double-click to add the item. |
|
>> |
Adds all the items displayed in the Available Items and Elements list to the Items and Elements to Display list |
|
< |
Removes one or more selected items from the Items and Elements to Display list. Alternatively, double-click to remove the item (except for Other Elements).
|
|
<< |
Removes all the items from the Items and Elements to Display list |
|
Items and Elements to Display |
Lists all the components, in order, to include in the instrument summary. From this list you can: Change the order by clicking in the first column and dragging to the desired location. Click on the No Rotation column of a selected symbol to prevent the symbol from automatically rotating in the summary thumbnail display. Click on the Scale column of a selected symbol to select the scale value; this overrides the default scale set for all symbols in Item scale. Click on the Alignment column to choose Left or Center alignment of the selected symbol. If more than one line item is selected, the rotation, scale, and alignment applies to all highlighted line items. |
|
Items and Elements list |
|
|
Sort Symbols |
Click to sort all the components, including Other Elements, in alphabetical order |
|
Options |
For certain Other Elements, opens a dialog box with options; for example, if you added a Header element, enter the header text. Alternatively, double-click to edit the item. |
|
Equipment Summary Key Layout Settings |
Set up the desired layout settings for each type of summary default: Equipment or Positions (hanging position), selected from the Summary Defaults |
|
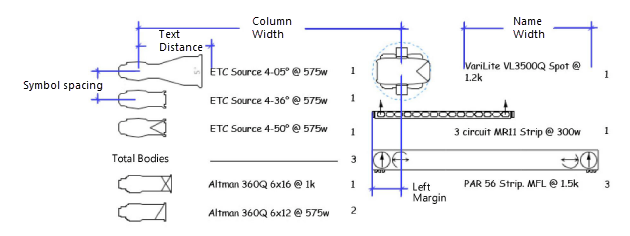
Column Settings |
|
|
Left Margin |
Sets the distance from the left of the summary insertion point to the bounding box of the displayed symbol |
|
Column Width |
Sets the total width of each column, in document units |
|
Text Distance |
Sets the distance between the end of the bounding box to the text description |
|
Name Width |
Sets the maximum width of descriptive text before it wraps |
|
Counts Width |
Sets the maximum width of the count column |
|
Column Spacing |
Sets the distance between columns |
|
Symbol Spacing |
Specifies the vertical distance between symbols. Additional distance is automatically added if the symbol is larger than the spacing. |
|
Bounding Border |
|
|
Style |
Select the style of border for the summary, or whether to omit the border |
|
Separation |
For the double border style, sets the distance between the lines |
|
Padding |
Sets the distance between the border's inner line and the items within the summary |
|
Set Insertion Point |
Specifies the location of the summary's insertion point; this can be helpful, for example, if you want to snap the summary to a title block border. All text and formatting parameters remain referenced to the upper left corner, regardless of the summary insertion point location. |
|
Key Title |
|
|
Show key title |
Displays a title for the summary |
|
Text |
Specify the title text to display |
|
Position |
Select where to locate the summary title with respect to the border |
|
Format Title Text/ Format Header Text/ Format Body Text |
Specifies the text formatting for the title, header, and body text |
|
Show Symbols |
Includes a thumbnail graphic of each equipment symbol in the key |
|
Auto rotate |
Orients symbols automatically to minimize the amount of space required |
|
Item scale |
Scales symbols by the specified proportion; this allows the summary key to be placed on a sheet layer without displaying the symbols at 1:1 scale. The scale of individual symbols can be overridden with the Scale column within the Items and Elements to Display list. |
|
Show GDTF mode |
Displays the GDTF mode for lighting devices |
|
Show wattages |
Displays the power consumption information of a consumer. For lighting devices, appends "@ [wattage]" to the instrument type. A blank wattage or a wattage of 0 does not display. |
|
Show weights |
Displays the unit's weight or load information, as set in the default parameters of the symbol |
|
Show counts |
Displays a count value for each object type, as limited by the selected filter |
|
Compare to inventory |
Compares and displays the counts against the total number of units of each type as calculated in the inventory |
|
Show color lst |
Includes a list of colors used by lighting devices in the drawing, as limited by the selected filter |
|
Show color swatches |
When a color list is included, adds a color swatch for each color |
|
Show gobo list |
Lists all of the gobo patterns used by lighting devices in the drawing, as limited by the selected filter |
|
Show circuit count |
Displays the number of circuits for lighting instruments on a hanging position |
|
Summary Defaults |
Select whether to specify the default settings for the summary when inserting it with the Summary Key tool (select Equipment) or from the Object Info palette of a hanging position (select Positions). This option is not available from the Object Info palette after the summary has been placed. |
Set up the layout parameters. The default parameter settings made here apply to summaries placed later in the file. Defaults for Positions and Equipment (selected in Summary Defaults) are saved separately and are in effect depending on how the summary is inserted. Taking the time to establish the defaults makes it much easier to insert summaries for hanging positions or for equipment in the drawing with the desired defaults already specified.
Select the items to include in the summary. You can add equipment symbols in use, other types of symbols (such as cables, speakers, soft goods, etc.), equipment symbols present in the file (but not currently in use), and formatting elements such as column headers, notes, and circuit summaries.
Filter the list of items to see in Available Items and Elements. Then click each type of item and move the desired elements to Items and Elements to Display. To change the order, click in the first column and drag the item to the desired position in the list, or click Sort Symbols to sort them alphabetically.
If you have included other elements that require formatting, select each one from the Items and Elements to Display list and click Options.
For headers, position height headers, or notes, enter the header or note text.
For a typical symbol, select the symbol to indicate labels (usually a label legend symbol, located within the Label Legend symbol folder)
For circuit summaries, the Circuit Summary Options dialog box opens to specify the circuit information to include in a hanging position summary. Specify the types of devices to count and how to count them, and enter the device amperage rating/voltage to obtain a report indicating the circuit type you will need for those devices.
Click to show/hide the parameters.Click to show/hide the parameters.
|
Parameter |
Description |
|
Header |
Enter the circuit summary header text |
|
Count By |
Select whether to count the circuits by channel, dimmer, or circuit number |
|
Two-fer By |
Select the method for counting two-fered circuits as one circuit. None: Counts all circuits, including ganged circuits Explicit: Counts only two-fer circuits that were created by the Ganging tool Anywhere: Counts any two-fered circuits, including those created by the Ganging tool and any set of two or more lights that are on the same circuit |
|
Amperage Ratings |
Specify the amperage ratings for the lighting devices, separating multiple values with a semi-colon (for example, 20;50 indicates 20A and 50A). Amperage rating is determined by a combination of a device’s wattage and voltage. Some examples include: With a voltage of 120V and a lighting device with a 5000W rating, the lighting device would go into the 50A circuit. With a voltage of 120V and a lighting device with a 500W rating, the lighting device would go into the 20A circuit. With a voltage of 120V and three 1000W lighting devices two-fered together, the lighting devices would go into the 50A circuit with two 50A two-fers. |
|
Voltage |
Specify the circuit voltage |
|
Device Types |
Select the types of devices to count in the circuit summary; typically two or more summaries are included, combining selected device types and specific power requirements so that you know the amperage required per circuit for various device types |
Click OK.
Click in the drawing to place the equipment summary. Click again to set the rotation.
The equipment summary parameters can be edited from the Object Info palette or by double-clicking on the equipment summary. However, the Summary Defaults option is not available since the summary already exists for lighting devices or hanging positions.
Click Build List to respecify items to include in the equipment summary.
When lighting devices in the drawing, hanging positions, inventory counts, or other factors have changed, click Refresh to update the equipment summary with the latest data.
