Creating spirals
|
Mode |
Tool |
Workspace: Tool set |
Shortcut |
|
Modes for The Symbol Insertion tool |
Spiral
|
Fundamentals, Architect, Spotlight: Basic Landmark: Add tool to workspace |
Alt+Shift+S (Windows) Option+Shift+S (Mac) |

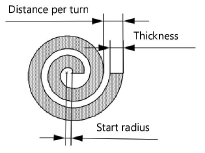
The Spiral tool draws an Archimedes spiral. The number of turns, distance per turn, start radius and thickness can be specified, as well as the number of points used to define the curve. Use the alignment modes on the Tool bar to temporarily override the insertion point. These modes change the alignment of the insertion point along the X axis of the bounding box surrounding the spiral.
For information on using the Offset Insertion and Wall Insertion modes, see Offset symbol insertion mode and Wall Insertion mode.
To draw a spiral:
Click the tool and modes.
Click Preferences to open the Spiral dialog box and set the tool’s default parameters. The parameters can be edited later from the Object Info palette.
Click to show/hide the parameters.Click to show/hide the parameters.
|
Parameter |
Description |
|
Distance per Turn |
Enter the distance between the outer edges of each turn in the spiral |
|
Number of Turns |
Specify the number of turns which determine the total sweep angle of the spiral; one turn equals 360 degrees |
|
Start Radius |
Enter the distance from the center to the beginning of the spiral |
|
Increment (deg) |
Specify the number of points used to define the curve; the higher the increment, the fewer the number of points (for example, an increment of 5 degrees means 360/5 = 72 points per turn) |
|
Thickness |
Specify the thickness value of the area between the outer and inner edge of the turn |
Click to place the object in the drawing, and click again to set the rotation.
To create a 3D spiral, see Creating helix-spirals.