 Inserting elevators
|
Tool |
Tool set |
|
Elevator
|
Building Shell |

The Elevator tool provides access to a variety of standard elevator types, including resources from manufacturers’ catalogs and your own elevator styles (see Concept: Plug-in object styles), in addition to individual objects created using the tool.
To insert an elevator:
Click the tool.
Do one of the following:
Click Elevator Style on the Tool bar to select a resource from the Resource Selector.
Click Preferences to open the object properties dialog box and specify the tool’s default parameters.
The parameters can be edited later from the Object Info palette.
Click to show/hide the parameters.Click to show/hide the parameters.
|
Parameter |
Description |
|
Flip |
If the object is in a wall, click to flip the object orientation |
|
Set Position |
If the object is in a wall, click to activate the Move by Points tool in Reference Point mode and move the object by a specified distance from a reference point |
|
Style |
Replace, remove, or edit the current style, or create a new plug-in object style for this object. Editing a style changes all instances in the file that use the style. |
|
Hide Style Parameters |
Hides the parameters that are set by style; these cannot be edited from the dialog box or Object Info palette |
|
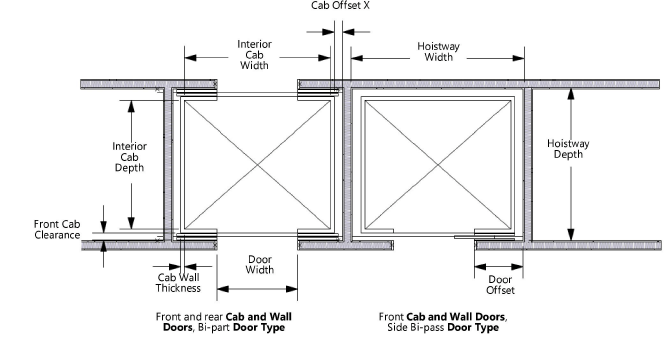
Hoistway Width/Depth |
Enter the hoistway width/depth |
|
Front/Rear Door |
Select the front and (if Show Rear Door is selected) rear door configuration |
|
Pick Wall for Rear Door |
If the Rear Door is set to Cab and Wall Doors, click to select the rear wall. In the drawing area, click the wall into which to insert the rear door; the elevator size automatically changes to fit. |
|
Update Rear Door Position |
If the wall associated with the rear door is moved, click to update the rear door position |
|
Door Offset |
Enter the door offset |
|
Door Type |
Select the door type |
|
Door Width/Height |
Enter the door width/height |
|
Cab Display |
Select whether to display the cab in 2D/3D views |
|
Internal Cab Width/Depth |
Enter the cab’s internal width/depth |
|
Cab Height |
Enter the cab height |
|
Cab Wall Thickness |
Enter the cab wall thickness |
|
Cab Offset X |
Enter the cab offset X |
|
Front Cab Clearance |
Enter the front cab clearance |
|
To control appearance and visibility for structural parts of the elevator, click to open the Classes dialog box. For each part, select a class from the list of classes present in the drawing, or create a new class. Select <Elevator Class> to place the part in the same class as the elevator object. Select Set Attributes by Class to control both the attributes and visibility by class. Deselect Set Attributes by Class to allow changes made in the Attributes palette to override the class attributes; only the visibility is controlled by class. |
Click on the drawing to place the object, and click again to set the rotation.
Optionally, create a style resource from the object (see Standard plug-in object styles with catalog options).