Modifying commands and tools in a workspace
|
Command |
Path |
|
Edit Current Workspace |
Tools > Workspaces |
In addition to managing the workspaces available in Vectorworks as described in Customizing workspaces, you can also edit the commands and tools available in each individual workspace. Workspace editing options include:
Add menus, tool palettes, tool sets, tools, and commands
Remove unused menus, tool palettes, tool sets, tools, and commands
Rearrange the order and the position of menus, tool sets, tools, and commands
Add, modify, delete, and print the keyboard shortcuts for tools and commands
Configure the context menus
Establish palette positions and settings to be used in the workspace
Specify tool set icons
You can also create customized plug-in tools, commands, and objects. See Using scripts.
The Vectorworks default workspaces in the application folder can't be modified. If you select a default workspace to edit, a copy of the workspace with the same name is saved to your user folder, and the copy is edited.
To edit the items available in a workspace:
Do one of the following:
Select the command.
Right-click on a menu in the main menu bar and select Customize to edit that menu in the workspace.
Select Customize from the Utility menu of a tool set, or right-click within a tool set and select Customize, to edit that tool set in the workspace.
Select Tools > Workspaces > Workspaces to open the Workspaces dialog box; select a workspace, and then click Edit.
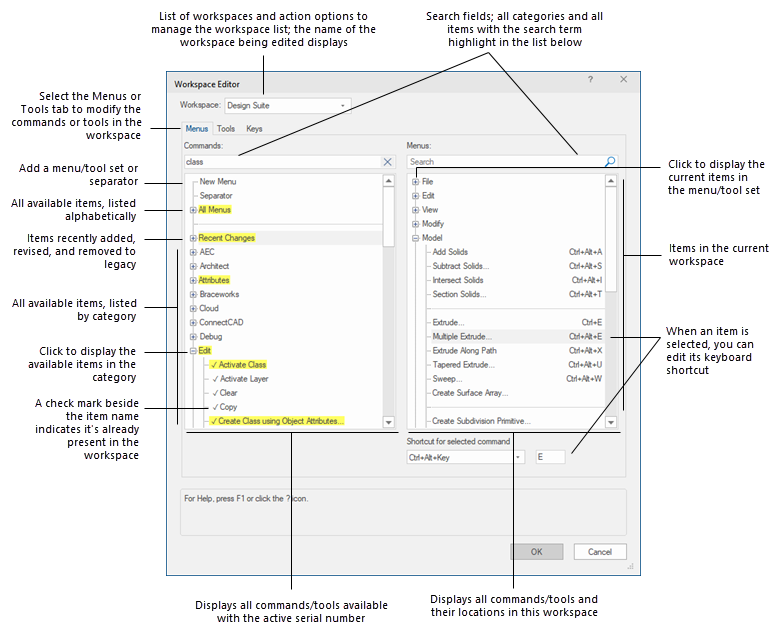
The Workspace Editor dialog box opens; if the dialog box was opened from a particular menu or a tool set, that section is expanded in the Menus or Palettes area on the right.
If you need to edit a different workspace, select it in the Workspace list; the workspace list is divided into sections based on where each workspace is saved.
You can edit multiple workspaces sequentially in the Workspace Editor dialog box. Each edited workspace is saved when you change to another workspace or click OK to close the dialog box.
Click the Menus tab, or the Tools tab, depending which part of the workspace you want to modify. The list on the left side of the dialog box contains all the commands/tools available with the current license. The list on the right side of the dialog box shows the organization of the commands and tools in the workspace currently being edited. The Menus tab is shown in this example, but the Tools tab offers the same functionality.
|
Modification |
Description |
|
Add a new menu or tool set/palette |
Click the New Menu or New Tool Palette or New Tool Set command from the Menus or Tools list and drag it to the desired position in the Menus or Palettes list. Alternatively right-click to copy and paste the command. For menus, the new item can be placed as a top-level menu, or if another menu is expanded, it can be placed as a submenu. Tool palettes contain tool sets, and tool sets contain tools; for example, the Basic palette contains the View/Draw tool set, which contains many of the basic editing and drawing tools. Tools can only be added to tool sets, not to tool palettes. Click to highlight the new menu or tool palette/set, and then click again to edit it; enter the name of the new item. |
|
Change a tool set icon |
The default icon for the tool set can be replaced by a custom icon, if desired. With a third-party icon editor, create icons for light and dark mode, in either .png or .svg format, as follows. Place all variants of the icon in the same folder. Standard-resolution: For both .png and .svg icons, create an image centered in an area 26 pixels wide by 20 pixels high. High-resolution: For .png icons only, also create an image centered in an area 52 pixels wide by 40 pixels high. Save the icon with the same name as the standard-resolution image with "@2x" appended to the end of the file name. For instance, if the standard-resolution icon is named 3DModelingToolSet.png, the high-resolution icon must be named 3DModelingToolSet@2x.png; otherwise the Vectorworks program will be unable to locate the icon. Dark mode: Create images as described above, but add "_dark" to the name (as in 3DModelingToolSet_dark.png and 3DModelingToolSet_dark@2x.png). Select the tool set and click Image to import the standard resolution icon; all variants in the folder are automatically imported. |
|
Add commands to a menu or tools to a tool set |
Click "+" (Windows) or triangle (Mac) to expand the list of commands/tools; enter a term in the search field to highlight all items (and their categories) that contain the term, to quickly locate the items needed. Click-drag one or more selected items from the Commands/Tools list to the desired position in the Menus/Palettes list. Alternatively right-click to copy and paste the selected items. You can also edit the Vectorworks context menus. A check mark beside an item in the Commands/Tools list indicates that item is already in the workspace being edited. If you drag a tool to a new position, you can drag it slightly to the right of the tool you are placing it under, and it will be placed in the workspace as a popout tool; see Pop-out tools. If you move an entire category together from the Commands/Tools list, and place it onto an expanded menu or tool set, the category is placed inside the menu or tool set. If you place an entire category onto the name of a collapsed menu or tool set, the category is added as a new menu or tool set under the one you placed it on. Commands and tools added to a workspace are still subject to licensure requirements. |
|
Add a separator (For menus/commands only) |
Click-drag the Separator command (Windows) or separator line (Mac) from the Commands list to the desired position in the Menus list; a separator line displays |
|
Move items |
Click-drag one or more items in the Menus/Palettes list to the desired position |
|
Delete items |
Select one or more item from the Menus/Palettes list and press the Delete key. If you delete an item that has other items stacked beneath it, all of the stacked items are deleted along with the main item; to prevent this, move the stacked items to another location first. A warning will display asking you to confirm deletion of an item if other items are stacked beneath it. Alternatively right-click to delete the selected items. |
|
Change a menu or tool set/palette name |
Select the item from the Menus/Palettes list and type the desired name; commands and tools cannot be renamed |
The Document Windows, Font, Tool Palettes, and Workspaces menu items are populated at run time. Therefore, they can only be placed as the last item in a list of submenu items.
If desired, assign or change a combination of keys to use as a shortcut to access a command or tool.
Assign or Modify: Select the item from the Menus/Palettes list; select a new shortcut key combination and/or enter a different key for the shortcut (if that key is reserved by the Vectorworks program or is already in use, a message displays).
Vectorworks remembers whether a numerical shortcut key is entered using the number key pad or the number row above the letters. A notation of "Num" indicates the number pad is used for the shortcut.
Delete: Select the item from the Menus/Palettes list, select the assigned shortcut key under the list, and press Delete.
Alternatively, Ctrl+right-click on a tool or command in the workspace itself to open the Change Shortcut dialog box and change the shortcut from there, without opening the Workspace Editor.
If a keyboard shortcut is already in use, when modifying a keyboard shortcut directly, or when adding a command or tool to a workspace where the default shortcut is already in use for a different item, the option to reassign the shortcut to the current item is presented. If the shortcut is reassigned, the original command no longer has a shortcut.
Common computer keyboard shortcuts such as Ctrl+C (Windows) or Cmd+Z (Mac) and operating system shortcuts cannot be overridden.
