Generating AI images
|
Command |
Path |
|
AI Visualizer |
Model Window > Palettes > Web Palettes |
Artificial intelligence can be a valuable tool when you want to quickly explore a variety of styles, colors, shapes, backgrounds, and obtain general inspiration during the design process. You can base the generated images on an existing Vectorworks drawing, trying out new looks more quickly than you could by changing the model's textures, lighting, and rendering settings. Alternatively, you can provide only a text prompt to generate a unique image that's not based on any existing drawing, allowing you to explore concepts quickly. With the AI visualizer, you can generate multiple images in minutes.
Once you have obtained an image, you could consider using it not just for design inspiration or client presentations, but also as the basis of a texture, image prop, plant image, image background, or to populate designs with people or items to add realistic touches. You can also inpaint an image to add details, modify, or remove details.
The AI Visualizer uses files and other data you provide only to generate the requested images; Vectorworks deletes your data after completing the operation and does not use it to train the AI model or for other purposes.
The AI visualizer quickly produces an image based on a Vectorworks file and/or text prompts, but it is not a substitute for creating a detailed rendering of a drawing with specified materials and so on.
The AI visualizer is processed on the Vectorworks Cloud, and is available only with a subscription or as a benefit of Vectorworks Service Select.
To generate AI images:
Select the command to open the web palette. The web palette can remain open while you work in Vectorworks, which allows you to change the Vectorworks images used as the source for image generation.
Control the appearance of the AI Visualizer by toggling to show or hide tool tips in the top right corner ( available on all panes), and by clicking disclosure arrows to show or hide groups of parameters. When a section is hidden, the icon in the section header indicates whether that section has content (a horizontal line displays on the icon when the section is empty
 ![]() .)
.)
The most recently generated image in the current session displays on the right side of the web palette.
On the Generate and Edit tabs, complete a series of image generation and editing operations.
On the Save tab, output the image in the needed format.
AI Visualizer: Generate tab
The Generate tab provides controls for defining the AI image, using a combination of text prompts, source images, and additional settings such as aspect ratio.
Click to show/hide the parameters.Click to show/hide the parameters.
|
Parameter |
Description |
|
Prompt |
Enter a description of the image to generate. The prompt should use natural language, but be precise and detailed for the best results. It can be lengthy, such as a paragraph. The description should refer to any image prompts provided, but the AI model does not understand references to them by number. Rather than "apply the pattern in image prompt 2 to the sofa in image 1," for example, you should say something like "apply the pattern to the sofa." The visualizer model should be able to identify which image provides a pattern and which has a sofa to use in generating the image. See below for prompt writing tips. |
|
Negative prompt |
Optionally enter a description in natural language of anything that should be omitted from the image. Sometimes AI adds a generic logo placeholder to the image; putting "logo" in this field may help eliminate that. If not, try editing the image to remove the logo. |
|
Image Prompt 1/2 |
You can optionally use one or two images from Vectorworks or an imported image file to provide context for the image generation; the source images display here. These image prompts can guide the composition of the generated image, so you can use a design created in Vectorworks as the basis for the image. They can also provide style elements such as specific textures or colors or a mood board, provide image props to be added to an image, and so on. The AI Visualizer works by detecting edges, colors, and textures if image prompts are used, to infer composition and materials. For example, an area of green near the bottom of the image is interpreted as grass. Image Prompt 1, when used, also sets the aspect ratio of the generated image. When no image prompt is used, an image is generated based on the text prompt and other settings. To use an image from a Vectorworks file, select a sheet layer viewport or bitmap, or set the desired view in a design layer (to be used for a screen shot) and click Refresh. To import an image, click Import and select the desired image file. The refreshed or imported image displays. To clear the image and generate from a text prompt only, click Clear. This option is used in combination with text prompts and the other settings to influence how the image is generated. A text prompt of at least one word is required. |
|
Generate similar |
Generates an image consistent with the current image, but reflecting changed settings like a different text prompt or style. Deselect this option to generate a different image. |
|
Enable seamless tiling |
Generates a seamless tiled pattern for use as wallpaper, image fills, textures, and so on. If this is selected, the text prompt should be a string of descriptive text, with a comma between each segment of the prompt, rather than a paragraph using natural language. |
|
Creativity |
Indicates how far the generated tiled pattern should deviate from the source image, or how conceptual a tile based only on a text prompt should be. Either click on the percentage number and enter a value, or drag to set the desired percentage. Higher values should produce more colorful and creative results. |
|
Aspect ratio |
When Image Prompt 1 has an image, the aspect ratio automatically matches the source image; otherwise, select the aspect ratio of the generated image |
|
Recall Settings |
When a bitmap object or viewport object previously generated by the Vectorworks AI Visualizer is selected in the drawing/viewport, click to change the prompts and aspect ratio to the ones that were used to generate the selected image; Generate similar is automatically selected. You can then select a different image prompt to generate from the recalled prompts (for example, apply the same recalled prompts to different viewports in a file), make small changes to the prompt or settings to adjust the new output, and so on. Composition, style, upsampling, and any editing applied to the source image cannot be recalled. The recallable metadata is attached to AI Visualizer-generated images saved to a PNG file or placed on the drawing/viewport as a bitmap. The prompts/settings can be shared with other users by sharing the generated images as .png files or as bitmap or viewport objects in a shared drawing. If the selected image has been recompressed as either a .png or a .jpg file, the metadata used to create it is discarded and can't be recalled. |
|
Generate |
Generates the image; a progress bar displays as the image is generated. Generating a new image discards the previous image; if you want to save an image for future reference, use one of the options on the Save tab before generating a new image. |
AI Visualizer: Edit tab
While the Generate tab creates a new image each time you click Generate, the Edit tab allows you to make detailed edits to an existing image. To edit an image, you can provide text instructions for what changes to make, provide an additional image prompt, draw a mask in the image area if you need to direct AI to change a very specific area, remove the background to create an image prop, and improve the details in the current image.
Above the image pane, there are two modes. You can conduct most editing operations in either mode, but to use image masking, select Draw Mask mode first. Use Compare mode to toggle between the previous image and current image, or drag the arrow scrubber to show part of both images.
Click to show/hide the parameters.Click to show/hide the parameters.
|
Parameter |
Description |
|
Undo/Redo |
Undo or redo the most recent edits |
|
Edit Instructions |
Enter a set of instructions in natural language for the AI model to use when editing the task. These should generally include verbs, such as add, move, zoom, change (such as the view or drawing style), or replace (such as a color, pattern or the seasonal setting), and so on. Prompts can also be semantic (what object needs to change) and can refer to locations in the image (where to make the change). Multiple instructions can be entered within a single paragraph, to be completed at once. |
|
Image |
Optionally add an image source from Vectorworks or an imported image file to provide information for the edit operation; the source image displays here. If you want to edit an existing image, you can import it here and edit it without first completing any steps on the Generate tab; the imported image serves as the current image. Otherwise, you can use the image to provide input such as specific materials and colors to be used in editing. To use an image from a Vectorworks file, select a sheet layer viewport or bitmap, or set the desired view in a design layer (to be used for a screen shot) and click Refresh. To import an image, click Import and select the desired image file. The refreshed or imported image displays. To clear the image and generate from a text prompt only, click Clear. This option is used in combination with text instructions and the other settings to influence how the image is edited. An instruction of at least one word is required. |
|
Masking controls |
Draw a mask on the existing image and make edits only within the specified area; see the section on editing AI images with masking, below, for more information.
Generally, the edit instructions can change objects in the image without needing a mask. If the instructions say "Add blue curtains to the window," the AI model can identify the window and carry out the instructions. However, in some cases, such as where there are repeated drawing elements, only some of which need to be edited (for example a curtain wall with different colored panels), the mask is useful to identify which specific objects to change. |
|
Brush size |
Sets the brush size for drawing a mask over the image or erasing a portion of a mask. Either click on the number and enter a value, or drag to set the desired brush size in pixels. |
|
Generate |
Generates the edits; a progress bar displays |
|
Improve Details Strength (%) |
Uses a different AI model for editing to show better details, especially for items farther in the background. Either click on the number and enter a value, or drag to set how aggressive the operation should be. A strength of 10-20% is recommended for enhancing a drawing; a higher number is more likely to add unwanted effects or otherwise diverge from the current image. |
|
Remove Background |
Removes the image background and replaces it with a transparent alpha channel. If a mask is used, this removes everything outside the mask. This is useful for creating image props, textures, and bitmap objects. |
 Draw Mask: Use the cursor/brush to draw a mask over part of the image.
 Erase Mask: Use the cursor/brush to erase portions of an existing mask.
 Loose Edit: Generally defines the area of the mask edits, but changes may occur outside the masked pixels. This mode is especially useful for cast reflections or shadows.
 Strict Edit: Strictly limits edit to only the pixels covered by the mask; use this mode only if such strict controls are necessary.
 Invert Mask: Inverts so the unmasked area becomes masked, and that area is edited.
AI Visualizer: Save tab
Use the Save tab to create the image output you need.
Click to show/hide parameters.Click to show/hide parameters.
|
Parameter |
Description |
|
Upscale 4X |
Increases the current image's dimensions by 4x |
|
Output |
Select the output type: Copy to clipboard copies the current image to the clipboard Create background creates a Renderworks background resource; see Creating Renderworks backgrounds Create bitmap object creates a bitmap of the current image and places it on the active layer in the Vectorworks file. The bitmap can be used as the source to generate a new image. Create image fill creates an image fill resource; see Defining and editing image resources Create image prop creates an image prop object; see Creating image prop objects Create texture creates a Renderworks texture; see Creating a new texture Replace object image replaces the original source image in the Vectorworks file with the generated image, if the current image was generated based on a selected sheet layer viewport or bitmap object. For a sheet layer viewport, the image inside the viewport is replaced, for example when you are using the generated image as part of a presentation board. However, the viewport's settings remain unchanged; update the viewport to return to the original image. Save to file saves a .png file of the current image to the location you select |
|
Export |
Exports the selected output; for output types with settings, the appropriate dialog box opens |
Edit an AI image with image masking
Use image masking to confine the edit operations to specific area. For most editing, masking is not needed, because the AI model can understand locations and directions within the model. The masking controls are useful primarily to change the material or texture of a specific portion of a drawing.
To edit an AI image with image masking:
With an existing image to edit, click Draw Mask on the Edit tab of the AI Visualizer in Draw Mask mode.
Enter the Edit Instructions, telling the AI Visualizer whether it is adding, modifying, or removing objects under the mask, and detailing the changes.
If an image is needed to guide the edits, such as if a particular fabric swatch should be used, add the image.
Click the Draw Mask mode and set the Brush Size needed.
Use the cursor to draw a mask on the image of roughly the size and shape needed for the object being edited; an area of white pixels is drawn.
Use the additional mask modes to refine the masked area:
If the mask is too large or needs to be refined, click Erase Mask, adjust the brush size, and use the cursor to selectively erase part of the mask.
Select whether the edits should be loosely in the area of the mask or strictly limited to the masked pixels.
Optionally invert the mask, to make the edits everywhere except the masked area.
Clear the mask entirely to start over.
Click Generate.
An uploaded Image provides the new fabric swatch to use, and the Edit Instructions tell the AI to "change the pillow to match the fabric swatch pattern"; the mask shows which pillow to change, and Loose Edit mode allows the AI Visualizer to select which pixels to edit
Tips for writing a good prompt
Use clear and precise natural language, and include specific details for the best results. While the text prompt on the Generate tab should include a description of the image, the prompt on the Edit tab should be phrased as instructions, telling the AI model what actions to take. The prompts can be long and include a full paragraph of information, including multiple changes to complete at once when editing the image. In addition to the tips below, visit the AI Visualizer topic on the Vectorworks Forum for a dynamic discussion of this evolving technology.
The prompts may include information such as:
Image style: watercolor, pencil sketch, realistic, crayon, photographic
Style of the objects in the image: modern, Mayan, brutalist, art deco, or even the name of a well-known designer whose style you want to explore
Type of project: interior, exterior, art gallery, coffee shop, park, apartment tower
Colors and materials: red metal, vertical wood siding, glass, sandstone pavers, brick
Setting or location: meadow, urban, beach, forest, the moon
Season, weather, time of day: autumn, summer, sunny, fog, night, golden hour
Lighting conditions: indirect amber lighting, dappled, light coming through a window
Style of furniture, plants, and other things that populate the scene: contemporary curved sofa, palm trees, Mission style dining room table
While the prompt should be clear and specific, avoid naming specific brands or other items the AI engine may not know; instead describe the object in detail.
Word order matters; by default, the AI engine gives more weight to text earlier in the prompt.
These same tips apply for editing instructions, as long as they are phrased as an action, such as "change" the image style, "add" a vase of flowers, or "replace" the color of a throw pillow.
And many more; this list is not exhaustive. AI may be useful for generating prompts.
Start with a simple prompt, and test it with a few generations of the image, to get an understanding of how the AI interprets the prompt.
Once you understand what kinds of results the current prompt generates, add more details or change some of the existing text to steer AI in the direction needed. Test multiple times each time you revise the prompt, to understand how the updated prompt has changed the outcome.
Usage examples
Using a Vectorworks image
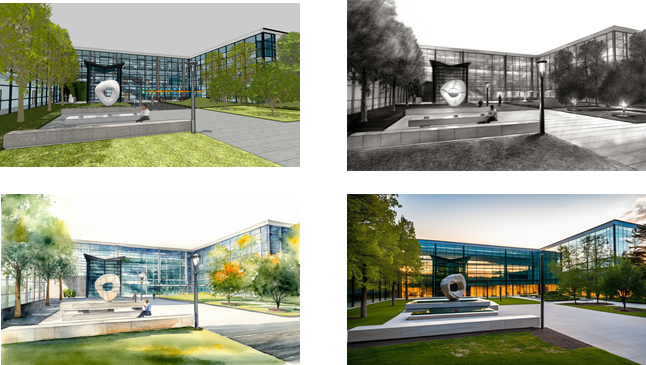
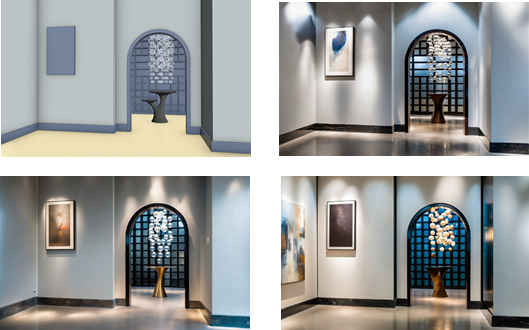
You can use a Vectorworks design layer view, or a selected bitmap object or sheet layer viewport within the Vectorworks file as the source when you generate using a Vectorworks image. Changing the prompt and other settings yields a wide range of results, all based on the original design. In each of the image sets below, the original Vectorworks image in the top left was used to generate additional looks just by changing the text prompt. This can be done when generating or editing an image.
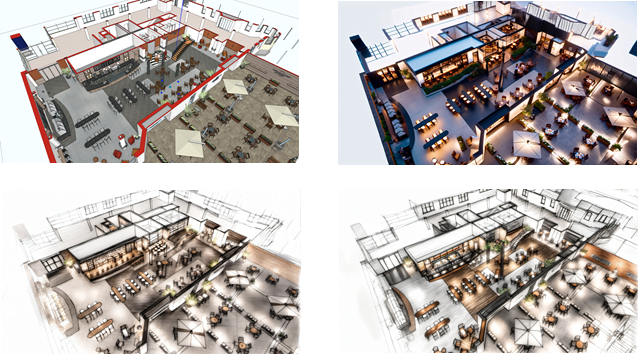
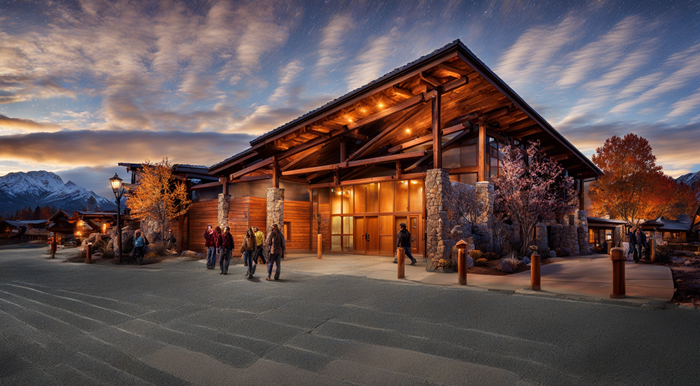
Use the AI Visualizer to provide context and life for Vectorworks drawings. More detailed and lengthy instructions, including to preserve the existing design as it is, while adding elements, gain better results.
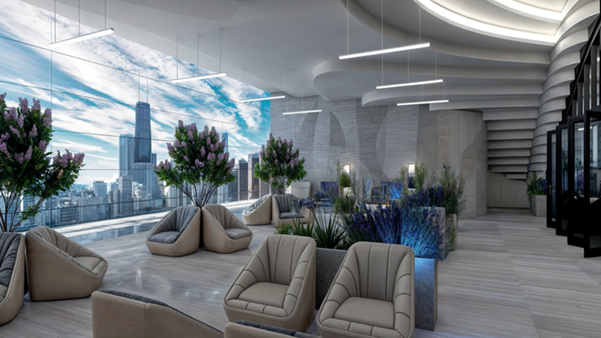
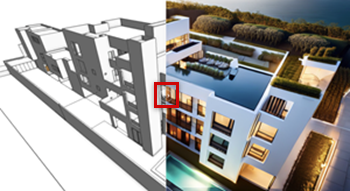
Provide a reference image, of a cityscape in this case, and instructions for how to use the image as the exterior view out the window. You should include specific instructions for both the Vectorworks drawing (to preserve interior elements exactly as they are) and for the exterior view (as to scale, perspective, lighting, and so on) to get the desired results.
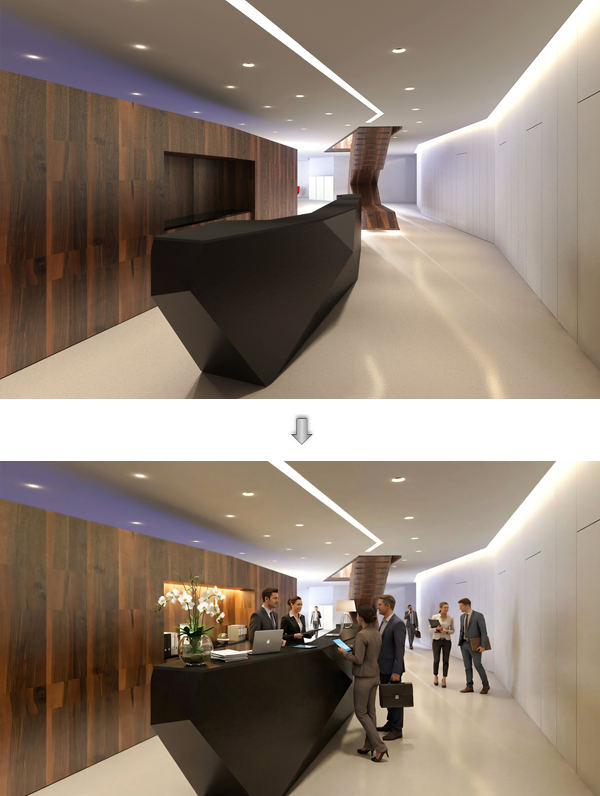
Instruct AI Visualizer to add people to the space. Detailed instructions should include preservation of the architecture, lighting, and furniture as it is, and also describe details about the people, such as whether they should be in casual or business attire, behind and/or in front of the counter, walking through the space, chatting in small groups, and so on.
By changing the text prompt, you can turn abstract shapes in a Vectorworks file into completely different objects.
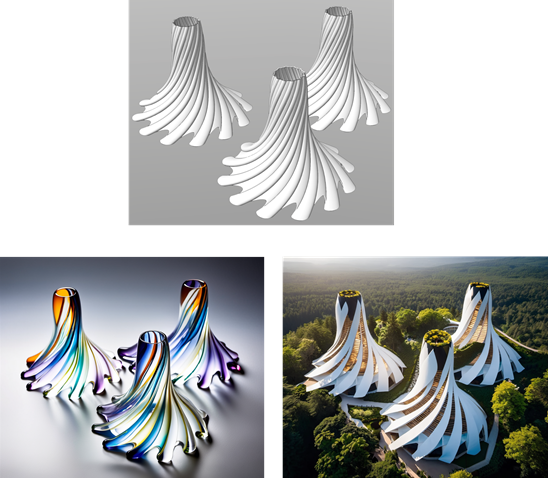
These abstract twisted shapes can be the inspiration for glass vases or for buildings, depending on the text prompt you provide
Text prompt only
Generating images from a text prompt only can provide general design inspiration at the beginning of a project. A simple prompt generates basic images to start the process.
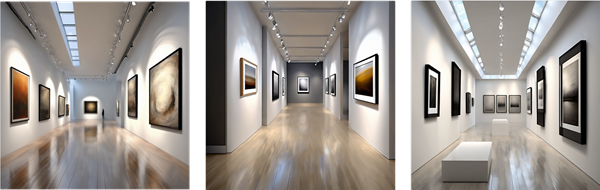
The prompt was "realistic, modern, gallery interior"
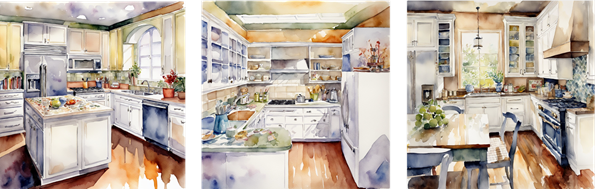
The prompt was "watercolor, kitchen, white cabinets"
More detailed prompts can lead to more elaborate results. Adjust the prompt between generations to help shape the output.
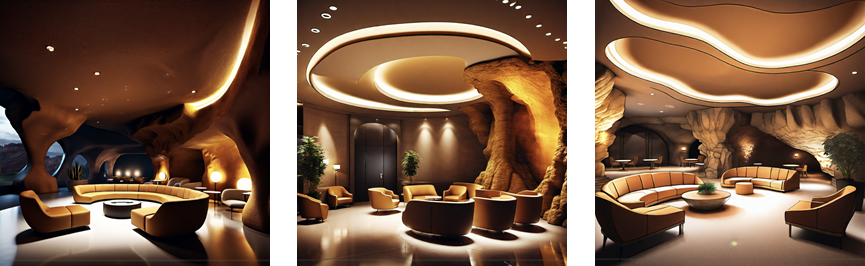
The detailed prompts that generated these images were more than 30 words each. The description of the ceiling was changed between images, from "in the shape of a cave" for the first image to "in the shape of a cave, stepped with indirect lights" for the others
Style
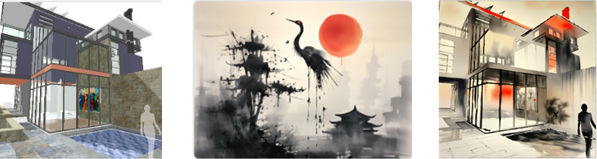
These two image prompts - a Vectorworks drawing and a painting - were used to create the image on the right.
Inpainting
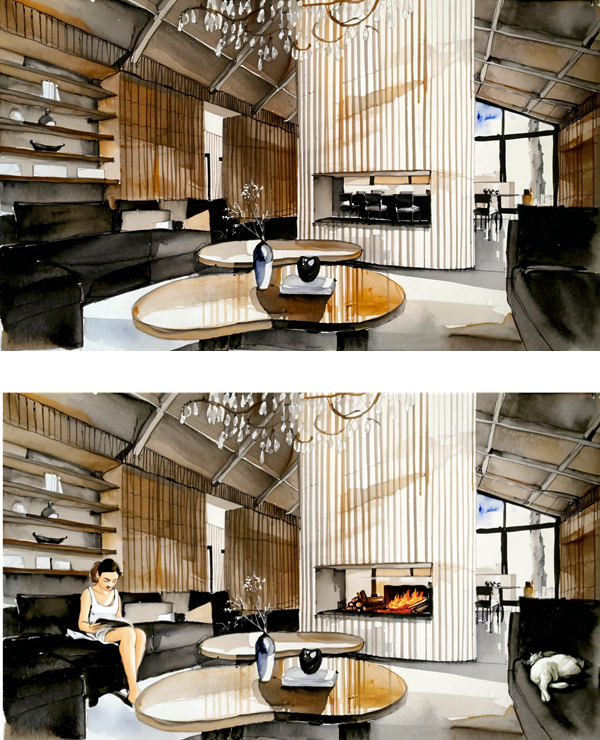
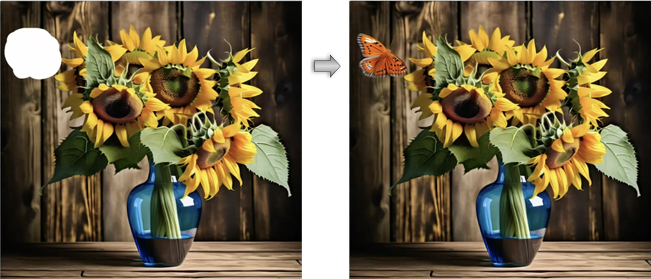
An Edit Instructions text prompt can be used to add details such as the woman and napping cat on the sofas, and the fire in the fireplace. A drawing mask could be used to edit very specific areas of the drawing but isn't needed for most edits.
Improve details
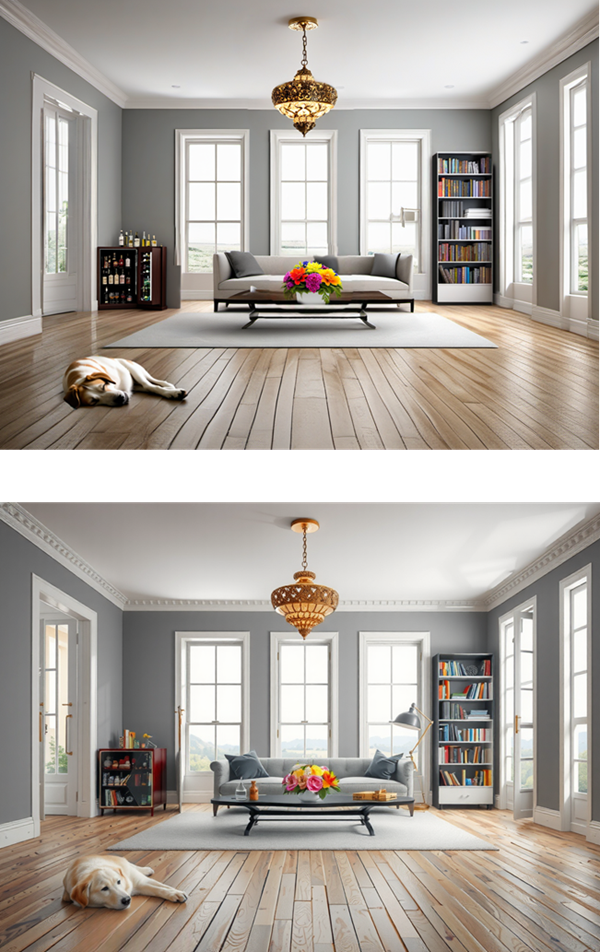
Improving the details refines both the original image and the inpainted objects such as the dog, flowers, and book case
Notice
To use the AI Visualizer you must agree not to use the Model or Derivatives of the Model:
In any way that violates any applicable national, federal, state, local or international law or regulation;
For the purpose of exploiting, harming or attempting to exploit or harm minors in any way;
To generate or disseminate verifiably false information and/or content with the purpose of harming others;
To generate or disseminate personal identifiable information that can be used to harm an individual;
To defame, disparage or otherwise harass others;
For fully automated decision making that adversely impacts an individual’s legal rights or otherwise creates or modifies a binding, enforceable obligation;
For any use intended to or which has the effect of discriminating against or harming individuals or groups based on online or offline social behavior or known or predicted personal or personality characteristics;
To exploit any of the vulnerabilities of a specific group of persons based on their age, social, physical or mental characteristics, in order to materially distort the behavior of a person pertaining to that group in a manner that causes or is likely to cause that person or another person physical or psychological harm;
For any use intended to or which has the effect of discriminating against individuals or groups based on legally protected characteristics or categories;
To provide medical advice and medical results interpretation;
To generate or disseminate information for the purpose to be used for administration of justice, law enforcement, immigration or asylum processes, such as predicting an individual will commit fraud/crime commitment (e.g. by text profiling, drawing causal relationships between assertions made in documents, indiscriminate and arbitrarily-targeted use).
Additional license information for Stable Diffusion can be found here: https://github.com/Stability-AI/generative-models/blob/main/model_licenses/LICENSE-SDXL1.0