 Creating Space LabelsCreating Space Labels
If none of the available space labels are suitable, create a new label.
To create a new space label:
From the Space Planning tool set or the Building Shell tool set, select the Space tool.
From the Tool bar, click Preferences to open the Space Settings dialog box.
Select the desired space label pane, and click Manage Space Labels. The Manage Space Labels dialog box opens.
Item |
Description |
|
Symbols list |
The left side of the dialog box displays a list of all space label symbols currently available, along with the current status of each: ● “Default” symbols are those available from default content, but not yet used in the drawing; once a default space label symbol is used, it is imported into the drawing file’s resources and the status becomes Specified. Default symbols cannot be renamed or deleted. ● “Specified” symbols are currently used in the drawing. ● “Unspecified” symbols are currently in the drawing file’s resources, but not yet used or saved as a default. |
|
Symbol preview |
The top right side of the dialog box displays a preview of the selected symbol; if a label field has not been defined yet, a red “Not specified” message displays on the image |
|
New Text Tag |
Opens the New Text Tag dialog box, to create a new space symbol; proceed with step 4
|
|
New Symbol Tag |
Opens the New Symbol Tag dialog box, to designate a symbol in the current document as a space symbol. |
|
Opens the Rename Label dialog box; enter a new name for the symbol and click OK. If the selected symbol has a “Default” status, a message displays that it cannot be renamed. |
|
|
Opens the Duplicate Label Symbol dialog box; enter a name for the duplicate symbol and click OK. |
|
|
Opens the Delete Space Label dialog box. Specify whether to delete the space symbol from the symbol library entirely, or to keep the symbol, but remove the space label definition from it (this removes the label from the list of current space label choices). Click OK to delete the label. If the selected symbol has a “Default” status, a message displays that it cannot be deleted. |
Click New Text Tag; the New Text Tag dialog box opens to the Data Fields tab.
All available data fields for spaces display in the list on the left. Select the fields to be used in the symbol, and click Add (or click Add All) to move them to the list on the right. To remove fields from the symbol list, select them and click Remove (or click Remove All). Alternatively, double-click a field name to move it from one list to the other.
In the list of selected symbol fields on the right, each field is assigned a sequential number, which corresponds to a variable in the symbol layout (for example, #2#). To change a field’s number, click its number column, and drag the field up or down to the desired location on the list.
Select the Attributes tab to specify how all fields in the symbol will display.
Item |
Description |
|
Font |
Select a font for the field text from the list of fonts available on the system |
|
Size |
Select a font size from the list of standard sizes available in points. To enter a custom point size, or to enter a size in different units, select Set Size to open the Set Text Size dialog box. Enter a Size, and then select the appropriate Unit: Points, Page Millimeters, or Page Inches. |
|
Style |
Select a style for the field text from the list of styles available. On Mac, select Custom Style to open the Custom Style dialog box, to specify a different combination of styles. |
|
Alignment |
Select a type of alignment for the field text: Left, Center, Right, or Standard (justify) |
|
Fill |
Select a fill for the background of the field text objects: None, Pattern, or Solid. Alternatively, to assign the fill by text object class, select Class Style. |
|
Color |
If a Solid fill is selected, select the fill color |
|
Pattern/Fore/Back |
If a Pattern fill is selected, select the Pattern, and the foreground and background colors |
|
Text Color |
Select a color for the field text |
Click OK to save the changes and return to the Manage Space Labels dialog box. Click OK again to return to the applicable space label pane.
Complete the definition of the label.
To save the label to your template, select the Save as Default option.
To change the appearance of the label (for example, to rearrange the data fields or to add graphic elements), click Edit Layout to open the symbol editing window.
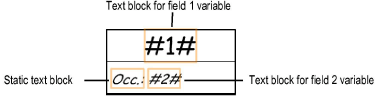
The symbol is a group object, in which each defined field is a text block that contains text in the following format: #(natural number)#. You may ungroup the blocks and move them or change their attributes, but do not change the contents of the text blocks.
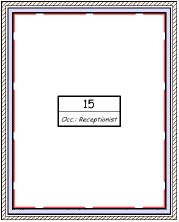
In the following example, the top part of the symbol is a center-aligned text block that contains a variable for field 1; the Space Number will be assigned to this field. The bottom part of the label has a text block that contains a variable for field 2; the Occupant Name field will be assigned to this field. Another text block was added, which serves as a label for the occupant name. A rectangle and a line were also added to enhance the label.
When the edits are complete, click Exit Symbol. The new label is now available to assign to spaces for this document.
~~~~~~~~~~~~~~~~~~~~~~~~~
![]()