Editing Worksheets
The contents of cells can be edited, and the rows and columns can be resized, cut, copied, pasted, added, and moved.
Moving Around in Worksheets
The following table describes the keys used to move around in the worksheet.
Keys
|
Description
|
|
Arrow (Up, Down, Right, Left)
|
Moves by one cell in the direction indicated
|
|
Tab
|
Moves right by one cell
|
|
Enter
|
Moves down by one cell
|
|
Shift+Tab
|
Moves left by one cell
|
|
Shift+Enter
|
Moves up by one cell
|
If more than one cell is selected, movement is restricted to the selected cells only.
Selecting Cells
Selected cells are surrounded with a black outline. When multiple cells are selected, the active cell is white, and the remaining selected cells are highlighted in blue.
Selection
|
Action
|
|
A single cell
|
Click the cell
|
|
A range of cells
|
Click-drag across a range of cells to select them, or click in one corner and Shift-click in the opposite corner
|
|
An entire column or row
|
Click the column letter or row number; to select multiple rows or columns, click-drag across the column letters or row numbers, or click the first column letter or row number, and then Shift-click the last column letter or row number in the desired range
|
|
Non-contiguous cells, rows, or columns
|
Press and hold the Ctrl (Windows) or Command (Mac) key and then click each cell, row, or column to select
|
|
The entire worksheet
|
Click the upper left corner of the worksheet (above the first row number)
|
Editing Cell Contents
When a cell is selected, the display of the Formula bar indicates whether the contents of the cell can be edited.
Only one cell can be edited at a time; if you select multiple cells, only the first cell in the selection is changed.
Formula Bar Display
|
Explanation
|
|

The cell address displays, and the red X and green check mark are active
|
The cell is in a spreadsheet row or database header row.
Edit the text, numbers, or formula from the Formula bar, or double-click the cell and edit the contents directly.
To accept the edits, do one of the following:
● Click the green check mark
● Select another cell
● Press Tab
● Press Enter (Windows) or Return (Mac)
To cancel the edits, press Esc or click the red X.
|
|

No cell address displays; the current cell value is not editable
|
In database sub-rows, the results of calculations cannot be edited. In addition, object attribute information, such as the class the object belongs to, cannot be edited in the worksheet.
|
|

No cell address displays, and the red X and green check mark are active
(Vectorworks Design Series required)
|
In database sub-rows, if Vectorworks Design Series products are installed, information that comes from the object’s data record can be edited in the worksheet, and the object’s record is updated automatically. For example, the price data for a sub-row object could be updated.
Edit the data from the Formula bar, or double-click the cell and edit the data directly.
To accept the edits and change both the worksheet and record, do one of the following:
● Click the green check mark
● Select another cell
● Press Tab
● Press Enter (Windows) or Return (Mac)
To cancel the edits, press Esc or click the red X.
|
|
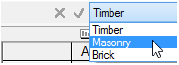
No cell address displays; a list of the values that are available for the current cell displays
(Vectorworks Design Series required)
|
In database sub-rows, if Vectorworks Design Series products are installed, some fields that come from the object’s data record can be edited, but they only allow certain pre-defined values. For example, the sill style for a window sub-row object could be changed.
From either the Formula bar or the cell, select the new value from the list to change both the worksheet and record.
|
|

Neither a cell address nor a cell value displays
|
In database sub-rows, if the Vectorworks Architect or Vectorworks Landmark product is not installed, information that comes from the object’s data record cannot be edited in the worksheet. To edit a value that displays in a sub-row, right-click (Windows) or Ctrl-click (Mac) the number of the row that is associated with the item in the drawing, and select the Select Item command from the context menu. Then use the Data tab of the Object Info palette to edit the object data.
|
Resizing Rows and Columns
To adjust column width or row height, drag the divider bar between the column letters or row numbers. If you select multiple rows or columns before you drag the bar, all rows or columns are adjusted to the same size.
Alternatively, select the Column Width command from either the Format menu or the column context menu (see Column Width). Adjust the row height with the Row Height command from either the Format menu or the row context menu (see Row Height).
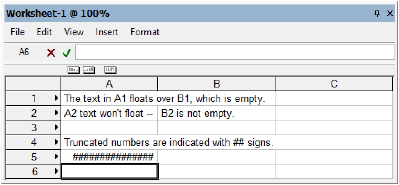
Text that is longer than the width of a cell “floats” over empty adjacent cells. Numbers that exceed the cell width are displayed with # characters. Alternatively, text can be set to wrap (see Formatting Worksheet Cells).
To hide a row or column, set the Column Width or Row Height to 0. To display the column or row again, position the cursor over the column letter or row number adjacent to the hidden column or row. When the cursor changes to a double bar resize cursor, click-drag the bar to resize the column or row.
Cutting, Copying, and Pasting Cell Contents
The standard shortcut keys for Cut and Paste can be used for worksheet editing. The same value or formula can be copied and pasted to a range of cells.
To copy cell contents to a cell or range of cells:
-
Select the cell with the information to repeat, and then press Ctrl+C (Windows) or Command+C (Mac) to copy the cell.
Alternatively, select the Copy command from either the Edit menu or the appropriate context menu (see Copy).
-
Select the destination cell for the information, and then press Ctrl+V (Windows) or Command+V (Mac) to paste. The formula or value is repeated in each of the selected cells.
Alternatively, select the Paste command from either the Edit menu or the appropriate context menu (see Paste).
Adding Rows and Columns
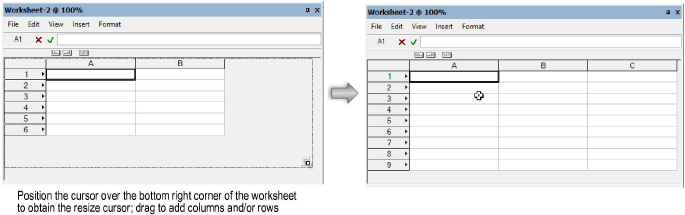
From the Insert menu, you can insert rows and columns (see Worksheet Commands). An empty row is added above the current row, or an empty column is added to the left of the current column. Another option is to position the cursor at the bottom right corner of the worksheet to activate a special resize cursor; drag to add rows and columns to the bottom and right side of the worksheet.
Moving Rows and Columns
Use the drag and drop method to move contiguous rows and columns or to move a copy of contiguous rows and columns.
To move a copy of rows or columns:
-
Click the column letter or row number to select a column or row (click-drag across the letters or numbers to select multiple columns or rows).
-
Press and hold Ctrl (Windows) or Option (Mac) and move the cursor to the edge of the selected rows or columns. When the cursor changes to a copy cursor to indicate that moving a copy is permitted, drag the selection to the desired location in the worksheet.
To move rows or columns:
-
Click the column letter or row number to select a column or row (click-drag across the letters or numbers to select multiple columns or rows).
-
Move the cursor to the edge of the selected rows or columns. When the cursor changes to a move cursor to indicate that moving the rows or columns is permitted, drag the selection to the desired location in the worksheet.
~~~~~~~~~~~~~~~~~~~~~~~~~
Editing Record Information with Worksheets

vectorworks.net