 Inserting Images in WorksheetsInserting Images in Worksheets
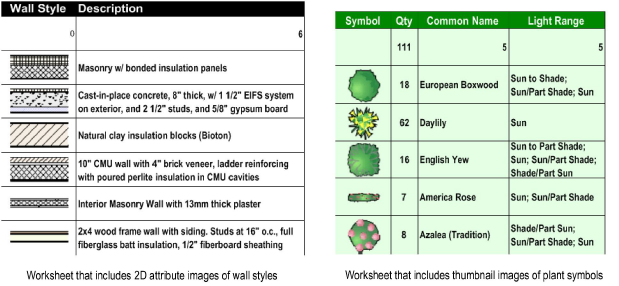
If Vectorworks Design Series is installed, images can be added to worksheets to provide graphic views of the objects in a drawing. The images can be either thumbnail versions of objects, or samples of the 2D attributes of objects. For example, you might create a window schedule that shows top and front thumbnail views of each type of window in your drawing, in addition to data about each window.
Worksheets can have two types of rows: spreadsheet and database. The cells in a spreadsheet row contain constants (text or numbers), or formulas. Database rows consist of a header row and sub-rows, and they show data that are associated with specific drawing objects. Images can be inserted in either type of row.
To insert an image in a cell, use the image function, which works the same as other standard worksheet functions; see Entering Formulas in Worksheet Cells.
Like other functions, you can enter an image function manually on the Formula bar, or use commands and dialog boxes to build a formula that uses the image function.
A cell that uses the image function in a formula can include either a text expression or an image, but not both.
To manually enter an image formula:
Select the cell.
Enter the image function (=IMAGE). The entry automatically displays in the worksheet Formula bar. If the cell is in a database header row, no further entry is required.
If the cell is in a spreadsheet row, enter the rest of the formula to specify which object to display. For example, to display an image of the symbol called K-02221, enter this:
=IMAGE(S='K-02221')
When the formula is complete, click the green check mark to validate the entry. To cancel an entry, click the red X.
The formula executes, and the image displays (Auto-recalc must be selected in the worksheet preferences).
Customize the image display as described in Entering Data in Spreadsheet Cells.
To enter a formula with the Image Function and Criteria commands:
Select the cell.
Select Insert > Image Function from the Worksheet menu.
The image function is placed in the worksheet Formula bar and the cursor is placed between the parentheses, awaiting an argument. If the cell is in a database header row, no further entry is required.
If the cell is in a spreadsheet row, enter criteria to specify which drawing object to display. Select Insert > Criteria from the Worksheet menu.
If an object is selected when the Criteria command is selected, the Paste Attributes dialog box opens. Otherwise, proceed to step 5.
Do one of the following:
● To use attributes of the selected object as the only selection criteria, select the attributes and click OK.
● To specify other criteria, or to use attributes of other objects in the drawing, click Custom.
The Criteria dialog box opens. For each set of criteria, select the choices that apply. Click More Choices to specify additional criteria sets. Click Fewer Choices to remove added criteria sets. Click OK to add the criteria to the function argument.
When the formula is complete, click the green check mark to validate the entry. To cancel the entry, click the red X.
The formula executes, and the image displays (Auto-recalc must be selected in the worksheet preferences).
Customize the image display as described in Entering Data in Spreadsheet Cells.
Click here for a video tip about this topic (Internet access required).
![]()