 Creating a Basic Seating
LayoutCreating a Basic Seating
Layout
Creating a Basic Seating
LayoutCreating a Basic Seating
LayoutThe Create Seating Layout command creates a seating layout object from one or more selected polygons, rectangles, rounded rectangles, ovals, arcs/circles, or polylines. Seating can consist of chairs, tables, or tables and chairs. Seating fills the objects in a user-defined arrangement with a “look-to” location defined by a control point. Seating layout objects can also be created by drawing a polyline and then selecting the Create Objects from Shapes command (see Creating Objects from Shapes). Along with the seating layout, a Seating Count worksheet is created.
The seating layout object is meant to provide a quick, preliminary seating plan. Vectorworks Spotlight users can use the Create Seating Section command to create a more detailed seating layout appropriate for final designs in professional event venues (see Creating Seating Sections). Seating layouts can be converted into seating sections for additional detailing by using the Create Seating Section command.
To create a basic seating layout object:
Create the shape defining the boundary of the seating area. Objects with one or more holes can be selected; seating will not be placed where a hole exists. Multiple shapes can be selected at one time (to create several seating sections, for example).
With the object selected, select the Create Seating Layout command from the appropriate menu:
● Architect workspace: AEC > Create Seating Layout
● Spotlight workspace: Spotlight > Architectural > Create Seating Layout
The Create Seating Layout dialog box opens.
A seating layout can also be created by clicking the Seating Layout tool from the Furn/Fixtures tool set. Draw a polygon with the tool and complete the parameters, which are identical to those described in Editing the Basic Seating Layout.
Click to show/hide the parameters.
A default symbol can be created to represent the seating; select Create a new seat symbol called and provide a symbol name. Alternatively, select an appropriate seating symbol from a library or the current file. In addition to seat symbols, table symbols and table and chair symbols can be used.
See Using Resources in Your Drawing for information on importing symbols.
Click OK to close the Create Seating Layout dialog box.
When prompted, click the focal point for the seating. All seats will face this point; table and chair symbols orient towards the point.
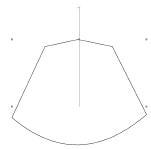
For concentric seat layouts, the distance of the seat focal point from the object determines the radius of the concentric layout. Click close to the object for a smaller radius.
The seating layout object and a Seating Count worksheet are created, with automatically calculated seat and table counts.
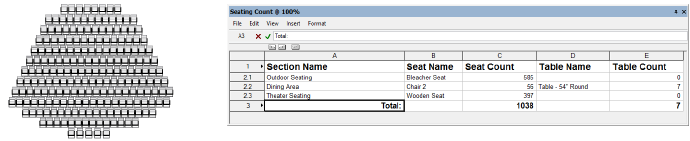
The Seating Count worksheet displays the number of seats and/or tables required for each seating layout section, as well as the total number of seats/tables needed for all sections. Nested symbols are counted in the worksheet, so tables and chairs are counted separately within a table and chair symbol. (If a symbol cannot be identified as a table or chair, it is counted as a chair.)
This worksheet functions only with a seating layout object. If you convert the seating layout to a seating section, the worksheet does not update.
~~~~~~~~~~~~~~~~~~~~~~~~~
![]()