Custom libraries are simply Vectorworks files that contain specific resources to make it faster and easier to access the resources while drawing in the Vectorworks program. Libraries do not increase the size of the current file or consume significant amounts of memory.
After you create a resource library file and place it in the appropriate location, the resources are available from the Resource Manager and Resource Selector. Alternatively, place the library file in the Defaults folder to display resources as custom default content in the Vectorworks program.
To create a resource library file:
Select File > New.
Import or create the resources to be included in the library.
Select File > Save.
The Save Vectorworks Drawing dialog box opens.
Select the location for saving the file.
Enter a name for the file in the Name field.
Click Save.
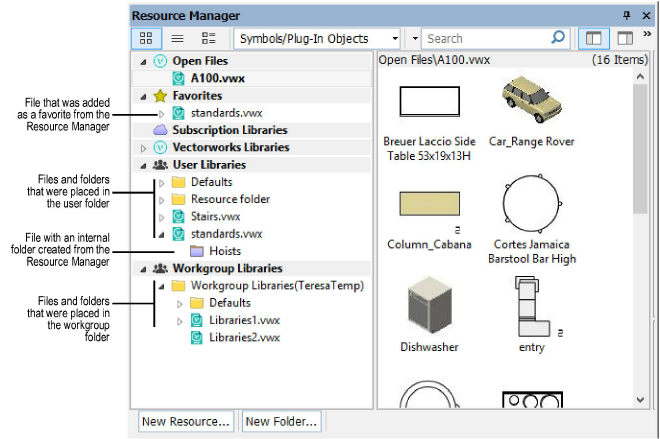
Place the library file in the appropriate location, depending on how you want to access it. If you have several files, create multiple folders to organize them. The Resource Manager also allows you to create internal folders to organize the resources within a given file.
Access Method |
File Location |
Reference |
|
Favorites group in the Resource Manager and Resource Selector |
● Option 1: The file location does not matter. From the Resource Manager, right-click (Windows) or Ctrl-click (Mac) on the file and select Add Selected File to Favorites from the context menu. ● Option 2: Favorites folder in your user folder: [User]\Libraries\Favorites\[folder name] |
|
|
User Libraries group in the Resource Manager and Resource Selector |
Libraries folder in your user folder: [User]\Libraries\[folder name] |
|
|
Workgroup Libraries group in the Resource Manager and Resource Selector |
Libraries folder in a network folder designated as your workgroup folder (Vectorworks Design Series required): [Workgroup]\Libraries\[folder name] |
|
|
Anywhere that lists of default content resources are available, such as the Text Style list on the Text tool’s Tool bar |
Defaults folder in your user folder, or in a network folder designated as your workgroup folder (Vectorworks Design Series required): [User]\Libraries\Defaults\[standard folder name] [Workgroup]\Libraries\Defaults\[standard folder name] |
Default content resources are available in various locations in the Vectorworks application, such as the Text Style list on the Tool bar for the Text tool. You can customize the default content available by creating resource libraries and placing them in a Defaults folder in your user folder, or in a shared workgroup folder.
Do not modify the files in the Defaults folder in the Vectorworks Libraries folder, because your changes can be lost when you update the Vectorworks application.
The location of your custom content files depends on who needs access to the content. The folder structure must be the same as that of the Vectorworks default content, and if a subfolder exists, the file must be placed in a subfolder. For example, Vectorworks default text styles are in a file in the Vectorworks application folder: [Vectorworks]\Libraries\Defaults\Text Styles. To make your library of custom text styles available in Vectorworks, place a file that contains the text styles in either your user folder or a workgroup folder.
● To create default content for yourself only, put the file in the appropriate subfolder within [User]\Libraries\Defaults (where [User] is the user data folder specified in your Vectorworks preferences). For example, place a text styles file in [User]\Libraries\Defaults\Text Styles. See Vectorworks Preferences: User Folders Tab for more information.
● If Vectorworks Design Series products are installed, you can create default content that is project-specific, or that is shared with a workgroup. To do so, put the file on the network in the appropriate subfolder within [Workgroup]\Libraries\Defaults (where [Workgroup] is a workgroup folder specified in your Vectorworks preferences). For example, place a text styles file in [Workgroup]\Libraries\Defaults\Text Styles). When coworkers set up this workgroup folder in their preferences, they also have access to the default content. See Sharing Custom Files with a Workgroup for more information.
The name of the custom library file also affects resource availability in the Vectorworks program. For example:
● To totally supersede the Vectorworks default text styles, use the same name as the text style file in the Vectorworks application folder (“Text Styles.vwx”).
● To make your custom default text styles available along with the Vectorworks default text styles, use a unique name, such as “Custom_Text_Styles.vwx.”
If a file name is repeated in any of the folders, only the content from one file is shown, according to the following precedence: user folder, workgroup folder, application folder. For example, if the following files exist, only text styles from the file in the user folder show in the Text Style list on the Text tool’s Tool bar.
● [User]\Libraries\Defaults\Text Styles\Text Styles.vwx
● [Workgroup]\Libraries\Defaults\Text Styles\Text Styles.vwx
● [Vectorworks]\Libraries\Defaults\Text Styles\Text Styles.vwx
If a custom library file contains multiple types of content, the program only displays the content type for the folder that contains the custom file (or an alias or shortcut to the file). For example, if a file contains both text styles and space tag symbols, and the file is in the Libraries\Defaults\Space\Space - Stamp folder, only the space tag symbols are displayed as defaults in the Vectorworks program.
~~~~~~~~~~~~~~~~~~~~~~~~~
![]()