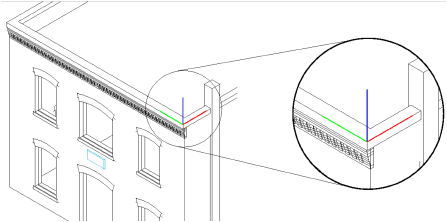
The Camera Match reference provides Camera Match with the model’s orientation in 3D space. It is positioned on the model to define the planes where the vanishing lines lie. The three color-coded axes define the following vanishing points:
● Green: Left vanishing point
● Red: Right vanishing point
● Blue: Vertical vanishing point
The Camera Match reference also establishes a 3D point that can be located in the photo (an existing point at a known height).
Typically, the Camera Match reference should be located at a corner of an object and the two arrows should point along two nonparallel vertical planes (such as two walls that meet at a corner). If the corner angle of the model is not 90 degrees, the angle between left and right axes can be adjusted to match. In Top/Plan view, drag the selection handle at the endpoint of each line to align with the corner of the model.
To place a Camera Match reference:
Navigate to the design layer that contains the 3D model.
Select View > Camera Match > Place Reference.
Name the Camera Match reference and click OK.
Click once on the desired point of reference in the model, rotate the Camera Match reference to relate to the model, and then click again.
The properties of a selected Camera Match reference can be edited from the Object Info palette.
Click to show/hide the parameters.
~~~~~~~~~~~~~~~~~~~~~~~~~
![]()
