 Inserting Hanging Positions
Inserting Hanging Positions Use the Hanging Position tool to insert a hanging position symbol from the Resource Manager. To import symbols from the libraries included with the Vectorworks Spotlight software, select Vectorworks Libraries from the file browser pane in the Resource Manager, and open the appropriate symbols library. You can also import custom symbols from a Favorites file or use a symbol from the current file. See Concept: Resource Libraries.

To insert a hanging position symbol:
Click the Hanging Position tool from the Spotlight tool set.
Click Position symbol on the Tool bar. From the Resource Selector, double-click a resource to activate it.
Alternatively, from the Resource Manager, either double-click the position symbol to insert or right-click on the position symbol and select Make Active from the context menu. The Hanging Position tool is automatically selected.
Click in the drawing to insert the active hanging position symbol definition, and then click again to set the hanging position rotation.
If a hanging position is accidentally inserted with the Symbol Insertion tool, the position functionality will not be present. When correctly inserted, the Object Info palette displays “Hanging Position” for the selected hanging position.
A different type of hanging position can be placed by changing the active symbol definition and continuing to use the Hanging Position tool.
The hanging position object parameters can be edited from the Object Info palette.
► Click to show/hide the parameters.
The Z value of a hanging position can only be specified for hanging positions with 3D geometry. However, the Z value can be specified for the lighting instruments or loads placed on any type of hanging position (2D, 3D, or hybrid). A hanging position created from a symbol or plug-in object automatically assumes the Z value of the original object.
If a hanging position is copied, it is automatically renamed; any associated duplicated loads are associated with the new hanging position. Deleting a hanging position does not delete the associated loads.
If instruments are moved to a different hanging position, the hanging position name is automatically updated for the instruments and the Z-height of the instruments is calculated automatically based on the hanging position Z-height.
Objects with load data can be associated with a hanging position; the load factors into Braceworks calculations (Braceworks required). Load objects include:
● Lighting instruments (see Inserting Instruments)
● Video screen objects, speakers and speaker arrays, soft goods, cables, and point and distributed loads
Load objects are associated automatically when inserted on a hanging position based on the Pick radius specified in the Spotlight preferences. If an object is converted to a hanging position after the loads were inserted, they can still be attached.
An associated, or attached, load on a hanging position has its height automatically set correctly and it moves with the hanging position.
A load that is attached to a hanging position can be moved off of the position. When Enable Auto Positioning when moved is selected in the Spotlight preferences, when a load is moved, it searches for a new hanging position within the Pick radius. It attaches to the nearest hanging position within the Pick radius, if one is found.
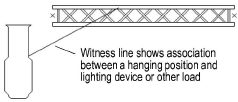
When Enable Auto Positioning when moved is deselected, a witness line indicates the association; witness lines are classed separately so that they can be displayed or hidden (set the class by clicking Classes from the Object Info palette of a selected hanging position). Witness lines can be shown or hidden for a selected hanging position with the Show Witness Lines parameter in the Object Info palette.
To attach one or more existing loads to a hanging position:
Select the hanging position.
Right-click on the hanging position, and select Attach Loads from the context menu.
The cursor changes to a bull’s eye. Valid load objects that can be associated with the hanging position are highlighted as the cursor moves over them.
Do one of the following:
● To add a witness line from the load to the hanging position, click to attach the load to the hanging position and set the hanging point.
● To associate loads but not draw a witness line, either double-click on a load, or click the check mark button on the Tool bar.
Continue to associate loads with the hanging position.
Press the Esc key or click on the Selection tool to stop associating loads.
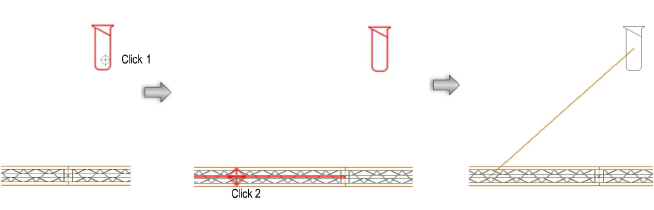
Alternatively, an individual load can be attached to a hanging position:
Select the load.
Right-click on the load, and select Attach to a Hanging Position from the context menu.
The cursor changes to a bull’s eye. Valid hanging position objects are highlighted as the cursor moves over them.
Click to attach the load to the hanging position. The click point becomes the hanging point.
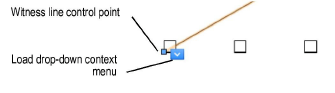
When a load is attached at an offset from the hanging position, a witness line is created from the hanging point on the hanging position to the insertion point on the load. The control point on the witness line can be moved to change its location.
When the hanging position is selected, a load drop-down context menu is available. The load can have a different hanging point set by selecting Set Hanging Point and clicking on a different location on the hanging position, or even a different hanging position. The load can be moved directly onto the hanging position (removing the witness line) by selecting Move to Hanging Point.
The hanging position that is associated with a load can be selected.
Select the load.
Right-click on the load, and select Select Hanging Position from the context menu.
The hanging position is selected.
Load objects can be removed from their association with a hanging position.
To disassociate a load object from its hanging position:
Select the load object’s associated hanging position.
From the load drop-down context menu, select Remove from Hanging Position.
Alternatively, disassociate one or more loads after selecting the hanging position:
Select the hanging position.
Right-click on the hanging position, and select Remove Loads from the context menu.
The cursor changes to a bull’s eye. Valid load objects that can be disassociated from the hanging position are highlighted as the cursor moves over them.
Click to detach the load from the hanging position.
Press the Esc key or click on the Selection tool to stop detaching loads.
~~~~~~~~~~~~~~~~~~~~~~~~~