A roof object can be reshaped in a 2D or 3D view with the Reshape tool. The roof edge, roof ridge, and roof slope can be changed.
The Reshape tool can be used in any view for basic roof shape editing; see 2D Reshape Modes. However, the Reshape tool should be used in a 3D view to edit the roof edge and roof ridge location.
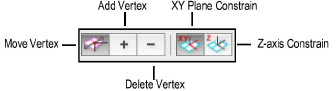
Five modes are available when both the Reshape tool and a roof object is selected in a 3D view.
Mode |
Description |
|
Move Vertex |
Adjusts the position of a selected roof vertex, constrained horizontally or vertically in combination with the Z-axis Constrain and XY Plane Constrain modes |
|
Add Vertex |
Adds a peak (vertex) to a roof |
|
Delete Vertex |
Deletes a roof peak (vertex) |
|
XY Plane Constrain |
In 3D Reshape mode, reshapes the roof object horizontally, constrained along the X and/or Y axes |
|
Z-axis Constrain |
In 3D Reshape mode, reshapes the roof object along the Z axis to change the height of a roof ridge or eave |

To reshape the roof horizontally:
In a 3D view, select the roof object.
Click the Reshape tool from the Basic palette, and click the XY Plane Constrain mode.
Position the cursor over a roof handle.
When the cursor is over a handle, the standard arrow cursor changes into an unfilled, four-way arrow.
Click-drag the handle to change the roof handle location, or enter specific X and Y distance values in the Data bar.
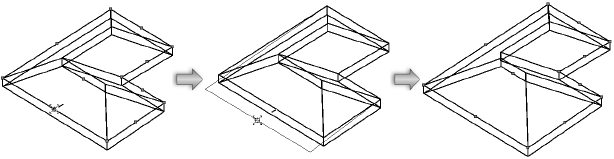
The roof edge, ridge, or eave handle location can be changed. The handle movement is constrained along the X or Y axis (the active layer plane); the height of the roof element cannot be changed in this mode.
Change the slope of a roof face by moving the ridge handle. If the reshape results in a roof slope that approaches or exceeds 90 degrees, you are prompted to create a gable wall if desired.
Click when the handle is at the desired location.

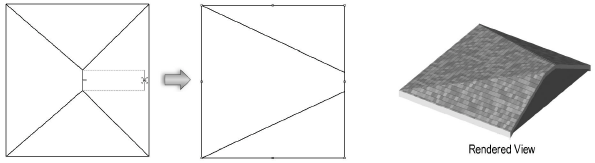
To change the height of a roof ridge or eave:
In a 3D view, select the roof object.
Click the Reshape tool from the Basic palette, and click the Z-axis Constrain mode.
Position the cursor over a roof ridge or eave handle.
When the cursor is over a handle, the standard arrow cursor changes into two-way hollow arrow.
Click-drag the handle to change the roof handle location, or enter the specific Z axis distance in the Data bar.
The roof ridge or eave handle location can be changed. The handle movement is constrained along the Z axis (vertically); only the height of the roof element can be changed in this mode.
Click when the handle is at the desired location.

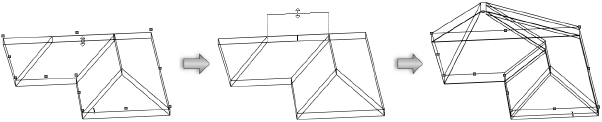
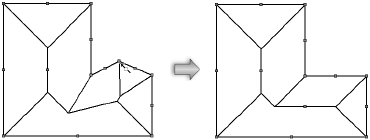
To add a vertex to a roof:
In a 3D view, select the roof for adding the vertex.
Click the Reshape tool from the Basic palette, and click Add Vertex mode.
Position the cursor over one of the edge or eave handles.
The standard arrow cursor changes into a single-headed, filled arrow with shaded boxes on either side of the shaft.
Click-drag the cursor to add a vertex to the roof edge or eave.
Click when the vertex is at the desired location.
The roof is automatically reshaped to accommodate the new vertex.


To delete a vertex from a roof:
In a 3D view, select the roof with the vertex to be deleted.
Click the Reshape tool from the Basic palette, and click Delete Vertex mode.
Position the cursor over the eave vertex to delete.
The standard arrow cursor changes into a single-headed, filled arrow with a hollow diamond in the shaft.
Click the vertex.
The vertex is removed and the roof is reshaped to the remaining vertices.
~~~~~~~~~~~~~~~~~~~~~~~~~
![]()