 Creating
Collars
 Creating
Collars
Creating
CollarsTo create collars (collar beams):
In the Roof Framer dialog box, click the Collars tab, and select Create Collars.
Specify the collar parameters.
Click to show/hide the parameters.
Parameter |
Description |
Style |
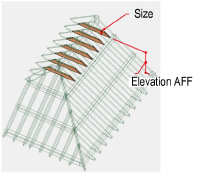
Select the collar style; flush collars or collar ties will only connect to the common rafters, joist collars connect to both common and jack rafters ● Joist: tie beam that rests on the bearing wall and overlaps the rafters ● Flush Collar: tie collar that is flush to the rafters, usually attached to the rafters with metal plates ● Collar Tie: tie collar that scabs onto the rafters and is attached with nails, bolts, and so on |
Size |
Specifies the collar size in width x height, in current file units. Sizes can be edited by selecting Edit List (see Custom Frame Element Sizes). |
Spacing |
Select the collar spacing (Every Rafter, Every Other Rafter, and Every Third Rafter) |
Location |
For joist or collar tie styles, specifies the location of the collars in reference to the rafters. For flush collar style, the location is automatically set to Middle. ● Middle places one collar at the center of the rafter for flush collar and joist styles, and one collar on each side of the rafter for the collar tie style ● Left/Right places a single collar on the designated side of the rafter for joist or collar tie styles. Joists and collar ties extend to the intersection of the rafter tops. |
Elevation AFF |
Specifies the elevation above finished floor of the bottom of the collars. If Flush Collar or Collar Tie is selected for Style, the default elevation is two-thirds of the roof height. Joist style is automatically set to 0. |
Class |
To control appearance and visibility, select a class from the list of classes present in the drawing or create a new class (see Creating Classes) |
Classes |
Edits class attributes |
Object Attributes |
Specifies the collar attributes |
Click OK to create the collars.

~~~~~~~~~~~~~~~~~~~~~~~~~
