To modify an object’s tile or associative hatch fill:
Click the Attribute Mapping tool from the Basic palette or Visualization tool set.
Click an object containing a tile or associative hatch fill. Only one object at a time can be edited.
An editing object with eight handles is placed over the fill. The fill origin is at the lower left corner of the editing object, where the red and green lines meet.
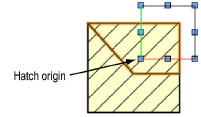
Use the editing object to set the fill location, scale, and rotation angle. The fill can also be nudged.
Action |
Description |
|
Edit the fill location |
Click on the editing object (anywhere except on a selection handle) and drag it to the desired location. Click to set. To precisely locate the origin, click close to the lower left handle, and move the editing object.
|
|
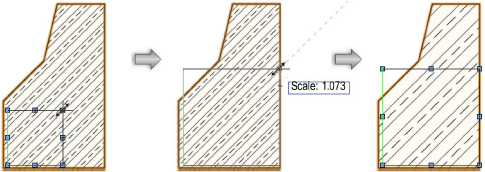
Edit the fill size |
Click one of the corner selection handles, and drag to set the editing object to a new size (or press the Tab key and enter a Scale value (for hatches) or Height/Width (for tiles) in the Data bar). Click to set.
|
|
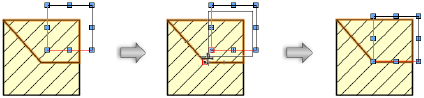
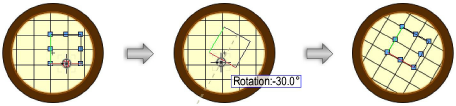
Edit the fill rotation |
Click one of the middle selection handles, and drag to rotate the editing object to the desired angle (or press the Tab key and enter a Rotation value in the Data bar); click to set the rotation. ● By default, the editing object rotates about the handle opposite the handle that is clicked on. ● To rotate about the fill origin, press the Shift key while rotating. ● To rotate about the center of the editing object, press the Ctrl key (Windows) or Command key (Mac) while rotating.
|
In the Attributes palette, the name of the fill is highlighted in blue, and “(local map)” is appended to the name.
A hatch or tile that has been edited with the Attribute Mapping tool is considered to be locally mapped. The edited hatch or tile can be saved as a new hatch or tile resource, retaining the mapping edits and allowing them to be applied to other objects.
To create a hatch or tile from a locally mapped associative hatch or tile:
Right-click (Windows) or Ctrl-click (Mac) on an object with a locally mapped tile or associative hatch, and select New Tile From Locally Mapped Tile or New Hatch From Locally Mapped Hatch from the context menu.
Provide a name for the new hatch or tile resource.
The new resource displays in the Resource Manager. The new hatch or tile definition has already been applied to the object, which is no longer considered to be locally mapped.
Click here for a video tip about this topic (internet access required).
~~~~~~~~~~~~~~~~~~~~~~~~~
![]()