Setting Snapping Parameters
The Snapping palette manages SmartCursor snapping; the on-screen feedback which displays while drawing is based on the snapping categories enabled in the Snapping palette. Different drawing tasks may require a variety of snapping combinations. A snapping category is enabled by clicking the desired tool from the Snapping palette. Each tool toggles to turn the snapping category on or off.
Snapping categories can be used individually or combined for precise drawing and snapping. For example, snap to object points and snap to the grid to find points which are both on an object and on a grid line. Snapping can also be combined with Data bar input to find a specific snap point along a defined location in the drawing area.
Snapping is available for both 2D and 3D tools; however, Snap to Tangent only applies to 2D tools, and Snap to Working Plane only applies to 3D tools.
The snapping parameters of most of the snapping tools are set in the SmartCursor Settings dialog box. Most of these settings are considered application settings, and apply to any file opened in the Vectorworks program. Certain settings are considered document settings and are saved with the file; these include grid dimensions, alternate angle extension lines, datum and smart edge offset, and distance snap settings. Some of the snapping tools do not have additional parameters, and are simply toggled on or off.
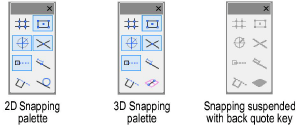
When drawing, it may become necessary to temporarily suspend SmartCursor snapping. Press and hold the ‘ key (back quote key) to suspend all snapping. The snapping settings are retained, and snapping resumes when the ‘ key is no longer pressed. The shortcut key for suspending snapping can be customized; see Modifying Special Shortcuts.
To set up and activate snapping categories:
-
If the Snapping palette is not open, select Window > Palettes > Snapping.
The Snapping palette opens. The last tool on the palette is different depending on whether a 2D or 3D tool is currently active.
-
Double-click a snapping tool to open the SmartCursor Settings dialog box with specific snapping parameters for that tool. Some of the tools do not have any additional parameters.
The SmartCursor Settings dialog box can also be opened by selecting Tools > SmartCursor Settings. Each tab of the dialog box is described in the following sections.
-
Enter the desired criteria, and then click OK to set.
The criteria are described in the following sections.
-
Click a snapping tool to activate it.
Snapping palette shortcut keys can be set in the Workspace Editor; see Modifying Special Shortcuts.
Different combinations of constraints and snapping parameters are required for different drawing tasks. Select the Tools > Custom Tool/Attribute command to easily create a script with the current SmartCursor settings and active tools on the Snapping palette. Execute the script by double-clicking on it from the Resource Manager to quickly change snapping parameters and settings. See Creating Custom Tool/Attribute Scripts for more information.
Click here for a video tip about this topic (internet access required).
~~~~~~~~~~~~~~~~~~~~~~~~~
General Snapping
Grid Snapping
Object Snapping
Angle Snapping
Smart Points Snapping
Smart Edge Snapping
Distance Snapping
Snap to Intersection
Snap to Tangent (2D Only)
Snap to Working Plane (3D Only)
Drawing with Snapping
SmartCursor Cues
Configuring Interactive Display
Was
this page helpful?

vectorworks.net