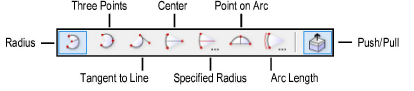
The Arc tool, which creates circular arcs of any angle, has seven modes. Create an arc by radius, three points, tangent, two points and center, two points and radius, two end points and another point on the arc, or by arc length and optionally, chord length. The Push/Pull mode is available in 3D views for instantly extruding the arc after creation.
The Arc tool and Quarter Arc tool share the same position on the Basic palette. Click and hold the mouse on the visible tool to open the Pop-out Tools list and select the desired tool.
Click here for a video tip about this topic (internet access required).
Mode |
Description |
Radius |
Defines the arc by its center |
Three Points |
Defines the arc by clicking three points |
Tangent to Line |
Defines the arc by defining a tangent to a line |
Center |
Defines an arc by clicking two points and a center |
Specified Radius |
Defines an arc by two points and a specified radius |
Point on Arc |
Defines an arc by two end points and another point on the arc |
Arc Length |
Defines an arc by the arc length and specified chord length |
Push/Pull (3D views only) |
Instantly extrudes the arc after creation; available in 3D views |
Either move the mouse to draw the arc or use the Data bar to enter an angle. Degrees start on the positive X axis (the “East” direction), and increase going counter-clockwise. (“East” is 0 degrees; “North” is 90 degrees; and “West” is 180 degrees.) To draw a quarter-circle wall beginning at 0 degrees and ending at the 6 o’clock position, enter -90 (minus 90) degrees. Enter 270 to draw an arc three-quarters of a circle around.
To create a NURBS curve, draw an arc and then select Modify > Convert > Convert to NURBS.
To edit an arc, click the middle handle with the Selection tool and drag to change the arc radius. Press the Option key (Mac) or Alt key (Windows) to change the arc’s size.

To create an arc by its radius:
Click the Arc tool from the Basic palette, and select the Radius mode.
Click to set the center of the arc.
Click the start point of the arc. Move the cursor until the desired arc orientation and size is previewed.
Click to set the end point of the arc.

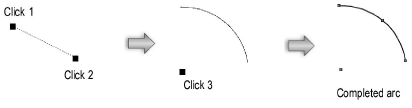
To create an arc by three points:
Click the Arc tool from the Basic palette, and select the Three Points mode.
Click to set the start point of the arc.
Click to set the point for the arc to pass through. Move the cursor until the desired arc orientation and size is previewed.
Click to set the end point of the arc.

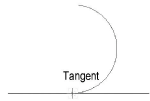
To create an arc by tangent:
Click the Arc tool from the Basic palette, and select the Tangent to Line mode.
Click to set the start point of the arc.
Click to define the line to which the arc will be tangent. Move the cursor until the desired arc orientation and size is previewed.
Click to set the end point of the arc.
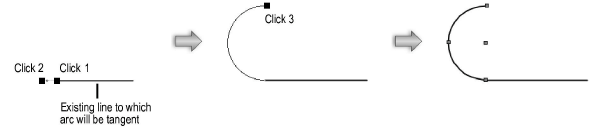
Use tangent snapping to assist with drawing the arc tangent to geometry; see Snap to Tangent (2D Only).

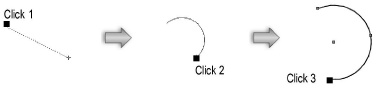
To create an arc by two points and center:
Click the Arc tool from the Basic palette, and select the Center mode.
Click to set the start point of the arc.
Click to set the end point of the arc.
As the cursor moves, the center of the arc is manipulated.
Click outside the arc to set the center.

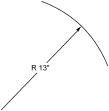
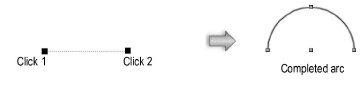
To create an arc by two points and a specified radius:
Click the Arc tool from the Basic palette, and select the Specified Radius mode.
Click to set the start point of the arc.
Click to set the end point of the arc.
The Arc Radius dialog box opens. Enter the length of the radius.
Click OK.
The arc is created.

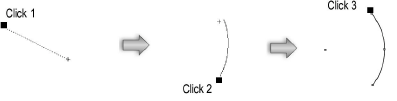
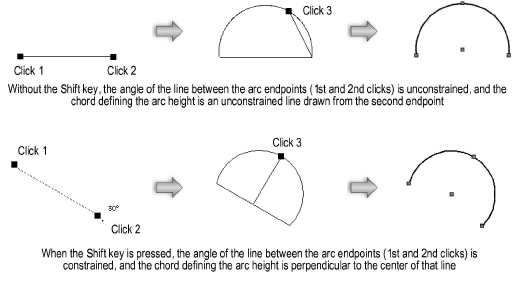
To create an arc by two end points and another point on the arc:
Click the Arc tool from the Basic palette, and select the Point on Arc mode.
Click to set the start point of the arc.
Click to set the end point of the arc.
Move the cursor until the desired arc shape and size is previewed, and then click to set the arc. To constrain the angle of the line between the arc endpoints, press the Shift key when drawing the arc.

To create an arc by arc length and chord length:
Click the Arc tool from the Basic palette, and select the Arc Length mode.
Click to set the start point of the arc.
Click to set the end point of the arc.
The Arc Length dialog box opens.
Click to show/hide the parameters.
Enter the desired parameters, and click OK to create the arc.
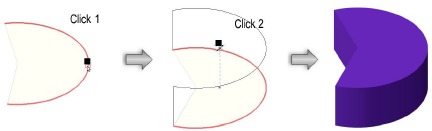
A planar arc that has been created in a 3D view can be extruded immediately after creation.

To extrude a created arc:
Enable the Push/Pull mode in the Tool bar for the Arc or Quarter Arc tool.
Create an arc using any of the modes in the Tool bar.
With the arc still selected, click, move the cursor, and then click to create the extrude.
An arc can be extruded at any time with the Push/Pull tool. See Direct Modeling with the Push/Pull Tool.
The extrude height and radius can be changed with the Reshape tool (see Reshaping Extruded Objects and Solid Primitives), the radius can be modified from the Object Info palette, and the resolution can be adjusted through the 3D Conversion Resolution setting (see Vectorworks Preferences: 3D Tab).
~~~~~~~~~~~~~~~~~~~~~~~~~
![]()