Create or import a texture resource as described in Creating Textures.
Select the object or objects to texture. If more than one object is selected, the texture resource applies to all objects in the selection. Additional mapping parameters are available for multiple selected objects so the texture renders seamlessly.
On the Attributes palette, select any Fill Style other than None (otherwise the texture will not render).
Click the Render tab from the Object Info palette.
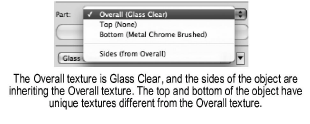
If the object has parts, specify the Overall texture to apply to the parts, or select an individual part and apply a texture. The selected texture applies to the entire object if it does not contain parts.
Select the desired Texture from a library or the current file, and then set the texture parameters, which apply only to the selected object.
The texture parameters and mapping can be edited in the Render tab of the Object Info palette.
Click to show/hide the parameters.


You can also apply a texture from the Resource Manager. Select the object, and then right-click (Windows) or Ctrl-click (Mac) on the resource, and select Apply from the context menu. Alternatively, double-click the resource, or drag the resource onto the object to apply it. To edit the mapping, use the Object Info palette or the Attribute Mapping tool.
The texture is applied to the selected object(s).