 Creating Wall End CapsCreating Wall End Caps
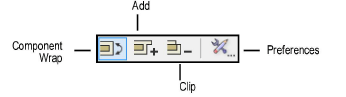
The Wall End Cap tool creates both standard and custom component wrapping at the end of a wall. It has three modes:
Mode |
Description |
|
Component Wrap |
Automatically wraps the selected component, creating a standard wall cap |
|
Add |
Creates a custom wall end cap by adding |
|
Clip |
Creates a custom wall end cap by removing |
|
Preferences |
Sets whether to create wall caps inside or outside the wall endpoint |

To set wall end cap preferences:
Click the Wall End Cap tool from the Building Shell tool set.
Click Preferences from the Tool bar.
The Wall End Cap Settings dialog box opens.
Determine whether to create the wall end caps outside the wall endpoint. Deselect the option to create the wall end caps inside the wall endpoint, so that the wall length does not extend past the original length.
Click OK.
This option is also available from the Object Info palette for existing wall end caps.

To create a standard end cap by wrapping a component:
Click the Wall End Cap tool from the Building Shell tool set.
Click Component Wrap from the Tool bar.
Click to select a component within the wall. This component wraps along the wall end.
Click to select the component where the wrapping should end.
The component wraps around the wall end to the end point.

An End Cap in Wall object is created by the Wall End Cap tool. This object, while distinct from the wall, moves with the wall and adjusts if the wall is resized. The object can be dimensioned, reported in wall schedules, and exported as part of the wall.
The wall cap uses the line weight of the source component, and its 3D geometry is of the same height as the source component.
The Extend Cap Past Wall Endpoint option can be changed from the Object Info palette.

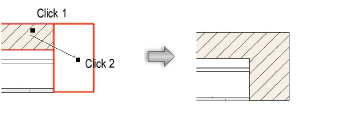
To create a custom wall end cap by adding a shape to a component:
Create a 2D, closed shape to represent the wall end cap. The object must intersect the end of the wall.
Click the Wall End Cap tool from the Building Shell tool set.
Click Add from the Tool bar.
Click to select a component within the wall. This component style is used to create the wall end cap.
Click to select the shape.
The shape is added to the component and the wall end, creating the custom wall cap.

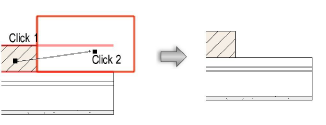
To create a custom end cap by clipping a shape from a component:
Create a 2D, closed shape to represent the wall end cap. The object must intersect the end of the wall.
Click the Wall End Cap tool from the Building Shell tool set.
Click Clip from the Tool bar.
Click to select a component within the wall. This component style is used to create the wall end cap.
Click to select the shape.
The shape is subtracted from the component, creating the custom wall cap.
Click here for a video tip about this topic (internet access required).
~~~~~~~~~~~~~~~~~~~~~~~~~
![]()